Simple Sourdough Focaccia: A Forgiving First Bake
How do I make easy sourdough focaccia?
On this page

Open by reassuring nervous beginners: if your boules keep coming out dense or flat, focaccia is the bake that finally builds confidence. Frame it as a "pan bread that hides mistakes"—no shaping, no scoring, no banneton, just a wet dough poured into oil. Promise a forgiving recipe plus the few things that actually matter so they get bubbly, golden focaccia on the first try.
Why Focaccia Is the Best First Sourdough Bake
If you've struggled with dense, flat, or gummy loaves, focaccia is the place to start. It skips almost everything that trips up beginners with a classic round loaf (a boule), and it's hard to ruin.
Here's why it's so forgiving:
- No shaping, scoring, or special tools. You don't need a banneton (the rattan basket used to hold a round loaf's shape) or a sharp blade to slash the top. The dough goes straight into an oiled pan and spreads to fit.
- High hydration does the hard work for you. Hydration simply means how much water the dough contains relative to flour. Focaccia uses a lot of water, which naturally creates that open, airy crumb full of holes—no advanced kneading skill required.
- Mistakes still taste great. Uneven dough, dimples that aren't perfect, or timing that drifts an hour off? The results are still delicious. There's no single "fail" moment.
- The pan and oil prevent the outcomes you fear. Baking in a pan supports the dough so it can't spread flat, and a generous layer of olive oil gives you a crisp, golden bottom instead of a pale, dense one.
Results will vary with your kitchen and climate, but focaccia gives you the most room to learn. Let's bake.
What You Need: Ingredients and Equipment
Here's everything you need—no mixer, no fancy gear. Just a bowl, your hands, and one pan.
Ingredients
| Ingredient | Grams | Cups (approx.) |
|---|---|---|
| Active sourdough starter | 100 g | ½ cup |
| Bread flour | 500 g | 4 cups |
| Water (lukewarm) | 375 g | 1½ cups |
| Fine salt | 10 g | 2 tsp |
| Olive oil (for dough + pan) | 60 g | ¼ cup |
Starter: Your starter needs to be active and bubbly—meaning it's full of air pockets, has roughly doubled in size, and smells pleasantly tangy. The classic test: drop a spoonful into water. If it floats, it's ready. If it sinks, feed it and wait a few hours.
Bread flour has more protein than all-purpose, which builds the structure that gives focaccia its airy chew. All-purpose works in a pinch, but expect a slightly flatter result.
Equipment
- A 9x13 pan. Metal browns the bottom and edges better than glass, giving you that crisp golden crust. Glass works too—just expect a paler base.
- A large mixing bowl for the dough.
- Your hands. That's the whole tool kit. No stand mixer, no dough hook, no bench scraper required.
Results vary by kitchen temperature and flour brand—warmer rooms ferment faster, so treat times as guides, not guarantees.
Understanding Hydration (Without the Math Anxiety)
Here's the only thing you need to know: for this focaccia, your dough should feel wet, loose, and a little sticky—and that's exactly right. Don't add extra flour to "fix" it.
Hydration simply means how much water is in your dough compared to flour. "High hydration" just means more water, which makes a wetter, stretchier dough. That's it. No formula required.
Bakers usually describe this with baker's percentages (water weight divided by flour weight). Our recipe runs around 80% hydration—but you can ignore that number completely. We've already done the math and given you exact grams and cups, so all you have to do is weigh and pour.
Why wet dough is good news for beginners:
- It's far more forgiving than a stiff dough—small measuring mistakes won't ruin it.
- You don't knead it. You stretch and fold, which is easier and less messy.
- Mistakes that wreck other breads (a slightly long rise, imperfect shaping) barely matter here.
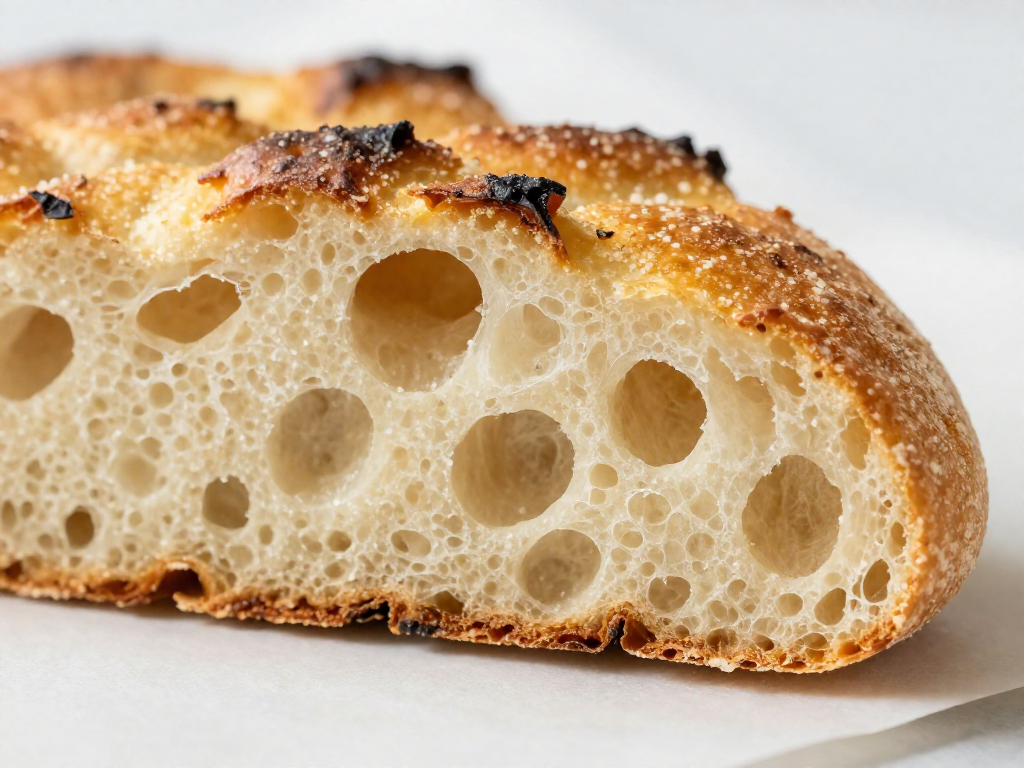
Why the wetness matters: all that water turns to steam in the hot oven and gets trapped by the gluten (the stretchy network in the dough). That trapped steam blows open those big, irregular air pockets—the signature airy, bubbly holes you want in good focaccia.
So when your dough looks too wet to be right, resist the urge to add flour. Sticky is the goal, not a mistake.
New term recap: hydration = water-to-flour ratio. More water = wetter dough = bigger holes.
Step-by-Step: How to Make Sourdough Focaccia
Here's the whole process, start to finish. The only "skill" you need is patience—the dough does most of the work for you.
Ingredients
- 500g (about 4 cups) bread flour
- 400g (about 1⅔ cups) lukewarm water
- 100g (about ½ cup) active, bubbly sourdough starter (starter that has doubled in size within the last 4–8 hours and floats in water)
- 10g (about 1¾ tsp) fine sea salt
- 50g (about ¼ cup) olive oil, plus more for the pan and top
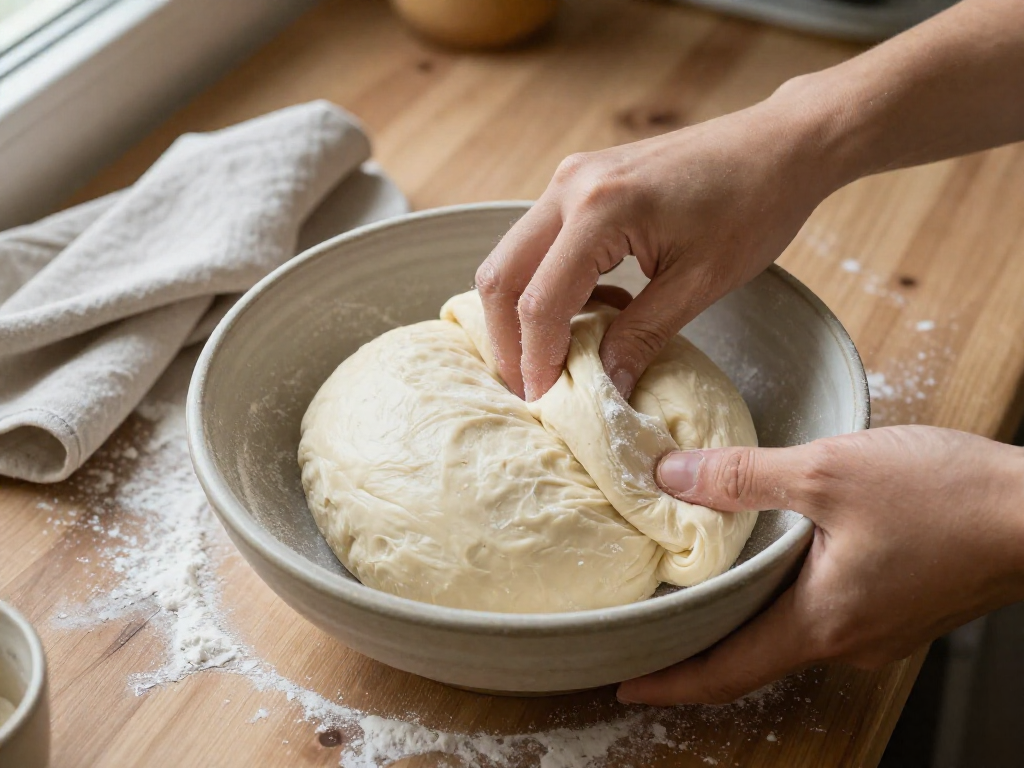
1. Mix the dough (no kneading)
In a large bowl, stir the water and starter together until milky. Add the flour and salt, then mix with your hands or a spatula until no dry flour remains. It will look shaggy and sticky—that's correct. Cover and rest 30 minutes. This rest is the autolyse: time that lets the flour fully absorb water so the dough becomes smoother on its own.
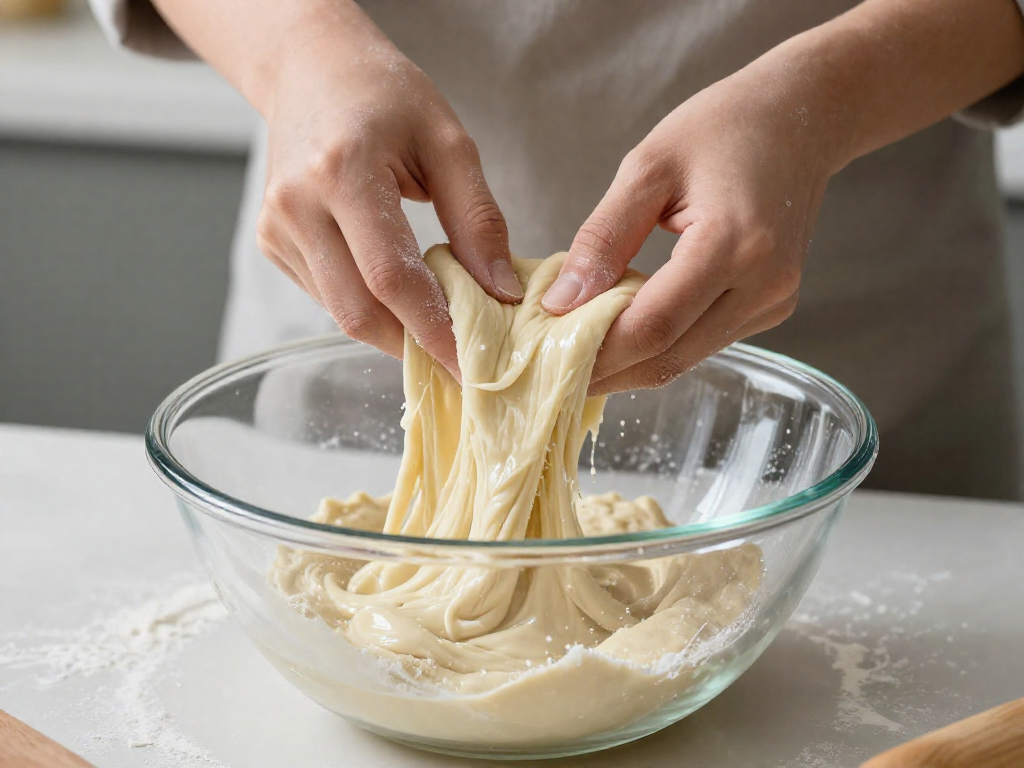
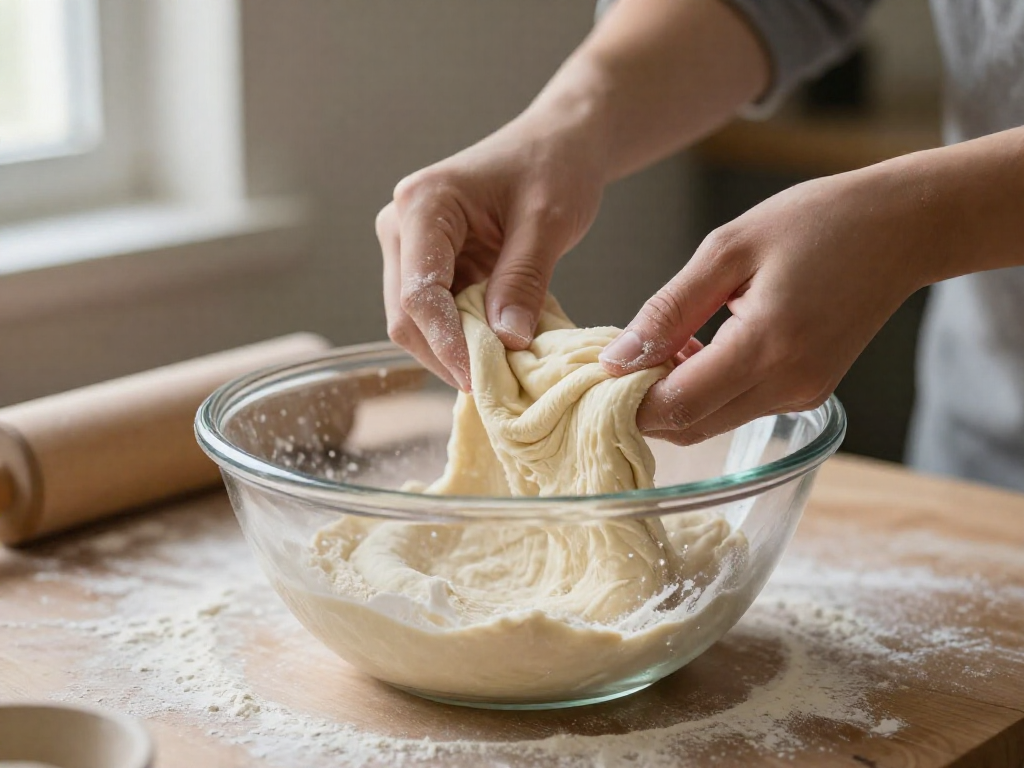
2. Stretch and folds
Instead of kneading, you'll do four sets of stretch and folds (lifting one side of the dough up and folding it over the middle, then rotating the bowl and repeating on all four sides). Do one set every 30 minutes for the first 2 hours. With each set the dough should feel tighter, smoother, and less likely to tear. Wet your hands first so it won't stick.
3. Bulk fermentation
Bulk fermentation is the first long rise, when the starter ferments the whole batch. After your last fold, cover and leave at room temperature. Watch the dough, not the clock: it's ready when it has grown by 50–75%, looks puffy and domed, and shows a few bubbles on the surface. This usually takes 4–6 hours at 70°F (21°C), but a warm kitchen can cut that in half and a cool one can double it.
4. Cold proof overnight
Drizzle a little oil over the dough, cover tightly, and refrigerate 12–18 hours. This cold, slow rise (the cold proof) deepens the flavor and lets you bake on your own schedule. The dough will rise a little more in the fridge.
5. Dimple, oil, and top
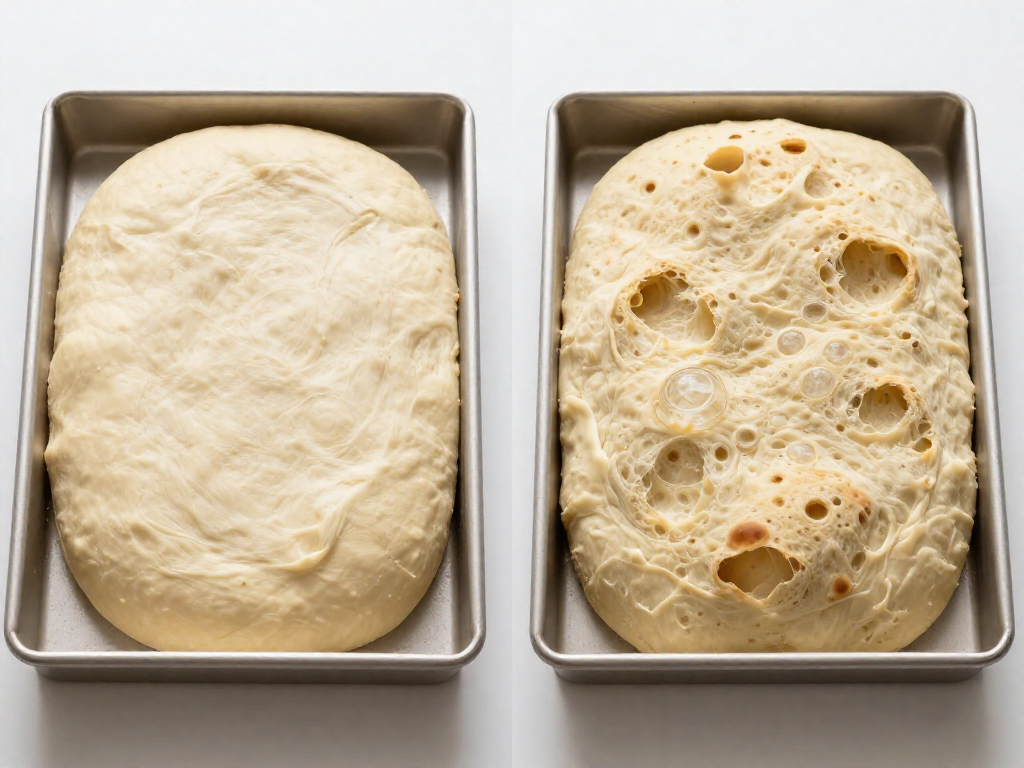
Generously oil a 9x13-inch pan. Tip the cold dough in and gently coax it toward the corners (it won't reach them yet). Rest 1–2 hours until relaxed and bubbly, then drizzle with oil and press your fingertips straight down all over to make deep dimples. Add toppings now—flaky salt, rosemary, halved cherry tomatoes, or thin-sliced onion.
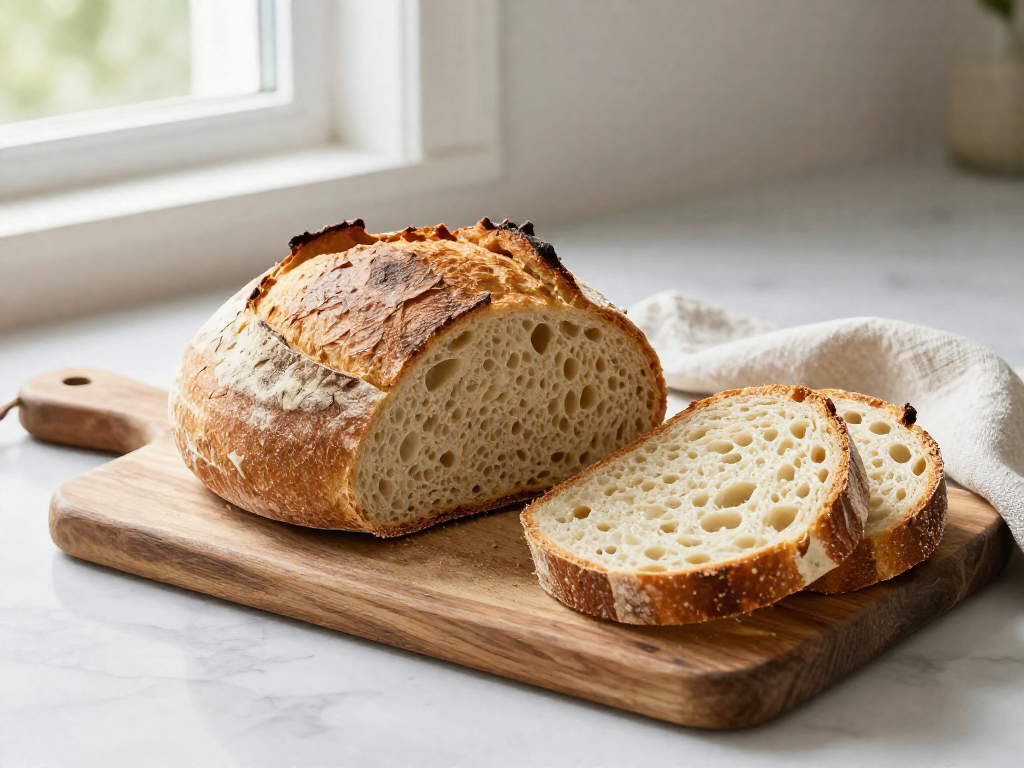
6. Bake
Bake at 450°F (230°C) for 22–28 minutes, until the top is deep golden and the edges are crisp and pulling from the pan. It's done when the internal temperature reads 205–210°F (96–99°C) or it sounds hollow when tapped. Cool 10 minutes before slicing.
Times and rise speeds vary by kitchen and climate, so trust the visual cues over the numbers.
A Beginner-Friendly Timing Schedule
Forget rigid hour-by-hour charts. Here's a simple "mix tonight, bake tomorrow" plan that fits around real life.
Sample schedule (evening mix → next-day bake):
| Time | Step | What to look for |
|---|---|---|
| 8:00 PM | Mix dough (flour, water, starter, salt) | Shaggy, no dry flour left |
| 8:30 PM–10:30 PM | Bulk ferment on counter, 2–3 stretch-and-folds 30 min apart | Smoother, slightly puffy dough |
| 10:30 PM | Cover and refrigerate overnight | — |
| Next day, any time | Pull from fridge, dimple into oiled pan, rest 2–3 hrs | Bubbly, jiggly, risen by ~50% |
| ~3 hrs later | Bake at 220°C / 425°F, 22–28 min | Deep golden, crisp edges |
Bulk ferment = the first long rise, when the dough builds flavor and structure.
The fridge is your safety net. Cold slows fermentation almost to a stop, so that overnight rest can stretch from 10 to 36 hours. Need to bake Saturday instead of Friday? Just leave it chilled another day.
Warm vs. cool kitchens. Above ~24°C/75°F, the dough moves fast—shorten the counter rise and watch for bubbles, not the clock. Below ~18°C/65°F, add an hour or two to each stage.
If life interrupts mid-bake: mid-bulk ferment, just refrigerate the dough to pause it. Already dimpled and waiting? Refrigerate again; bring back to room temp before baking. Sourdough is patient—results vary by kitchen, so trust the visual cues over exact times.
Troubleshooting: Gummy, Flat, or Dense Focaccia
Got a loaf that didn't turn out? Find your symptom below, then apply the fix on your next bake. Results vary by kitchen temperature and starter strength, so treat these as starting points.
Gummy crumb (wet, sticky, or "raw" feeling inside)
The two usual culprits are underbaking and under-fermentation (fermentation = the time the dough sits while the wild yeast in your starter produces gas and flavor).
- Bake longer and hotter. Pull the focaccia when the internal temperature hits 205–210°F (96–99°C) on an instant-read thermometer, or when the top is deep golden and the bottom sounds hollow when tapped.
- Let it cool fully on a rack for at least 30 minutes. Slicing hot focaccia traps steam and feels gummy even when it's done.
- Extend the bulk ferment (the first long rise) next time. If the dough barely grew, it needed more time or a warmer spot (around 75–78°F / 24–26°C).
Flat focaccia (spreads out, no height)
Usually a weak starter or over-proofing (letting the dough rise too long until it collapses).
- Feed your starter and use it at peak: doubled in size, domed, and bubbly, roughly 4–8 hours after feeding.
- Cut the proof time. If the dough looked puffy then deflated and went soupy, it over-proofed. Bake sooner next time.
Dense texture (heavy, tight crumb, few holes)
This points to too little fermentation or too little water.
- Give it more time. The dough should look jiggly and bubbly and grow by 50–75% before baking.
- Add water. Beginners often under-hydrate. Nudge water up by 10–20g next batch; wetter dough makes an airier crumb.
No bubbles at all
Your starter likely isn't active. Feed it once or twice a day for 2–3 days at room temperature until it reliably doubles before you bake again.
Topping and Serving Ideas
The beauty of focaccia is that the dimpled top is a blank canvas. Press your toppings into the dimples just before baking so they nestle in instead of sliding off.
- Classic rosemary and flaky salt: Scatter 1 tablespoon fresh rosemary leaves and a generous pinch of flaky salt over the oiled dough. Simple, fragrant, and hard to beat.
- Cherry tomato and garlic: Press 150g halved cherry tomatoes (cut-side up) and 2 thinly sliced garlic cloves into the dimples. The tomatoes blister and sweeten as they roast.
- Sweet variations and dipping oils: Try thin apple or pear slices with a drizzle of honey, or skip toppings and serve plain with a small bowl of olive oil, cracked pepper, and a splash of balsamic for dipping.
Storing and reheating: Keep leftovers in an airtight container at room temperature for up to 2 days. To revive, warm slices in a 180°C (350°F) oven for 5 minutes until the crust crisps up again. Focaccia also freezes well for up to 1 month—reheat straight from frozen.
FAQ
Can I make sourdough focaccia without an active starter?
Not for a true sourdough rise. Focaccia needs an active starter (a flour-and-water culture that is bubbly and roughly doubles 4-8 hours after feeding) to leaven the dough. If your starter is sluggish, feed it once or twice and use it when it passes the float test: a small spoonful dropped in water floats. In a pinch you can make a same-day focaccia with commercial yeast instead, but the flavor and open crumb will be different. If your starter just isn't ready, wait—a weak starter is the most common cause of a flat, dense loaf.
How long does sourdough focaccia need to ferment?
Plan on two stages. First is the bulk ferment (the main rise after mixing, when the dough roughly doubles and looks puffy and jiggly): about 4-8 hours at warm room temperature (around 24-26°C / 75-78°F). Colder kitchens take longer. Second is the cold proof, an overnight rest in the fridge (8-24 hours) that builds flavor and makes the dough easy to handle. Watch the dough, not the clock: it should be bubbly, domed, and wobble like set jelly before baking. Total time is mostly hands-off waiting.
Why is my sourdough focaccia gummy in the middle?
Gummy crumb almost always means it's underbaked or was cut too soon. Fixes: (1) Bake longer—focaccia needs an internal temperature of about 96-99°C (205-210°F); check with a thermometer. (2) Use a hotter oven (220-230°C / 425-450°F) so the middle sets. (3) Let it cool at least 20-30 minutes before slicing, since it keeps cooking as it rests. Other causes: too much dough crammed in a small pan, or under-fermented dough that never developed structure. If the top browns before the inside cooks, lower the rack and tent loosely with foil.
Can I skip the overnight cold proof?
Yes, you can bake the same day, but expect trade-offs. The overnight cold proof (resting the dough in the fridge) deepens the tangy flavor and firms the dough so it's easier to dimple and shape. To skip it, simply let the bulk ferment finish at room temperature until the dough is puffy and bubbly, then transfer to your oiled pan, do a final rise of 1-2 hours, dimple, and bake. The result is milder in flavor and a touch trickier to handle because the dough is slacker, but it still works well for a first bake.
What pan is best for sourdough focaccia?
A metal quarter-sheet pan or a 9x13-inch (about 23x33 cm) metal baking pan is ideal—metal conducts heat well and gives the signature crisp, oil-fried bottom. For a thicker, fluffier focaccia use a smaller 8x8-inch (20x20 cm) or 9-inch round pan; for thin and crispy, spread the dough into a larger sheet. Coat the pan generously with 2-3 tablespoons of olive oil to prevent sticking and create the crunchy base. Glass and ceramic work but bake slower and brown the bottom less; if using them, add a few minutes and check for doneness.
How do I store and reheat focaccia?
Focaccia is best the day it's baked. To keep it 1-2 days, store at room temperature in a paper bag or loosely wrapped—avoid sealed plastic, which traps steam and turns the crust soft. To reheat and revive the crisp crust, warm slices in a 180°C (350°F) oven for 5-8 minutes; a sprinkle of water on the cut side before reheating helps soften a dried-out crumb. For longer storage, freeze cooled pieces in a freezer bag for up to 3 months, then reheat from frozen at 180°C (350°F) for 10-12 minutes. Skip the microwave—it makes focaccia chewy.
See also
- How to Tell If Your Sourdough Starter Is Ready to Bake
- Beginner's Guide to Sourdough Bulk Fermentation
- Fixing a Gummy Sourdough Crumb
- Easy Sourdough Discard Recipes
- How to Feed and Maintain a Sourdough Starter
Related articles
Sourdough Pizza Dough for Beginners: A Forgiving Way to Practice Shaping
Can I use my sourdough starter to make pizza dough, and is it easier than a loaf?
Jul 20, 2026 · 9 min read
The Hardest Loaf to Mess Up: A 60% Hydration Sourdough for Absolute Beginners
What is the easiest sourdough bread recipe that minimizes handling and hydration issues?
Jul 20, 2026 · 8 min read
How to Store Sourdough Bread So It Stays Fresh
Learn how to store sourdough bread so it stays fresh for days, how to freeze loaves and slices, and how to revive a stale crust. Simple beginner steps.
Jun 29, 2026 · 9 min read