Beginner Overnight Sourdough: Mix at Night, Bake in the Morning
How do I schedule sourdough to bake fresh in the morning?
On this page

Why an Overnight Schedule Works for Beginners

If you want fresh bread in the morning, the easiest plan is simple: mix your dough at night, let it rise while you sleep, and bake when you wake up. Here's why this works so well when you're just starting out.
- The dough works while you sleep. Sourdough rises through a long, slow process called bulk fermentation (the first big rise, when the whole batch of dough ferments and grows). Stretching this over 8–12 overnight hours means the clock does the hard part for you.
- Less hands-on time. Same-day baking ties you to the kitchen for stretches and folds all afternoon. Overnight baking asks for just a few minutes of mixing at night, then a short morning routine.
- Cooler temps are more forgiving. Kitchens drop a few degrees overnight, which slows fermentation down. Slower means a wider window to catch the dough at the right point, so timing mistakes matter less.
- You wake up to dough that's ready — not a half-day commitment hanging over your whole Saturday.
Results vary by kitchen and climate, so treat the times as a starting point and watch the dough, not just the clock.
What You Need Before You Start
Gather everything below before you mix at night. The whole schedule depends on two things: an active starter and an accurate scale.
Your starter must be active and bubbly. An active starter is one you've fed recently and that has woken up enough to raise dough. Feed it 4–8 hours before you mix. It's ready when it has doubled in size, looks domed with bubbles on top, and passes the float test: drop a small spoonful into water and it should float. If it sinks, wait longer or feed it again. A flat, liquidy, or hooch-covered starter is not ready.
Tools you'll need:
- Digital kitchen scale (non-negotiable — cup measures are too inconsistent for sourdough)
- Dutch oven with a lid (a 4–6 qt cast iron works best for trapping steam)
- Banneton (a proofing basket) or a bowl lined with a floured tea towel
- Large mixing bowl and a bowl scraper or spatula
Ingredients (one loaf):
| Ingredient | Grams | Approx. cups |
|---|---|---|
| Bread flour | 500 g | ~4 cups |
| Water (lukewarm) | 350 g | ~1½ cups |
| Active starter | 100 g | ~½ cup |
| Salt | 10 g | ~2 tsp |
A note on room temperature. Dough ferments faster when it's warm and slower when it's cool. At around 21°C / 70°F the overnight times in this recipe work as written. If your kitchen runs warmer (24°C+ / 75°F+), the dough may over-ferment overnight — use cooler water and check earlier. If it runs cooler, expect it to need more time. Watch the dough, not just the clock; results vary by kitchen and season.
The Overnight Sourdough Schedule (Mapped to Clock Times)
Here is the exact timeline. Copy it, adjust the clock times to fit your evening, and follow the sensory cues at each step. This schedule assumes a kitchen around 70°F (21°C).
| Time | Step | What you do |
|---|---|---|
| ~12:00 PM | Feed starter | Feed so it peaks by 8:00 PM |
| 8:00 PM | Mix + autolyse | Combine flour, water, starter, salt; rest 30 min |
| 8:30–10:00 PM | Stretch & folds | 3 sets, 30 min apart, then cover |
| Overnight | Bulk ferment | Dough rises on the counter while you sleep |
| 7:00 AM | Shape + final proof | Shape into a tight ball, rest 60–90 min |
| 8:30 AM | Bake | Bake in a preheated Dutch oven |
Earlier that day: feed your starter
Starter is the living mix of flour and water that makes your bread rise. Feed it about 8 hours before mixing (around noon) so it peaks—doubles in size and looks bubbly and domed—right at 8:00 PM. If it has already collapsed by mixing time, your bread will struggle to rise.
Cue: Drop a spoonful in water. If it floats, it's ready.
8:00 PM — Mix and autolyse
Combine your ingredients, then autolyse (pronounced "auto-lease")—simply let the dough rest so the flour fully absorbs the water. This makes the dough easier to work with later.
- 500 g (about 4 cups) bread flour
- 350 g (about 1½ cups) water
- 100 g (about ½ cup) active starter
- 10 g (about 2 tsp) salt
Mix until no dry flour remains. Cover and rest 30 minutes.
Cue: Shaggy, sticky dough with no dry patches.
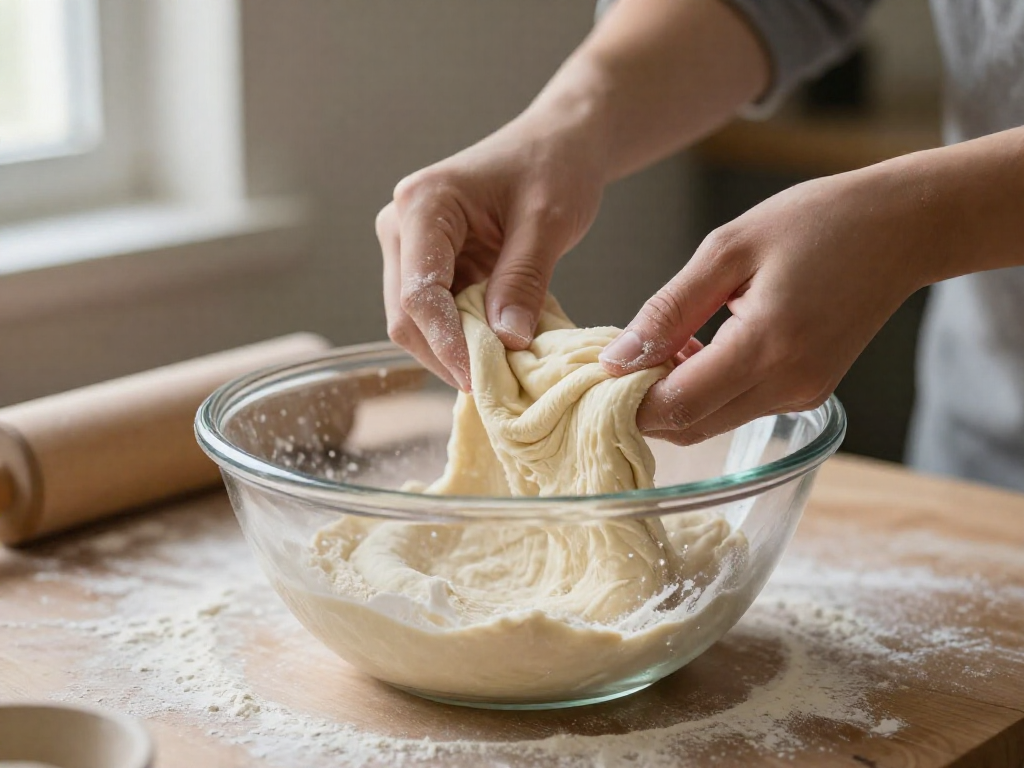
8:30–10:00 PM — Stretch and folds
Do 3 sets, 30 minutes apart. For each set: wet your hand, grab one side of the dough, stretch it up, and fold it over the center. Rotate the bowl and repeat 4 times. This builds strength without kneading.
Cue: By the last set the dough feels smoother and holds its shape better. Cover and leave on the counter.
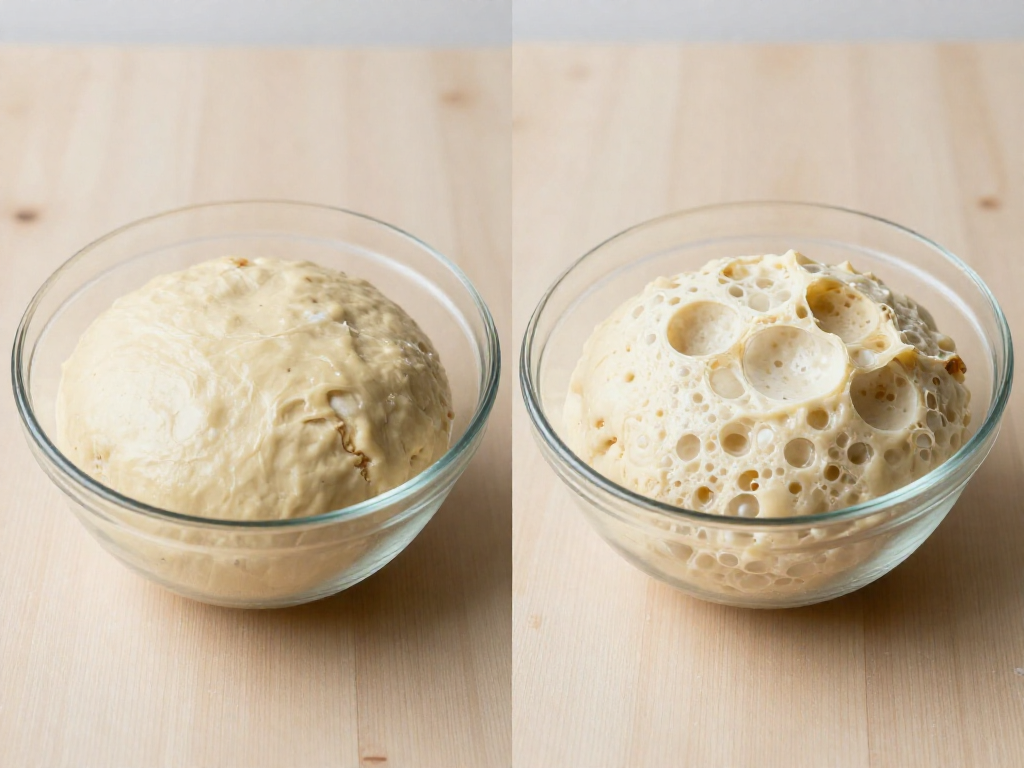
Overnight — Bulk ferment
Bulk ferment is the main rise, when the whole batch of dough ferments together. Yours happens overnight while you sleep.
Cue: By morning the dough should have risen about 50%, look puffy, and show a few bubbles on the surface.
7:00 AM — Shape and final proof
Turn the dough out, shape it into a tight round, and let it rest 60–90 minutes (the final proof).
Cue: Poke it gently. The dent should spring back slowly.
8:30 AM — Bake
Bake in a Dutch oven preheated to 475°F (245°C): 20 minutes covered, then 20–25 minutes uncovered until deep golden brown.
Warm vs. cool kitchen adjustments
Temperature drives fermentation speed, so adjust the overnight rest:
- Warm kitchen (75°F+ / 24°C+): Dough ferments faster. Use cooler water and check it earlier—it may be ready before 7:00 AM. Over-fermented dough looks soupy and bakes flat.
- Cool kitchen (below 68°F / 20°C): Dough ferments slower. Use slightly warmer water and give it an extra hour or two in the morning before shaping.
Results vary by kitchen and climate, so trust the visual cues over the clock.
Step-by-Step: Night-Before Instructions
Do these four steps around 8:00 PM. Total hands-on time is about 15 minutes, spread over an hour.
1. Mix the dough (8:00 PM)
In a large bowl, combine:
| Ingredient | Grams | Cups (approx.) |
|---|---|---|
| Bread flour | 500 g | 4 cups |
| Warm water (about 90°F / 32°C) | 350 g | 1½ cups |
| Active sourdough starter | 100 g | ½ cup |
| Fine salt | 10 g | 1¾ tsp |
Starter = the living mix of flour and water that makes your bread rise. It's "active" when it's bubbly and has doubled within the last 4–6 hours.
Squeeze everything together with one wet hand until no dry flour remains. It will look shaggy, sticky, and lumpy — that's correct. Cover and rest 30 minutes.
2. Stretch and folds — no kneading (8:30 PM)
Instead of kneading, you'll build strength with stretch and folds: wet one hand, grab the edge of the dough, pull it up until it stretches, then fold it over the center. Turn the bowl a quarter and repeat — 4 pulls total (one full turn).
Do one set now. Then do 3 more sets, about 15 minutes apart. By the last set the dough will feel smoother and tighter, and hold together when you lift it.
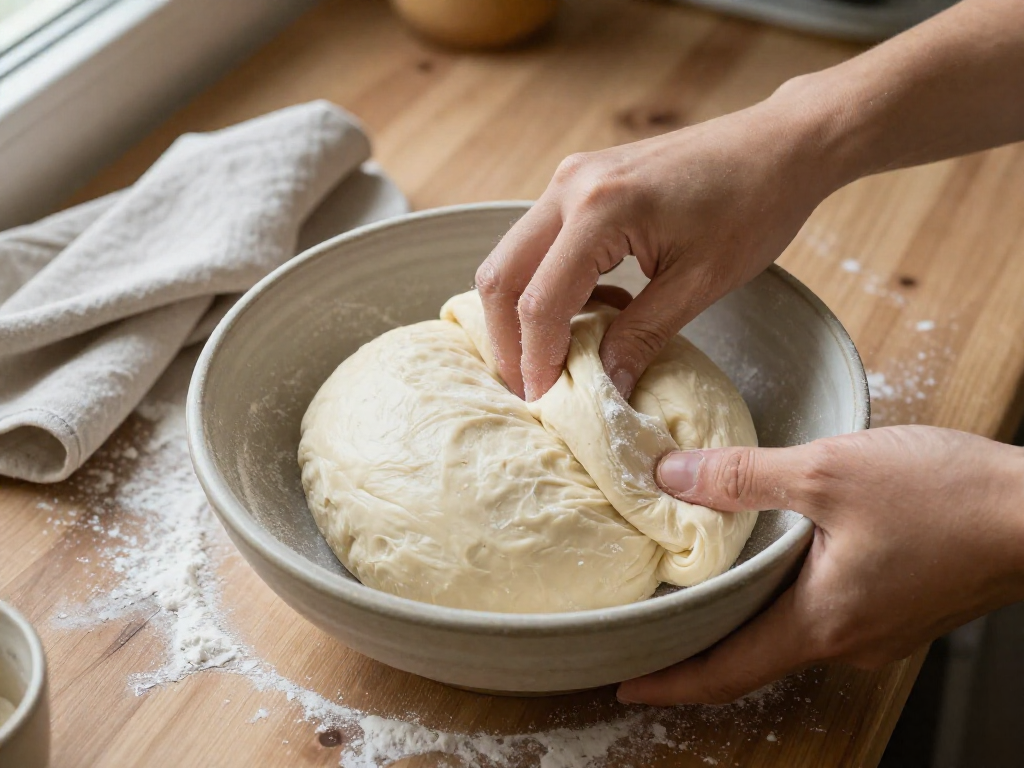
3. What it should look like before bed (around 9:15 PM)
After the final fold, the dough should be:
- Smoother and slightly puffy, not a sticky puddle
- Pulling into a loose ball when nudged to the side of the bowl
- Showing a few small bubbles on the surface
It won't be fully risen yet — that happens overnight.
4. Cover and leave it overnight
Cover the bowl tightly with a lid, plate, or plastic wrap so the top doesn't dry out. Leave it on the counter at room temperature (68–72°F / 20–22°C) for 8–12 hours.
Note: Warm kitchens (above 75°F) ferment faster — check it earlier. Cool kitchens are slower. By morning the dough should have risen by roughly 50–75% and look domed and bubbly. Results vary by climate, so trust the look more than the clock.
Step-by-Step: Morning Instructions
Your dough rested overnight during the bulk ferment (the long first rise where the dough develops flavor and gas). Here's how to finish it in the morning.
1. Check that bulk ferment is done
Look for these cues before doing anything else:
- The dough has grown by about 50% (not quite doubled).
- The surface looks domed and slightly bubbly.
- A few bubbles are visible at the edges of the bowl.
If it still looks flat and dense, leave it on the counter another 30–60 minutes. Cold kitchens take longer.
2. Shape the loaf simply
- Lightly flour your counter and tip the dough out.
- Fold the four edges into the center, like folding an envelope.
- Flip it seam-side down and gently drag it in small circles to build a tight, round ball (you'll feel it grip the counter).
- Place it seam-side up into a bowl lined with a floured kitchen towel, or a floured proofing basket.
3. Short final proof
Cover and let it rest at room temperature for 45 minutes to 1 hour. This is the final proof (the last rise before baking). Test it: press a floured finger into the dough. If the dent springs back slowly and partway, it's ready. If it springs back instantly, give it 15 more minutes.
Meanwhile, put your Dutch oven (lid on) in the oven and preheat to 245°C / 475°F for at least 30 minutes.
4. Score and bake
- Turn the dough out onto a square of parchment paper, seam-side down.
- With a sharp blade or knife, make one confident slash about 1 cm (½ inch) deep across the top. This controls where the bread expands.
- Lift the parchment and lower the dough into the hot Dutch oven. Cover.
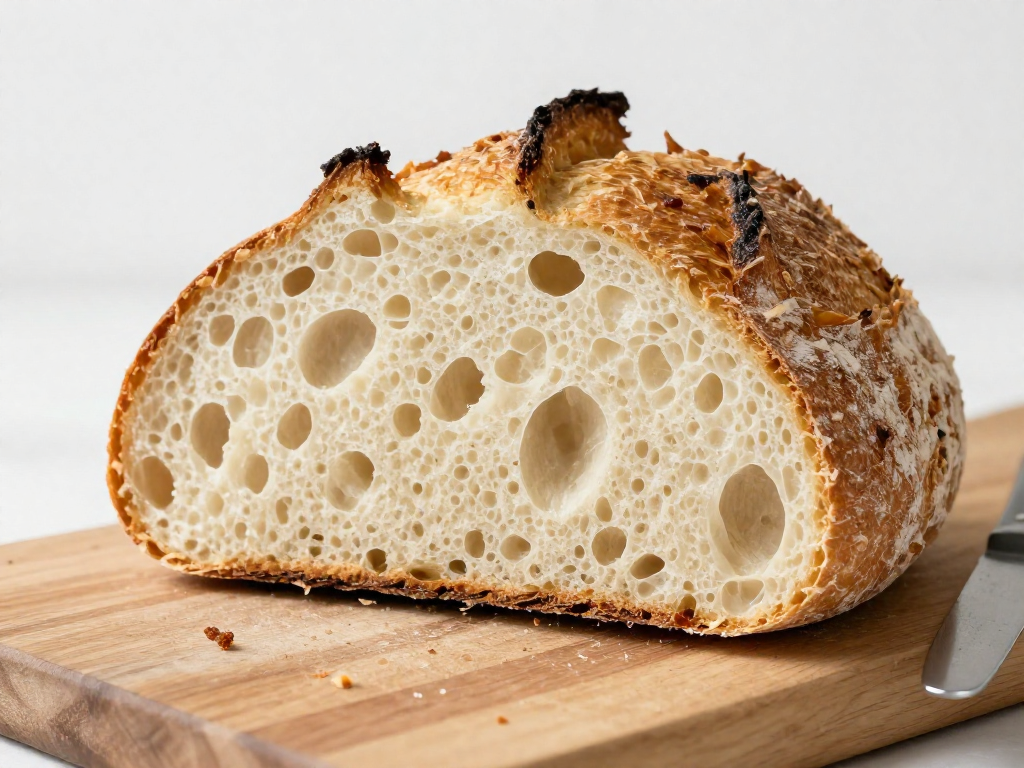
- Bake 20 minutes covered, then remove the lid and bake 20–25 minutes uncovered, until deep golden brown.
Cool on a rack for at least 1 hour before slicing. Cutting early traps steam and can make the crumb feel gummy. Times vary by oven, so use color and a hollow tap on the base as your real cue.
Troubleshooting Overnight Loaves
Most overnight loaf problems come down to proofing (how long your dough rises) and temperature. Find your symptom below, then make the matching fix on your next bake.
Dough spread flat overnight (over-proofed)
Your loaf rose too long and ran out of strength, so it puffed up and then collapsed into a flat puddle. Baked, it looks wide and short with little spring.
- Cause: A warm kitchen (above ~74°F / 23°C) sped up the rise, or the dough sat out too many hours.
- Fix: Cut the overnight time by 1–2 hours, or move the covered dough to the fridge for the last few hours. Aim to bake when the dough has grown by about 50–75%, jiggles like set jelly, and holds a slow dimple when poked.
Dense, tight crumb (under-proofed)
The loaf baked into a heavy brick with small, tight holes and a tight, pale center.
- Cause: A cool kitchen (below ~65°F / 18°C) slowed the rise, so the dough hadn't risen enough by morning.
- Fix: Give it more time before baking, or let the shaped dough warm on the counter for 1–2 hours in the morning. Look for a noticeably puffy, airy dough before it goes in the oven.
Gummy, wet crumb
The inside feels sticky or paste-like, even though the crust looks done.
- Cause: You cut it too early, or it was underbaked.
- Fix: Bake longer until the internal temperature reaches 205–210°F (96–99°C), and cool the loaf fully on a rack for at least 1–2 hours before slicing. Cutting a warm loaf traps steam and makes the crumb gummy every time.
Tune the schedule to your kitchen
Temperature is the biggest variable. Warm room → shorten the rise; cool room → lengthen it. Track your kitchen temp and your results for a few bakes, then adjust the overnight window by an hour at a time. Results always vary by kitchen and season, so treat each loaf as a data point, not a failure.
Make It Fit Your Sleep and Morning
The overnight schedule bends to your routine. Here's how to adjust it.
Shift the start time. Want to bake earlier? Mix the dough earlier the night before. The goal is roughly 9–12 hours of overnight rise (called the bulk ferment, the long rise where the dough roughly doubles and gets puffy). If your kitchen is warm, aim for the shorter end; if it's cool, the longer end.
- Mix at 8 PM → shape and bake around 7–8 AM
- Mix at 10 PM → shape and bake around 9–10 AM
Use the fridge to delay. Not ready to bake when you wake? After the overnight rise, shape the loaf, then put it in the fridge for up to 24 hours. Cold slows the dough way down, so you can bake whenever it suits you. Bake straight from the fridge—no need to warm it up first.
Weekday vs. weekend. On busy mornings, the fridge delay buys you time. On a relaxed weekend, bake right after you wake.
Bake-when-you-wake routine. The night before, line your banneton or bowl and preheat plans so you can move from bed to oven with minimal fuss.
Results vary by kitchen temperature, so watch the dough, not just the clock.
FAQ
How long should sourdough bulk ferment overnight on the counter?
Plan for about 8–12 hours at a typical room temperature of 68–72°F (20–22°C). "Bulk ferment" is the first rise after mixing, when your whole batch of dough rises together before shaping. Don't watch the clock alone—watch the dough. It's ready when it has grown by roughly 50–75% in volume, looks puffy and domed, shows a few bubbles on top and along the sides of the bowl, and jiggles like set jelly when you nudge it. At warmer temperatures (75–78°F) it may be done in 6–8 hours; in a cool kitchen it can take 12–14. Mix at night, check first thing in the morning, and use the visual cues rather than a fixed time.
What if my kitchen is too cold or too warm overnight?
Temperature controls speed, so adjust your timing and starter amount instead of fighting it. If your kitchen is cold (below ~66°F/19°C), the dough ferments slowly: use slightly warmer water (around 80°F/27°C), proof in a warmer spot like an oven with just the light on, or simply expect a longer rise of 12–14 hours. If it's warm (above ~76°F/24°C), the dough ferments fast and can over-ferment into a slack, sticky, flat loaf: use cooler water, reduce starter to about 30–40g, and check earlier (6–8 hours). The goal in any kitchen is the same visual result—50–75% rise, puffy and domed—not a specific number of hours.
Can I put the dough in the fridge overnight instead?
Yes, and it's a great beginner-friendly option. Let the dough start its bulk ferment (first rise) on the counter for about 1–2 hours so fermentation gets going, then cover it and move it to the fridge overnight for 10–16 hours. The cold slows fermentation dramatically, which makes timing forgiving and often improves flavor and crust. In the morning the dough should look slightly risen and feel firmer and easier to shape than room-temperature dough. You can shape it cold and bake straight away, or let it sit out 30–60 minutes first. If it hasn't risen at all after a long cold proof, your starter was likely underactive at mixing time.
Why is my overnight sourdough flat in the morning?
Flat loaves almost always trace back to one of three causes. First, over-fermentation: if the dough rose too long or your kitchen was warm, it loses structure and spreads out—fix it by shortening the rise or reducing starter. Second, an underactive starter: if your starter wasn't bubbly and at peak when you mixed, it can't lift the dough—fix it by feeding the starter and using it when it has doubled. Third, weak shaping or low dough strength: not enough tension when shaping lets the loaf relax flat—fix it by doing a few stretch-and-folds during bulk ferment and shaping the dough into a tight, taut ball before its final rise. Baking in a preheated Dutch oven also helps the loaf spring up rather than out.
How do I know my starter is ready to mix at night?
Your starter is ready when it's at its peak—active, bubbly, and roughly doubled in size after a feeding. Three quick checks: (1) it has visibly risen to about double and the surface is domed with bubbles; (2) it smells pleasantly tangy and yeasty, not sharply sour or like nail polish remover; and (3) it passes the float test—drop a small spoonful into water and if it floats, it's full of gas and ready. Feed it 4–12 hours before you mix (timing depends on your kitchen temperature) so it hits peak right around your nighttime mix. If it's flat, liquidy, or sinks in water, give it another feeding and wait before baking.
Can I bake the loaf later in the morning if I oversleep?
Often yes—just check the dough before deciding. If you wake to dough that's risen 50–75% and is puffy but not collapsed, shape it and bake right away. If it has clearly over-risen (very domed, full of large bubbles, slack, or starting to deflate), it's headed toward flat and sour; shape it gently and bake immediately rather than waiting longer. To buy yourself a safety margin for sleeping in, move the dough to the fridge—cold slows fermentation and a finished bulk ferment can hold there for several hours, even up to a day, until you're ready to shape and bake. Results vary by kitchen and climate, so always trust the dough's appearance over the clock.
See also
- How to Tell If Your Sourdough Starter Is Ready to Bake
- Beginner Sourdough Troubleshooting: Dense, Flat, and Gummy Loaves Explained
- Easy Same-Day Sourdough for Busy Beginners
- How to Shape a Sourdough Boule (Step-by-Step)
- Sourdough Hydration Explained for Beginners
Related articles
Sourdough Pizza Dough for Beginners: A Forgiving Way to Practice Shaping
Can I use my sourdough starter to make pizza dough, and is it easier than a loaf?
Jul 20, 2026 · 9 min read
The Hardest Loaf to Mess Up: A 60% Hydration Sourdough for Absolute Beginners
What is the easiest sourdough bread recipe that minimizes handling and hydration issues?
Jul 20, 2026 · 8 min read
How to Store Sourdough Bread So It Stays Fresh
Learn how to store sourdough bread so it stays fresh for days, how to freeze loaves and slices, and how to revive a stale crust. Simple beginner steps.
Jun 29, 2026 · 9 min read