What Is Bulk Fermentation and Why Does It Matter Most?
What is bulk fermentation in sourdough?
On this page
What Is Bulk Fermentation in Sourdough?
Bulk fermentation is the first long rise of your dough, the stage right after mixing when the entire batch ferments together as one mass, before you divide and shape it into individual loaves. It's often called the "bulk rise" or "first rise," and for most beginners it's the single most important stage to get right. If your loaves come out dense, flat, or gummy, this is usually where things went wrong.
Here's exactly where it fits in the process:
- Mix your flour, water, salt, and starter (the living mix of wild yeast and bacteria that makes sourdough rise).
- Autolyse (optional) — a short rest of just flour and water, usually 30–60 minutes, that helps the dough come together more easily.
- Bulk fermentation — the long rise covered in this guide. ← You are here
- Pre-shape and final proof — divide, shape, and let the shaped loaves rise one last time before baking.
What's actually happening in the dough
During bulk fermentation, two things happen at the same time:
- Wild yeast eats the flour's sugars and releases carbon dioxide (CO2). Those gas bubbles get trapped in the dough, which is what makes it puff up and rise.
- Bacteria produce mild acids. These give sourdough its tangy flavor and, just as importantly, strengthen the dough's structure so it can hold its shape later.
The word "bulk" simply means you're fermenting the whole batch together as one lump — not separate, already-shaped loaves. That's the key difference between this stage and the final proof that comes after shaping.
How long does it take?
Plan for roughly 4 to 8+ hours, but treat that as a rough window, not a fixed rule. Bulk fermentation is driven by temperature, so it varies a lot from kitchen to kitchen:
- Warm kitchen (around 78°F / 26°C): often 4–5 hours
- Cool kitchen (around 68°F / 20°C): often 7–9 hours or more
Because of this, you'll learn to watch the dough, not the clock. We'll cover the exact visual and sensory cues — how the dough should look, feel, and jiggle when it's ready — in the next section.
Beginner takeaway: Bulk fermentation is the long first rise of the whole dough. Getting it right is the biggest factor in an open, airy loaf — and time is only a guide, since your kitchen's temperature changes everything.
Why Bulk Fermentation Matters More Than Any Other Step
If you only master one stage of sourdough, make it bulk fermentation—the rest period after mixing where your dough roughly doubles, fills with gas, and builds strength on the counter. Here's the blunt truth: this is the single step where a great loaf is won or lost.
Why it outranks everything else:
- It builds the structure that creates an open crumb. During bulk fermentation, wild yeast in your starter (the living mix of flour and water you feed to leaven the bread) produces carbon dioxide gas. That gas gets trapped in a web of gluten—the stretchy protein network in wheat dough—creating the airy holes you want inside a finished loaf.
- Most failed loaves trace back to right here. Dense, gummy, or flat bread almost always means the dough was under-fermented (not enough rise and gas) or over-fermented (left so long the structure collapsed). Shaping and scoring problems are real, but they rarely cause a brick.
- You cannot fix it later. Shaping, scoring, and baking can only work with the dough you hand them. If bulk fermentation went wrong, no clever oven trick rescues it. This is the "garbage in, garbage out" rule of the whole bake—every later step inherits whatever happened here.
What good bulk fermentation gives you:
- Flavor: longer, proper fermentation develops the mild tang sourdough is loved for.
- Rise: enough trapped gas means a tall, springy loaf instead of a flat puddle.
- Digestibility: fermentation begins breaking down components in the flour, which many bakers find gentler on the stomach.
- Crumb texture: the difference between soft, open slices and a tight, gummy center.
This is why we'll spend more time on reading your dough here than on any other stage. Note that timing varies a lot by kitchen temperature and starter strength, so we'll lean on visual and sensory cues—not the clock alone—to know when bulk fermentation is done.
What Actually Happens to Your Dough During Bulk
During bulk fermentation (the first long rise, after mixing and before you shape the loaf), your dough is doing two jobs at once: building structure and filling with gas. Here is how to see that progress so you can stop watching the clock.
Watch for these changes, in roughly this order:
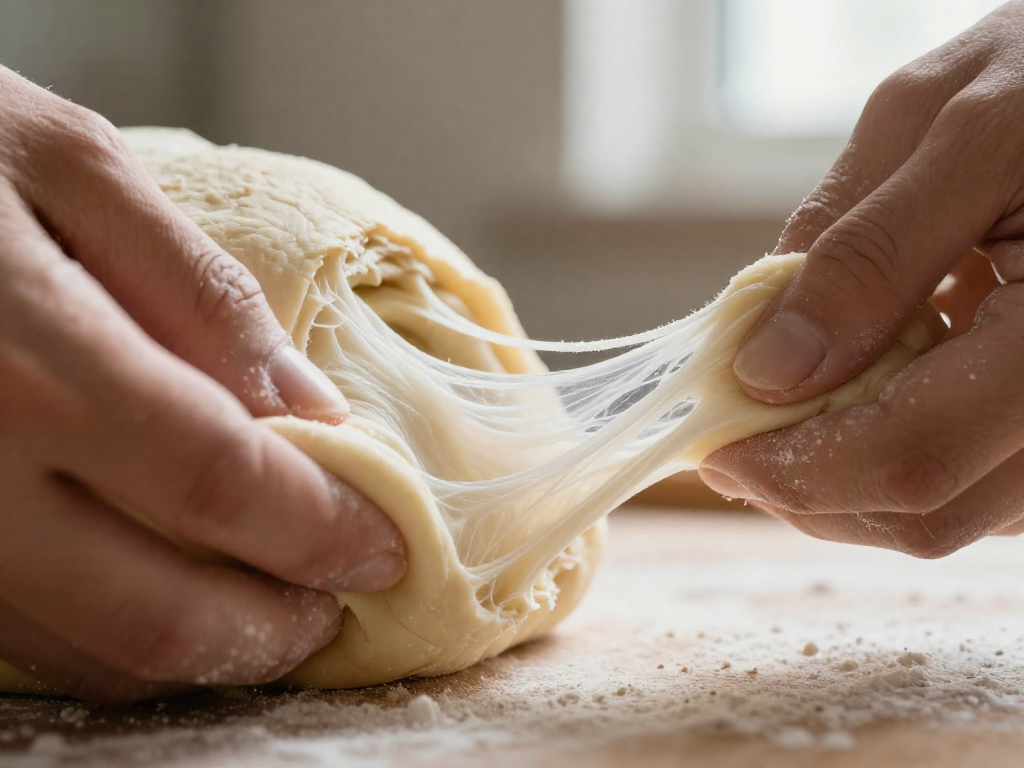
- The dough gets stronger and stretchier. Early on it tears easily. As the gluten (the protein network that traps gas) develops, you can stretch a corner thin without it ripping. This is called extensibility, and it means the dough can balloon instead of breaking.
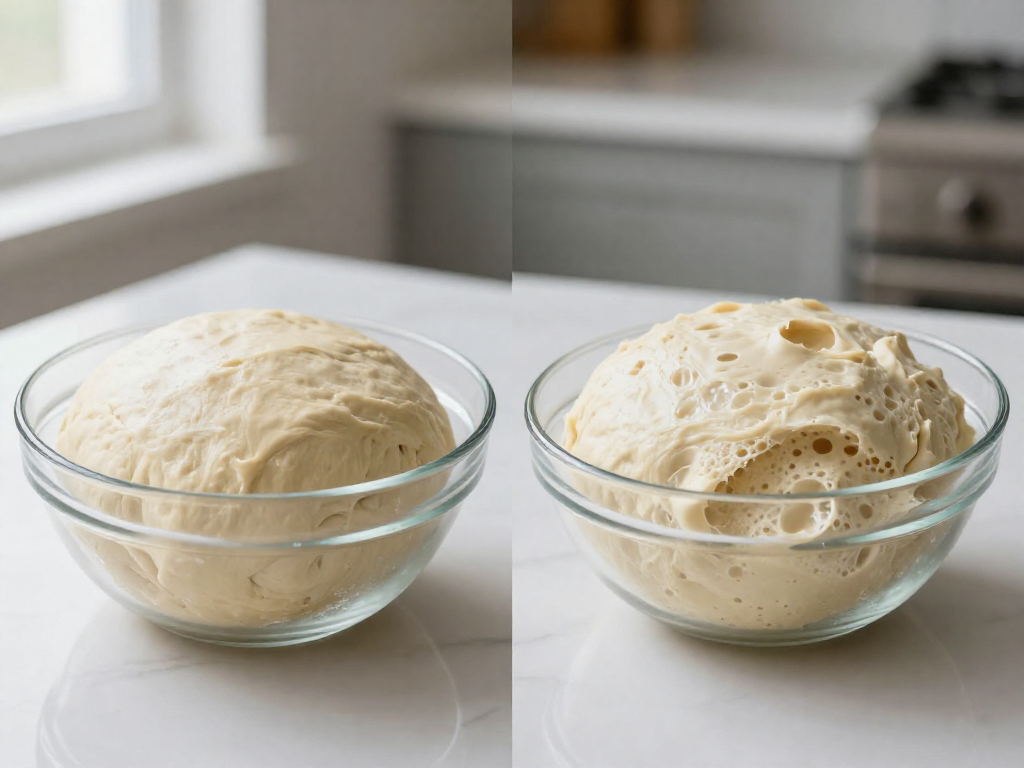
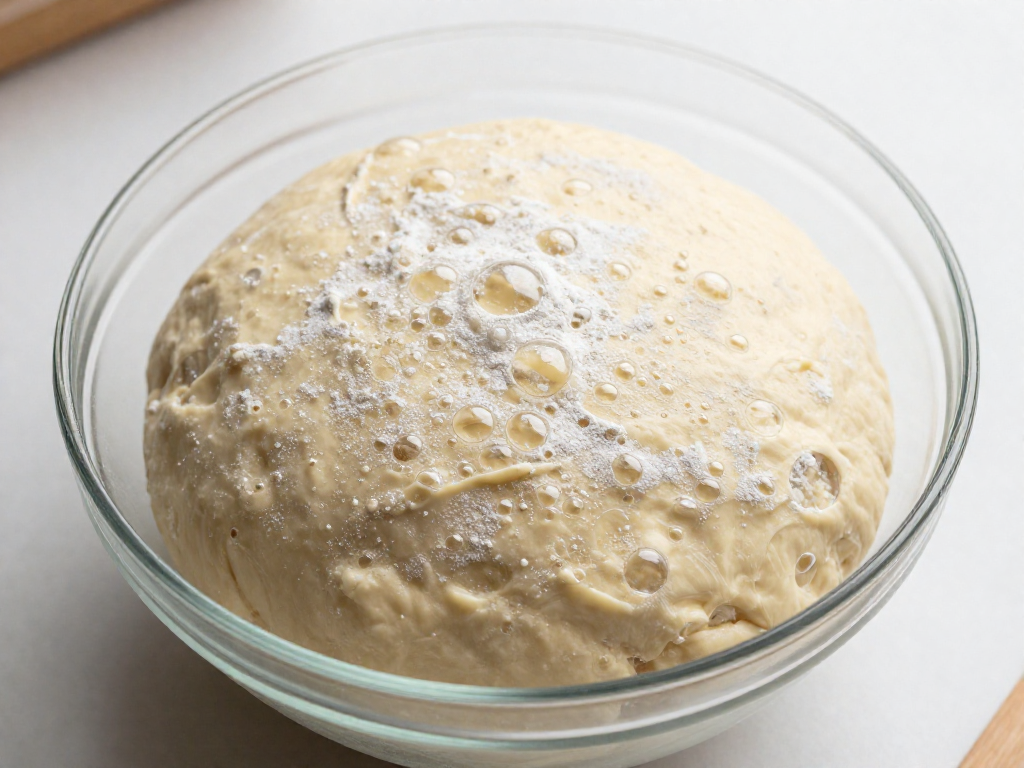
- Bubbles appear and the dough lightens. You'll see small and large bubbles on the surface and through the sides of a clear bowl. Give the bowl a gentle shake: a ready dough jiggles like soft jelly instead of sitting like a heavy lump.
- It grows by about 50%, not double. Many beginner guides say "let it double," but for most home recipes a ~50% volume increase gives a more reliable, less sour, less gummy loaf. Mark the dough's starting height on the bowl with a piece of tape so you can judge growth accurately.
- The top domes and the edges pull in. A finished bulk dough looks puffy and rounded on top, and the edges release slightly from the side of the bowl rather than clinging flat.
Where stretch-and-folds fit in. A stretch-and-fold is simply grabbing one side of the dough, pulling it up, and folding it over the center, then rotating the bowl and repeating 3–4 times. Do a set every 30 minutes during the first 1.5–2 hours of bulk. They build that strong, stretchy gluten without kneading, helping the dough hold gas and rise tall instead of spreading flat.
Beginner takeaway: Trust the dough's behavior—jiggle, bubbles, ~50% growth, domed top—over any exact time. Warm kitchens move fast; cool kitchens go slow. Results vary by kitchen and climate, so read the dough.
How to Tell When Bulk Fermentation Is Done
The honest answer: don't trust the clock alone. Bulk fermentation (the first big rise, after mixing and before you shape the dough) finishes faster in a warm kitchen and slower in a cold one. The same recipe can take 4 hours one day and 7 the next. So instead of watching time, watch your dough. Here are the cues that actually work.
1. Volume increase (the most reliable sign)
Your dough should grow by about 30–75%, not necessarily double. The exact target depends on your flour and recipe:
- Whole wheat or rye flour: aim for the lower end, ~30–50%
- Plain white bread flour: ~50–75% is common
A 100% rise (full doubling) usually means you've gone too far for most beginner recipes — the dough overferments and bakes up gummy or flat.
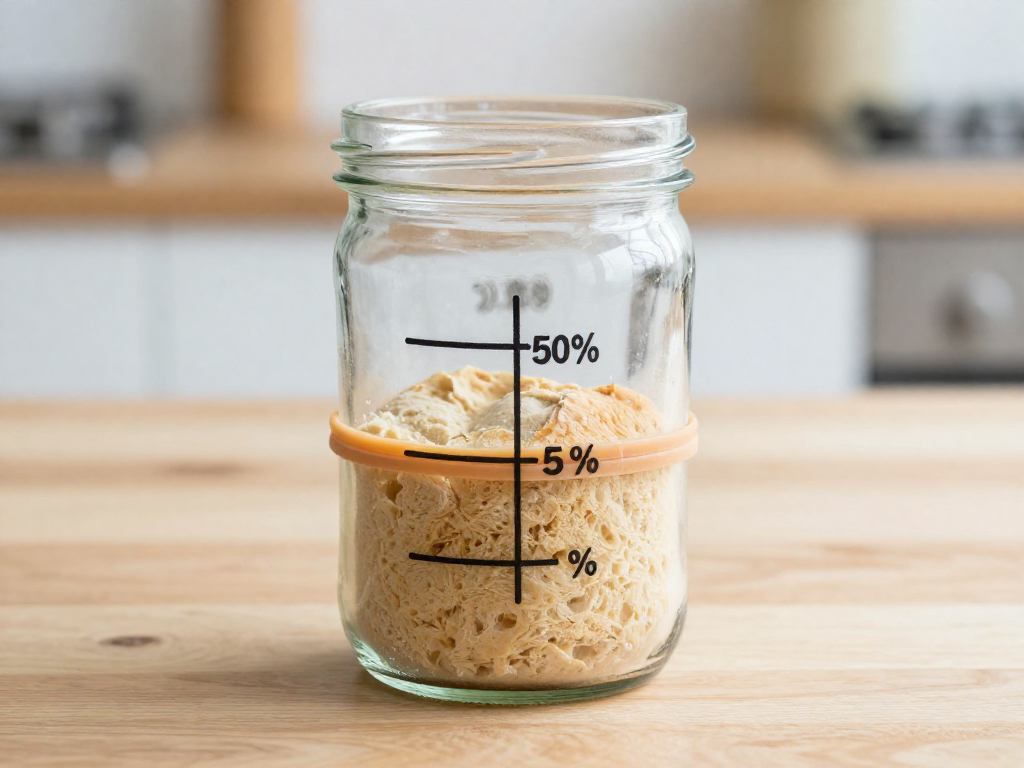
2. The aliquot jar method (easiest for beginners)
This removes all the guesswork. Right after mixing, pinch off a small piece of dough (about 30 g), press it into a small straight-sided jar, flatten the top, and mark the level with a rubber band or tape.
Because the jar piece rises at the same rate as your main dough, you can literally see the percentage rise. When the dough climbs past your target mark (say, 50% above the line), bulk is done. No math, no poking — just look.
3. Look and feel
- Domed, rounded top instead of flat and slack
- Bubbles visible on the surface and along the sides of the bowl
- Jiggly and alive — give the bowl a gentle shake and the dough should wobble like set jelly
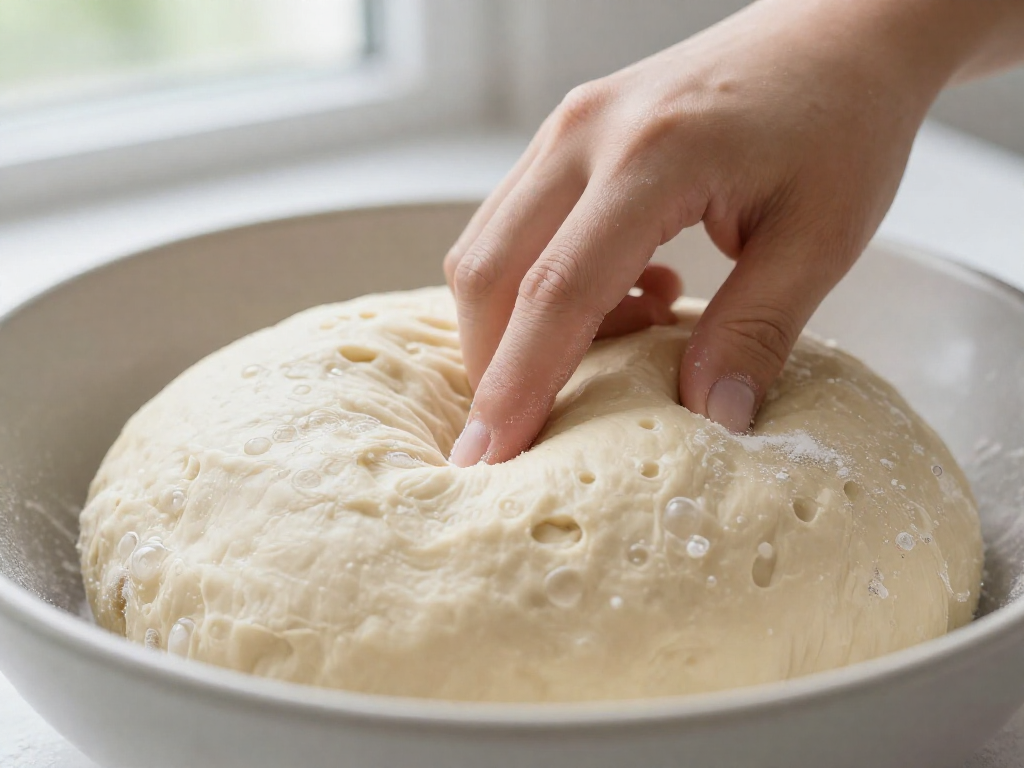
4. The poke test
Lightly flour a finger and press about 1 cm into the dough.
- Springs back slowly and partway → ready
- Springs back instantly and fully → needs more time
- Stays fully dented and the dough feels deflated → likely overfermented
5. Smell
Properly fermented dough smells mildly tangy and slightly sour — pleasant and yeasty. A sharp, vinegary, or boozy (alcohol) smell means it's gone too far.
Beginner tip: Pick two cues — the aliquot jar plus the poke test — and trust them together. Results vary by kitchen and climate, so build confidence batch by batch rather than chasing one perfect number.
How Temperature Controls Your Timing
The short answer: dough temperature, not the clock, decides when bulk fermentation (the first long rise, when your dough develops most of its strength and flavor) is done. Warm dough ferments fast; cool dough ferments slow.
This is why a recipe that says "bulk ferment for 4 hours" can actually take 7 in your kitchen. The author baked in a 78°F kitchen. If yours sits at 66°F, your dough is moving at half speed. Copying their time blindly is the #1 reason beginners end up with dense, under-risen loaves.
Aim for a dough temperature of 74–78°F. This range is forgiving and predictable for beginners. Check it by pushing an instant-read thermometer into the center of the dough right after mixing.
A rough rule of thumb: every ~17°F change roughly doubles or halves the pace. So at 70°F, expect bulk to take noticeably longer than the recipe's time; at 80°F, expect it to finish early. Always watch the dough, not just the timer (see the visual cues in the previous section).
Simple ways to find a warm, steady spot:
- Oven with the light on (door closed) — often holds around 75–80°F. Check with a thermometer first; some run hotter.
- Top of the fridge — gentle warmth from the motor.
- A proofing box or a cooler with a jar of warm water inside.
Use temperature to fit your schedule. Want a slower rise so you can sleep or go to work? Keep the dough cool. Need it done sooner? Find a warmer spot. You control the pace by controlling the temperature.
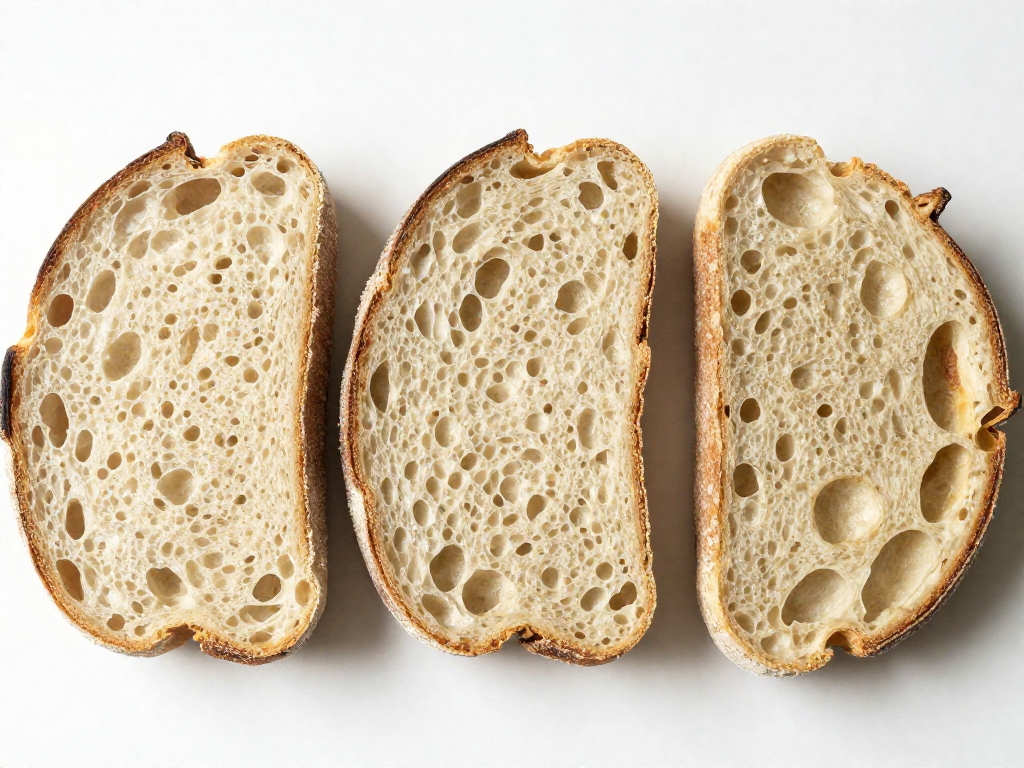
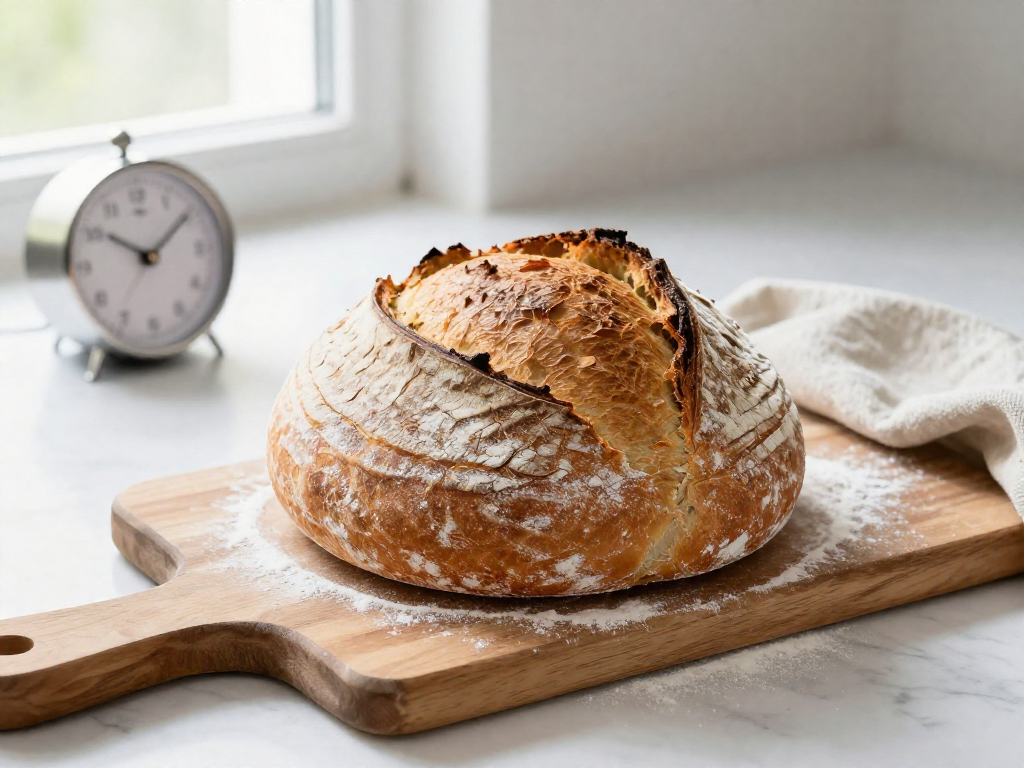
Under-Proofed vs. Over-Proofed: How to Read the Results
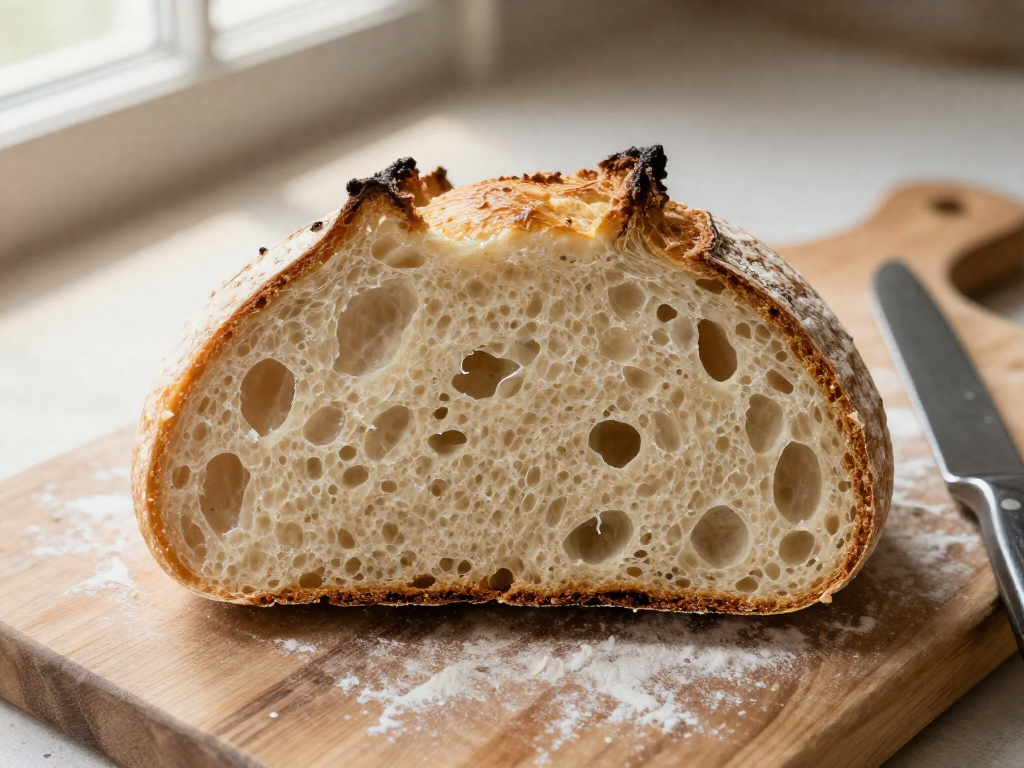
Your finished loaf tells you exactly what went wrong during bulk fermentation (the first long rise, before shaping, when your dough develops flavor and structure). Cut a slice and match what you see to the table below.
| What you see | Likely cause | Fix next time |
|---|---|---|
| Dense, tight crumb; gummy, undercooked-feeling center; little oven spring (the rise in the first 10–15 min of baking) | Under-fermented — bulk ended too early | Let bulk run longer, until the dough grows ~50% and looks puffy and domed |
| Flat, spread-out loaf; sticky, slack dough that won't hold shape; strong sour smell; "blowouts" (bursts on the side) | Over-fermented — bulk ran too long | End bulk sooner, or keep the dough cooler to slow it down |
The two failure modes, side by side
- Under-proofed dough is tight. It feels firm, springs back fast when poked, and bakes up short and pale with a damp middle. The yeast simply didn't have enough time to fill the dough with gas.
- Over-proofed dough is exhausted. It feels loose and wet, doesn't bounce back, and has used up its strength, so it can't trap gas or hold its shape. The result is a sad, flat pancake.
How to adjust
- Too dense? Add 30–60 minutes to bulk, or move the dough somewhere warmer (around 24–26°C / 75–78°F).
- Too flat and slack? Stop bulk earlier next time. Watch the dough, not the clock—rising temperature speeds everything up.
Why "slightly under" beats "over" for beginners
You can rescue a slightly under-fermented dough: it still has structure, springs in the oven, and gives you a usable loaf. Over-fermented dough has no structure left to recover. When you're unsure, stop bulk a little early. Results will still vary with your kitchen and the season, so treat each bake as a data point, not a failure.
Common Bulk Fermentation Mistakes Beginners Make
Bulk fermentation is the first long rise, after mixing and before shaping, when your dough builds most of its strength and flavor. Here are the mistakes that most often cause dense, flat, or gummy loaves, plus the quick fix for each.
- Going strictly by the clock instead of the dough. A recipe time is only a starting point for one specific kitchen. Fix: Watch the dough for a 50–75% rise, a domed, jiggly surface, and a few bubbles, then decide.
- Using a weak or under-fed starter. A sluggish starter ferments slowly and unevenly. Fix: Use it at peak, 4–8 hours after feeding, when it has doubled and passes the float test (a spoonful floats in water).
- Cold dough in a cold kitchen with no adjustment. Fermentation slows roughly by half for every 8°C (15°F) drop, so the same timing leaves dough under-proofed (risen too little). Fix: Aim for a dough temperature of 24–25°C (75–78°F), or simply allow more time when it's cool.
- Confusing bulk fermentation with the final proof. The final proof is the shorter rise after shaping. Fix: Treat them as two separate stages with their own cues.
- Stopping at "double" because someone told you to. For many beginner recipes, doubled dough is already over-proofed (risen too far), which gives a flat, gummy crumb. Fix: Stop earlier, around 50–75%.
- Skipping any objective measure. Fix: Use an aliquot jar—pinch off a small dough sample into a straight-sided jar, mark the start line, and end bulk when it hits your target rise.
See also
- How to Make and Feed a Sourdough Starter
- Sourdough Hydration Explained for Beginners
- Why Is My Sourdough Dense and Gummy?
- Beginner Sourdough Bread Recipe (Step by Step)
- How to Shape a Sourdough Boule
- Understanding the Sourdough Proof Stage
Related articles
Sourdough Lingo You Don’t Need: Simple Words Instead of ‘Autolyse’ and ‘Crumb’
Why do sourdough bakers use so much jargon, and what simple substitutions can I use?
Jul 20, 2026 · 4 min read
The Beginner’s Guide to Sourdough Gluten Development: Why Stretch and Folds Work
How does gluten development work in sourdough, and why are stretch and folds so effective for beginners?
Jul 20, 2026 · 9 min read
How Long Does It Really Take to Bake Your First Sourdough?
Wondering how long sourdough really takes? See the realistic active vs. passive time for your first loaf, hour by hour, so you can plan with confidence.
Jun 29, 2026 · 8 min read