The Shaping Secret: How Your Technique Affects Oven Spring and Crumb
Does the way I shape my dough really matter for the final loaf?
On this page
Most beginners think shaping is just for looks. But here's the truth: your shaping technique directly governs how your bread rises in the oven and what the inside looks like. Let's see the science and practical steps to get it right.
Introduction: Why Shaping Is More Than Cosmetic
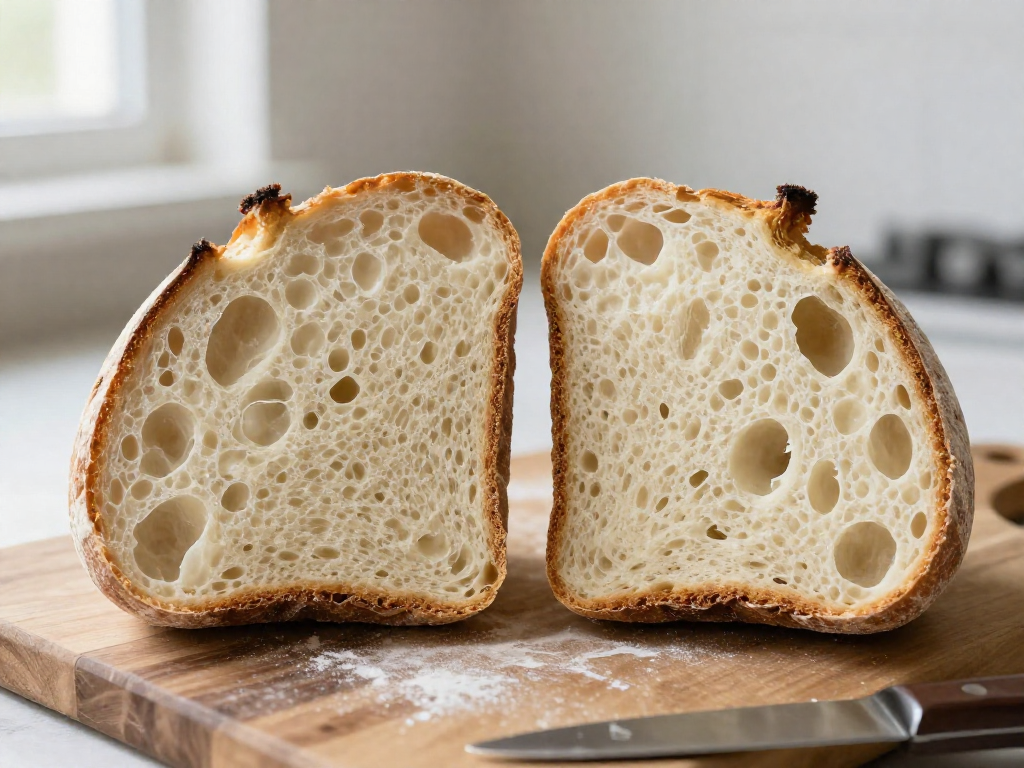
Yes, the way you shape your dough absolutely matters—it’s often the hidden lever that turns a dense, flat disc into a tall, airy loaf. Many beginners obsess over starter strength and hydration percentages, but skip the crucial step of building surface tension right before the dough hits the oven. That tension is what organizes the gluten network, traps gas, and fuels oven spring (that dramatic burst of rise in the oven) and an open crumb (the pattern of holes inside your loaf). In fact, Breadtopia found that a boule shape gave the least oven spring in a direct comparison, likely because its round form creates weaker tension and lets the dough spread once scored.
Loose shaping leads to a flatter loaf with sloping shoulders and a tight crumb; over-tightening can degas the dough and crush the air pockets you’ve built. But the sweet spot—gentle cinching that encourages an open crumb, or firm stitching for slack doughs—makes all the difference. Even simple choices like shaping as a batard instead of a boule can nudge your crumb from closed to lacy. Throughout this article, we’ll show you exactly how shaping transforms your bread, with clear steps and visual cues that will have you producing loaves that spring high and cut beautifully.
The Science: How Surface Tension Organizes Gluten and Traps Gas
Shaping dough isn’t about making it look neat—it’s a physical process that determines whether your loaf climbs into a tall, airy masterpiece or sprawls into a sad, flat disc. The key is surface tension. When you fold, tuck, and rotate dough against the counter, you stretch its outer skin taught. That tension does two things: it aligns long gluten proteins into a continuous, elastic net just beneath the surface, and it physically constrains the dough so gas can’t easily escape sideways. Together, they turn an unstructured mass into a gas-filled balloon ready for the oven.
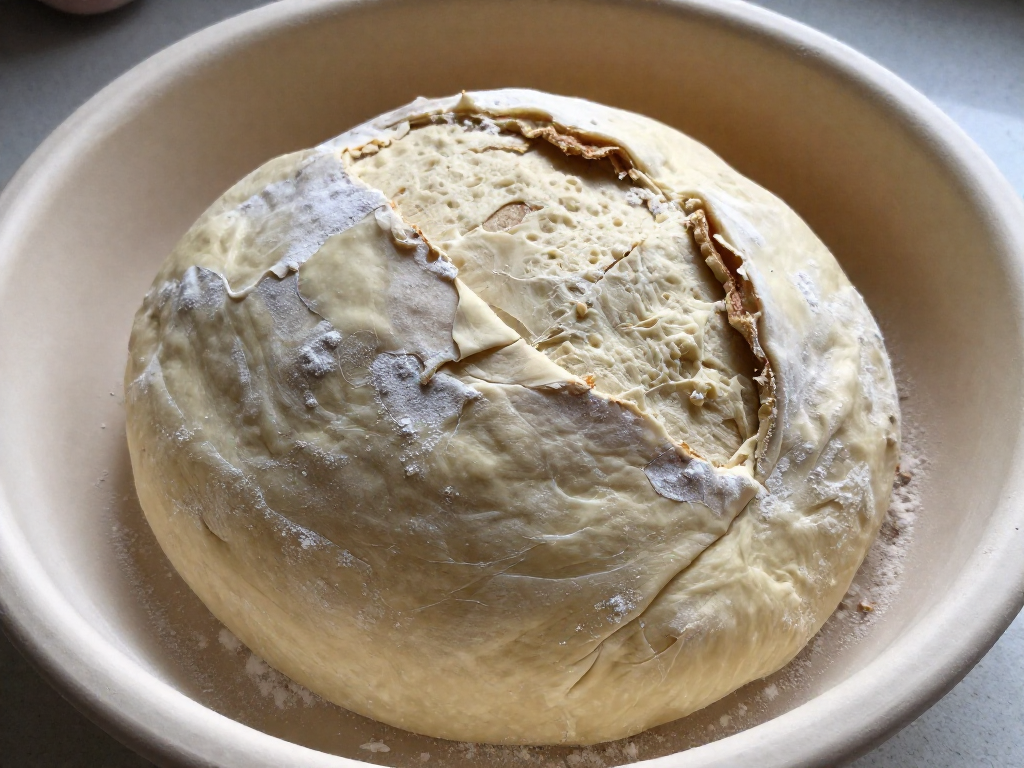
Before shaping, your dough’s gluten is a tangled web—strong but disorganized. The act of building surface tension pulls those strands parallel, like tightening the strings of a tennis racket. This aligned network is what holds onto the carbon dioxide produced during fermentation. Without it, the gas bubbles would simply merge and leak out during handling or scoring. In a hot oven, rapid expansion of steam and gas creates immense pressure; a weak, misaligned gluten net lets the dough ooze outward instead of springing up. That’s why a poorly shaped loaf collapses wide the instant you score it, giving you a flat profile with dense, gummy crumb.
The difference becomes crystal clear when you compare shapes. Breadtopia ran side-by-side tests and found that a round boule had remarkably less oven spring than a batard. The reason? The boule’s lower height and rounded geometry made it harder to build uniform surface tension; once scored, the dough oozed outward, losing the upward thrust needed to open the crumb. A batard, with its longer, compact shape, held its tension and shot upward, resulting in a taller loaf and a more open interior. In fact, it’s widely observed that boules tend to have a tighter crumb for exactly this reason—less tension, less upward expansion.
For beginners working with doughs around 65–70% hydration (soft but not soupy), surface tension is make-or-break. At that hydration level, dough is slack enough that without a taut skin, it simply flops out into a flattish blob rather than holding a proud shape. The gas pressure can’t fight gravity on its own; it needs that organized gluten cage to direct it vertically.
So shaping is far more than aesthetics. It’s the final, critical stage where you give your dough the structural integrity to unleash its oven spring. The skin you create is the difference between a loaf that rises tall with an airy, irregular crumb and one that spreads out with sloping shoulders and a dense interior. Mastering surface tension is the secret that turns a sticky, bubbly mass into bread worth bragging about.
Batard vs. Boule: How Shape Dictates Crumb and Oven Spring
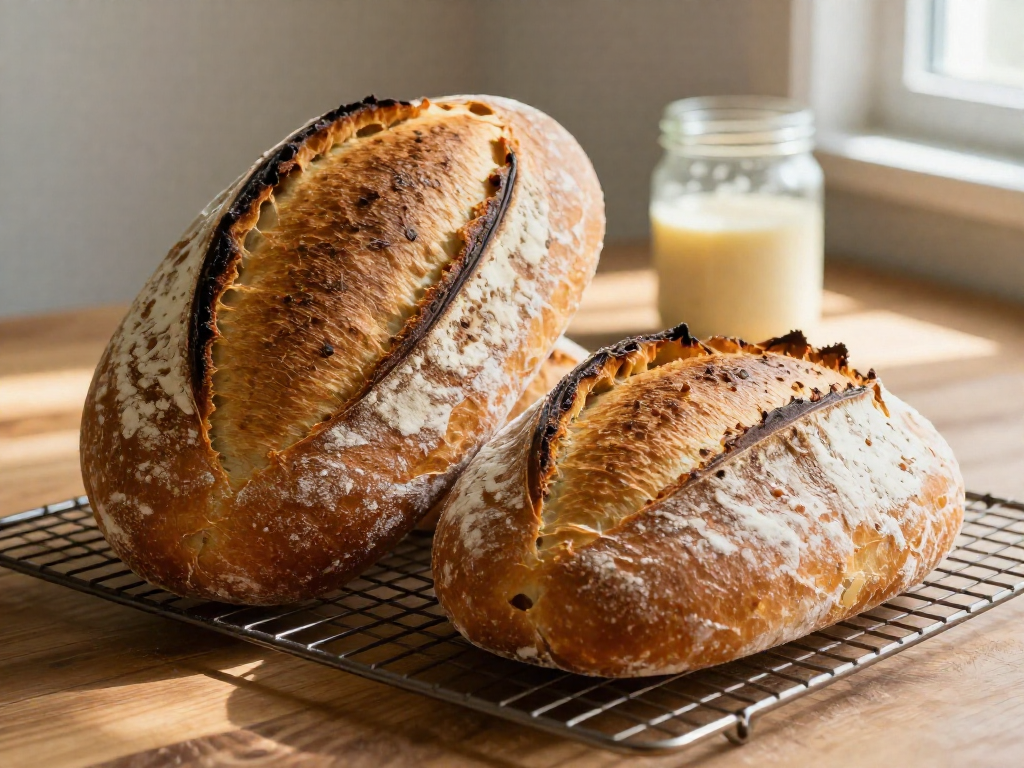
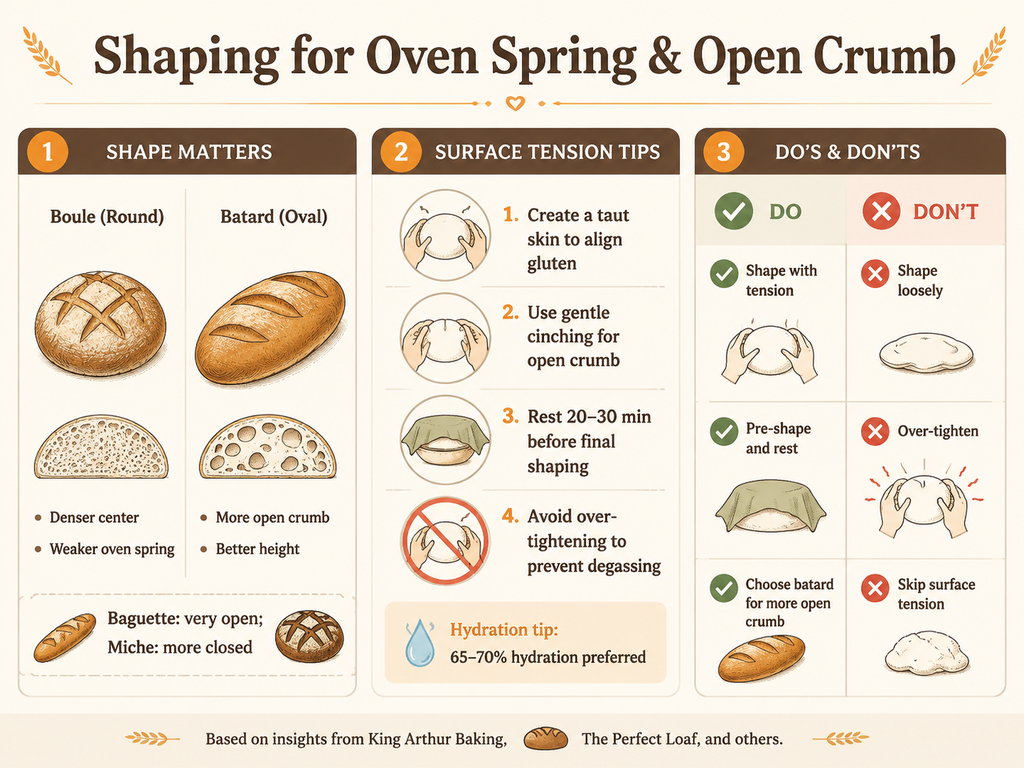
Your shaping decision isn't just about aesthetics—it directly controls how much oven spring your loaf gets and whether the crumb opens up or stays tighter. The two most common home-baker shapes are the boule (a round loaf) and the batard (an oval or football shape). If you're chasing that airy, Instagram-worthy crumb, choose the batard.
Bakers widely observe that an oval shape promotes a slightly more open interior. King Arthur Baking notes that in their experience, a batard yields a more open crumb than a round boule. Maurizio at The Perfect Loaf echoes this, finding boules tend to bake with a more closed, denser texture. But it's not just anecdotal: in a controlled side-by-side test, Breadtopia found the boule had the least oven spring of all shapes baked. The reason? A round loaf's curved surface can't hold tension as evenly—once scored, the dough tends to ooze outward rather than spring upward. That lateral spread compresses the crumb and kills height.
What's more, dough height matters more than overall size or width. A tall, tightly shaped batard creates vertical tension that forces the dough to expand upward in the oven, stretching the gluten network into that open honeycomb we love. The boule, even when shaped to the same height, can't distribute that tension evenly—its center often ends up denser. Breadtopia's testing confirmed that the boule shape, at the same height as other loaves, still showed a noticeably tighter center crumb. The symmetry of a round loaf seems to concentrate the weight toward the middle, suppressing lift.
The extreme cases drive the point home. A classic French baguette—long and thin—has an irregular, wildly open interior. A large, symmetrical miche (a giant round) bakes up far more closed. The more you stretch the dough into a cylinder, the more the crumb wants to fissure and open; a squatter, wider shape resists that expansion. The shape's influence on crumb is real and predictable.
Now, a boule isn't doomed—it just demands more from your shaping technique. To get decent oven spring from a round loaf, you must build serious surface tautness during final shaping, pulling the dough firmly across the work surface until it resists. The batard shape, on the other hand, pairs naturally with a gentler shaping technique called cinching (folding the dough like a letter and sealing the seam), which preserves more gas. Maurizio Leo of The Perfect Loaf emphasizes that his preferred cinching method encourages a more open crumb, whereas a structural stitching method is reserved for slack doughs. That gentle handling, combined with the batard's elongated form, gives you a head start toward a lighter loaf.
Scoring a batard is also simpler: a single long slash down the centre directs expansion perfectly, whereas a boule often needs a crosshatch or starburst pattern to prevent an uneven burst. So, for your best shot at a tall, open-crumbed loaf, shape a batard. Give it a tight surface, proof it in a floured oval basket (banneton), and score it confidently down the length. The shape guides the spring upward, and the interior follows suit. If you prefer boules for sandwiches or tradition, go for it—just accept a slightly tighter crumb and focus on nailing every other variable (strong starter, proper fermentation) to compensate. But if oven spring is your goal, the batard gives you an edge right from the shaping bench.
Tight vs. Loose: Finding the Tension Sweet Spot
Shaping tension is a balancing act. Shape too loosely, and your dough will spread out in the oven, yielding a flat loaf with sloping shoulders and a crumb that never fully opens—the structure just isn’t there to hold the upward push. But crank the tension too aggressively, and you can actually degas the dough, especially if it’s already well organized from a long bulk ferment. The result is a dense, gummy interior that had no chance to spring.
The sweet spot is a taut, smooth skin that holds its shape without squeezing out all the gas. For most beginner sourdoughs, this comes from a gentle cinching motion—pulling the dough toward you with cupped hands to tighten the surface, then tucking the seams underneath. Maurizio Leo at The Perfect Loaf describes this precisely: a standard “cinching” method encourages a more open crumb, while a tighter “stitching” method is reserved for slack, high-hydration doughs that need more structural reinforcement. If your dough is firm enough to hold a round, the lighter touch almost always gives a better rise and a more lacy interior.
A useful gauge: the dough should feel like a water balloon—plump and tense but not stiff. When you prod it, you’ll feel resistance, but it should still jiggle gently. For doughs around 65–70% hydration that aren’t proofed in a basket, that surface tension is often the whole difference between a graceful dome and a pancake. Get that tautness right, and you’ll see the payoff in the oven.
Step-by-Step: Beginner-Friendly Shaping for Boule and Batard
Shaping is where you give the dough its final form, but it’s also your last chance to build the surface tension that drives oven spring. A well-shaped loaf traps gas evenly and rises upward instead of spreading outward. Here’s a beginner-friendly method that works for both round boules and oval batards.
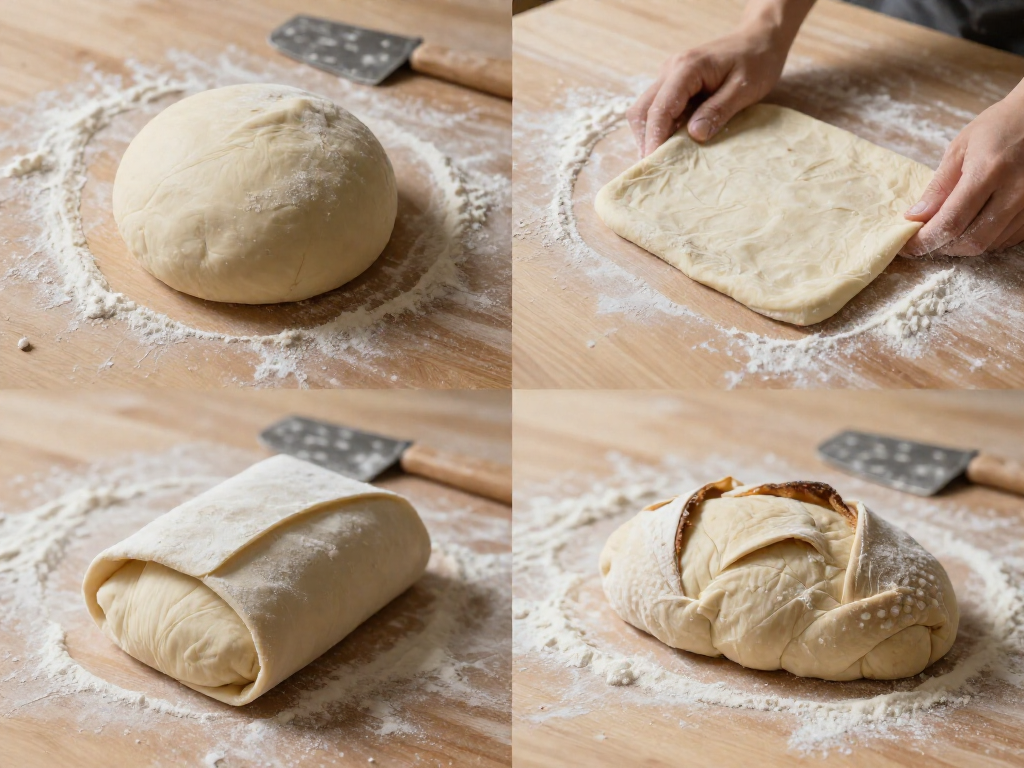
Start with a pre-shape. After bulk fermentation, turn your dough onto a lightly floured surface and gently shape it into a loose round—no need to de-gas aggressively. Let it rest, covered, for 20 to 30 minutes. This relaxation step is everything: it loosens the gluten network so you can shape without tearing, and skipping it often leads to a tight, fight-back dough (Sherwood Coffee). You’ll know it’s ready when the dough feels softer and spreads slightly.
Now choose your shape. For a boule: gather all four edges up into the center, pinch them together, then flip the dough seam-side down. Cup your hands around it and gently drag it toward you in small circles; you’ll feel the skin tighten. Stop when you see a smooth, taut surface—overdoing it can tear the skin. For a batard: pat the dough into a rectangle, fold the top third down and the bottom third up like a letter, then roll it tightly from the top edge, sealing the seam with your fingertips. Tuck in the ends and use the edge of your pinkies to create tension along the length as you roll it back and forth.
Place the shaped dough seam-side up in a floured banneton or bowl lined with a tea towel. This position keeps the smooth side protected and under tension during the final proof. When you invert it onto parchment to bake, the taut skin is on top, ready to score and expand.
If shaping still feels slippery or frustrating, lower your dough’s hydration to 70–75%—a slightly stiffer dough holds its shape with less handling and often produces dramatic oven spring. Remember, a gentle touch yields an open crumb; aggressive handling degasses the dough and closes the crumb. Take your time, trust the rest, and let the dough’s responsiveness guide your hands.
Common Shaping Mistakes and How to Fix Them
Even experienced bakers slip up with these common shaping errors. Spot them early, and your loaves will lift higher and open more evenly.
Skipping the bench rest is a classic misstep. After pre-shaping, the dough needs time to relax so gluten doesn’t fight you during final shaping. As Sherwood Coffee notes, a 20–30 minute rest is essential—without it, the dough tears easily, undoing all that tension you want to build.
Floury hands make shaping a wrestling match. Lightly flour only the work surface, and keep your hands slightly tacky (damp, not wet). Good grip lets you drag the dough across the counter to tighten it, instead of just slipping around.
Overworking degasses the dough and shreds the gluten you’ve built. Once the surface feels taut and smooth, stop. Think of tucking a sheet snug, not stretching a balloon—pushing too hard tears the skin and costs you oven spring.
Inadequate tension leads to a flat, sack-like loaf. Use the drag method: on an unfloured patch of counter, cup the dough with both hands and pull it toward you in short, firm tucks while rotating. You’ll feel the skin tighten. That taught surface is what drives upward spring instead of sideways spread.
Sources
- How to produce an open crumb in sourdough bread | King Arthur Baking — kingarthurbaking.com
- Sourdough Bread: How Dough Shape and Size Influence Crumb — breadtopia.com
- How To Shape a Boule (Round) | The Perfect Loaf — theperfectloaf.com
- The Ultimate Guide to Shaping Bread Dough | The Perfect Loaf — theperfectloaf.com
- How to Shape Sourdough Bread (Build Tension for Better Oven Spring and Crumb) | Homemade Food Junkie — homemadefoodjunkie.com
- 10+ Tips for Better Sourdough Oven Spring - The Pantry Mama — pantrymama.com
- Surface tension | The Fresh Loaf — thefreshloaf.com
- Instagram (ashley_dxb) — instagram.com
- 10 tips for MASSIVE oven spring (in comments) : r/Sourdough — reddit.com
- Shaping the Dough: The Art of Structure and Consistency in Sourdough Baking — sherwood.coffee
See also
- Sourdough Scoring Techniques
- How to Achieve Open Crumb in Sourdough
- Beginner's Guide to Sourdough Hydration
- Common Sourdough Mistakes and Fixes
Related articles
Stop Aiming for 'Perfect': Redefining Sourdough Success as a Beginner
Should beginners lower their expectations for a perfect loaf?
Jul 28, 2026 · 4 min read
Sourdough Lingo You Don’t Need: Simple Words Instead of ‘Autolyse’ and ‘Crumb’
Why do sourdough bakers use so much jargon, and what simple substitutions can I use?
Jul 20, 2026 · 4 min read
The Beginner’s Guide to Sourdough Gluten Development: Why Stretch and Folds Work
How does gluten development work in sourdough, and why are stretch and folds so effective for beginners?
Jul 20, 2026 · 9 min read