Sourdough Starter Fasting: What to Do When You Go on Vacation
How do I prepare my sourdough starter for a multi-week absence and revive it smoothly?
On this page

Address the anxiety of leaving a starter untended; reassure that with this guide, your starter can survive your vacation and welcome you back with flour and bubbles.
Why Plan Ahead: Vacation Without Killing Your Starter
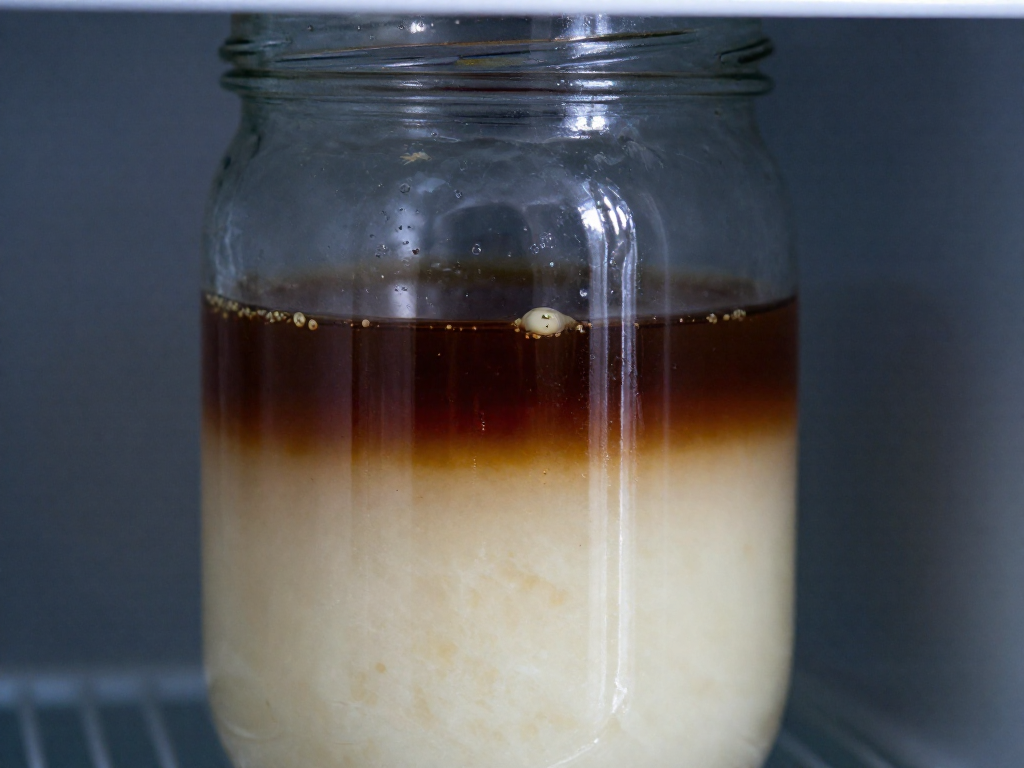
You don’t need to fear coming home to a dead starter. Sourdough is far tougher than most beginners believe, and with one simple routine before you leave, your culture will bounce right back. If your starter is mature (over six months of regular use), just seal the jar and tuck it into the fridge — no feeding required. A younger starter gets a little more care: feed it equal weights of flour and water, let it peak at room temperature, then refrigerate. For anything up to three weeks, that’s all; longer trips call for dehydration. When you return, the dark liquid on top (hooch) is normal — stir it in, discard most, and feed regularly; it perks back up in a few feedings. As Foodbod Sourdough puts it, "It will be perfectly fine and you do not need to take any special action."
Short Absence vs. Long Absence: Which Method to Choose
If you’re heading out for up to three weeks, just pop your starter in the fridge and forget about it. No special feeds, no stiffening—just a lid, a chill, and confidence. The Perfect Loaf has found that a starter can easily survive three weeks in the refrigerator without a feeding. For longer trips, though, you’ll want to either plan a fridge refresh around week two or, even better, dry your starter for shelf-stable storage that lasts months.
The age of your starter matters, too. A mature starter that’s been fed regularly for over six months is resilient: before your trip, you can literally just put the lid on and stick it in the fridge. No feeding required. A younger starter (less than six months old) needs a little more love. Give it a feed at its usual ratio, let it rise to its peak in a warm spot (around 70°F), then gently place it into the fridge. That peak-strength yeast will have more reserves to carry it through the cold sleep.
The Pre-Vacation Feed: Lock It In for the Fridge
The goal right before you leave is simple: put a well-fed, active starter into the fridge so it drifts off slowly, not starving. The exact steps depend a little on your starter’s age, but the core routine is the same, and you have one powerful trick that buys you extra time—reducing the hydration.
Start by discarding or setting aside all but a small amount of your starter. For a young starter (less than about 6 months old), the safest move is to feed it equal weights of flour and water—no math tricks. For example, if you keep 30g of starter, stir in 30g of room-temperature water and 30g of flour. Then place the jar in a spot around 70°F (a typical kitchen) and wait until it peaks—the top domes, and it has doubled or tripled. Only then do you put it in the fridge, loosely covered so gases can escape without drying it out.
If your starter is older and you’re short on time, you can skip the wait: feed it, let it sit at room temperature for just one hour, then seal and refrigerate. This still gives the yeast a quick wake-up before the cold slows everything down.
But here’s the real longevity trick: stiffen the starter by using less water. A classic 100% hydration starter (equal flour and water) works, but a thicker, lower-hydration starter ferments more slowly and stays dormant longer. Cut the water by about 20%. So if you’d normally add 100g of water to 100g of flour, use just 80g. Maurizio Leo at The Perfect Loaf recommends this as a simple way to stretch your fridge window. The mixture will be pasty rather than pancake-batter consistency—that’s perfect.
An often-overlooked detail is the jar. Use a container that’s large enough to hold triple the starter’s volume, because even in the cold there can be some expansion. A lid that isn’t airtight prevents pressure build-up, but make sure it fits securely enough to keep the fridge smells out. A wide-mouth glass jar with a piece of plastic wrap loosely on top, then the ring (not tightened), works nicely.
Once you close that fridge door, your starter is locked in for weeks. When you return, you’ll wake it up with a couple of feedings, but for now, you’ve done the heavy lifting—literally, by reducing the water.
What to Expect When You Open the Fridge After Vacation
When you pull your starter from the fridge, it's likely separated into a gray liquid layer (hooch) and a thin, liquidy batter. That's a sign of hunger, not failure. Smells of vinegar, nail polish remover, or sharp tang are normal. Only a moldy, musty, or rotting odor means it's time to discard. The texture should be thin and liquid—Crave the Good notes that a thick or chunky consistency is a warning to start over. The darker and more voluminous the hooch, the more feedings your starter will need to fully revive, but in almost all cases, it's salvageable.
Step-by-Step: Reviving Your Sleeping Starter
Reviving a cold, neglected starter is simpler than it looks—it's mostly about small feedings, patience, and a warm spot. Plan on two to four 12‑hour feeding cycles to bring it back to full strength.
Take it out and warm it up. Remove the jar from the fridge and let it sit at room temperature for about an hour—this lets the cold starter relax and makes it easier to work with (The Perfect Loaf). You'll probably see a layer of dark liquid (hooch) on top; stir it back in or pour it off—both work.
Scoop and discard. Take a small amount of the warmed starter—anywhere from 20 g (about 1 tablespoon) for a quick refresh, up to 50 g (about 3 tablespoons) if you're in a hurry—and transfer it to a clean jar. A teaspoon (roughly 6 g) is enough when you're patient and want to minimize waste. Discard the rest of the old starter; using too much carryover can slow things down.
First feeding: equal parts, ideally whole wheat. Feed the starter with an equal weight of fresh flour and water. Equal parts by weight, not volume. For a liquid starter, use a 1:1:1 ratio (e.g., 30 g starter, 30 g water, 30 g flour). If your starter is stiffer, go with 1:2:2 or even 1:3:3 to give it more food and time. Whole wheat flour or a blend of whole wheat and white flour works best here—the extra micronutrients wake up the yeast and bacteria faster.
Warmth and time. Stir everything together until no dry flour remains, loosely cover the jar (lid not tight), and let it ferment at a warm room temperature—ideally 75–80 °F (24–27 °C). If your kitchen is cool, place the jar in an oven with the light on, on top of the fridge, or use a proofing box. Let it sit for about 12 hours. You're looking for it to double in volume, with a domed, bubbly top and a pleasant, slightly vinegary smell.
Repeat until it doubles reliably. After the first 12‑hour cycle, discard all but a small portion again and feed once more. Repeat this discard‑and‑feed loop. Most dormant starters bounce back after 2 to 4 of these cycles. You know it's ready when it consistently doubles within 4–6 hours of feeding and passes the float test (a spoonful of starter floats in water).
Scale up for baking and store the rest. Once revived, you can build up the quantity you need for a recipe by feeding without discarding, or by using a larger base. After you've taken what you need for baking, feed the remaining starter immediately and pop it back in the fridge—the cold will slow fermentation, and you can wake it up again next time you bake.
When to Walk Away: Spoilage Signs That Mean Toss
After a long fridge nap, your starter might look weird, smell strong, or separate. Most of that is normal—gray hooch, a sharp vinegar tang, even a nail-polish-remover scent are all signs of a hungry but healthy culture. But there are a few deal-breakers that mean you should toss it and start fresh, no guilt attached.
Pink or orange streaks are the biggest red flag. These aren't harmless yeasts; they signal bacterial contamination that can make you sick. Fuzzy mold (green, black, or white fur) is another instant discard. And if the smell hits you as rotten, musty, or like decay—not just intensely sour—don't try to save it.
Texture matters, too. A starter that's been neglected for weeks should look thin and liquid once stirred. If it's thick, chunky, or has a curdled consistency, it's past the point of safe revival (Crave the Good).
The one exception: if you see just a bit of surface mold floating on top of the hooch and the rest of the starter looks clean, you can attempt a rescue. Carefully scrape off the top layer and all the hooch, then scoop from the very bottom of the jar to feed a new batch. But if there's any hint of pink mixed in, or the mold has spread into the starter itself, the whole jar is compromised. Trust your eyes and nose—when in doubt, throw it out.
Sources
- How To Store a Sourdough Starter in the Fridge for Vacation | The Perfect Loaf — theperfectloaf.com
- How to Leave Your Sourdough Starter so You can take a Vacation! — youtube.com
- How to Store a Sourdough Starter (Without Feeding It) | The Perfect Loaf — theperfectloaf.com
- How To Revive Your Starter after Months in the Fridge — youtube.com
- How To Revive Your Sourdough Starter After Months Of Neglect — youtube.com
- Reviving A Sourdough Starter — sourdoughhome.com
- Reviving Sourdough Starter {Even If It's Been Months} - Crave The Good — cravethegood.com
- 21 Common Sourdough Starter Problems with Solutions — theperfectloaf.com
- How to store sourdough starter | King Arthur Baking — kingarthurbaking.com
- How to look after your starter - Foodbod Sourdough — foodbodsourdough.com
FAQ
Can I freeze my sourdough starter instead?
Yes, freezing is a solid option. To revive it, simply thaw the starter at room temperature, then feed it equal parts starter, flour, and water. For very long breaks, drying your starter might be even more reliable—The Perfect Loaf notes that dried starter can last over two years in a pantry.
How long can my starter really sit in the fridge without feeding?
A healthy starter can usually go 2–4 weeks in the fridge without a feeding, though mature starters have survived months. The Perfect Loaf finds that three weeks is typical, while many home bakers report their starters bouncing back after being left for much longer. If possible, aim to feed it weekly to keep it vigorous.
What if I only have all-purpose flour for revival?
All-purpose flour works just fine to revive your starter. It might need a couple more feedings to reach full strength compared to whole wheat flour, which is richer in micronutrients. Stick with regular feedings, and it’ll bounce back.
How do I know if my starter is actually dead?
Your starter is almost certainly alive unless you see pink or orange streaks, fuzzy mold, or it smells rotten or putrid. A dark layer of liquid (hooch), a thin and liquidy texture, and tangy or nail-polish-remover smells are all normal signs of a hungry starter that just needs to be fed.
Can I use the hooch or should I pour it off?
Hooch is harmless, so the choice is yours. Stirring it back in gives your starter a tangier flavor, while pouring it off can mellow the acidity. Many bakers pour it off before feeding to keep the flavor balanced.
How many feedings until it’s ready to bake again?
Plan on 2–4 feedings, spaced about every 12 hours, until your starter reliably doubles in volume within 2–6 hours after a meal. Foodbod recommends looking for that consistent doubling as your green light—once it happens, your starter is strong enough to leaven dough.
See also
- sourdough starter troubleshooting guide
- how to create a sourdough starter from scratch
- easy beginner sourdough bread recipe
- how to maintain a sourdough starter
Related articles
Why a Rye Starter Might Be Your Best Beginner Sourdough Hack
Is a rye sourdough starter easier for beginners? Yes! Learn why rye flour ferments faster, is more forgiving, and how to create your own 100% rye starter with step-by-step instructions, plus tips for using it in any recipe.
Jul 28, 2026 · 8 min read

The Emotional Side of Sourdough: Dealing with Starter Anxiety and Failure
How do I cope with the stress and disappointment when my sourdough starter fails or seems to die?
Jul 20, 2026 · 7 min read

Can You Make a Sourdough Starter Without Discarding Flour?
Tired of throwing flour away? Learn whether you can make a sourdough starter without discarding, plus a low-waste method that actually works for beginners.
Jun 29, 2026 · 5 min read