How to Revive a Neglected or Dead-Looking Sourdough Starter
Can I save my starter that hasn't been fed in weeks?
On this page
Open by reassuring the panicked reader: a starter that looks "dead"—gray, liquid-topped, sour-smelling, or untouched for weeks—is almost always alive and salvageable. Promise a clear, no-jargon rescue protocol and the honest signs of when to give up, so they stop guessing and feeling intimidated.
Is My Starter Actually Dead? (Probably Not)
Short answer: yes, you can almost certainly save it. A starter that hasn't been fed in weeks—even months—is usually dormant, not dead. The wild yeast and bacteria that make your bread rise simply go to sleep when they run out of food. Feed them, and they wake back up.
Before you toss anything, check what you're actually looking at.
Scary but totally normal
These signs alarm beginners constantly, and none of them mean death:
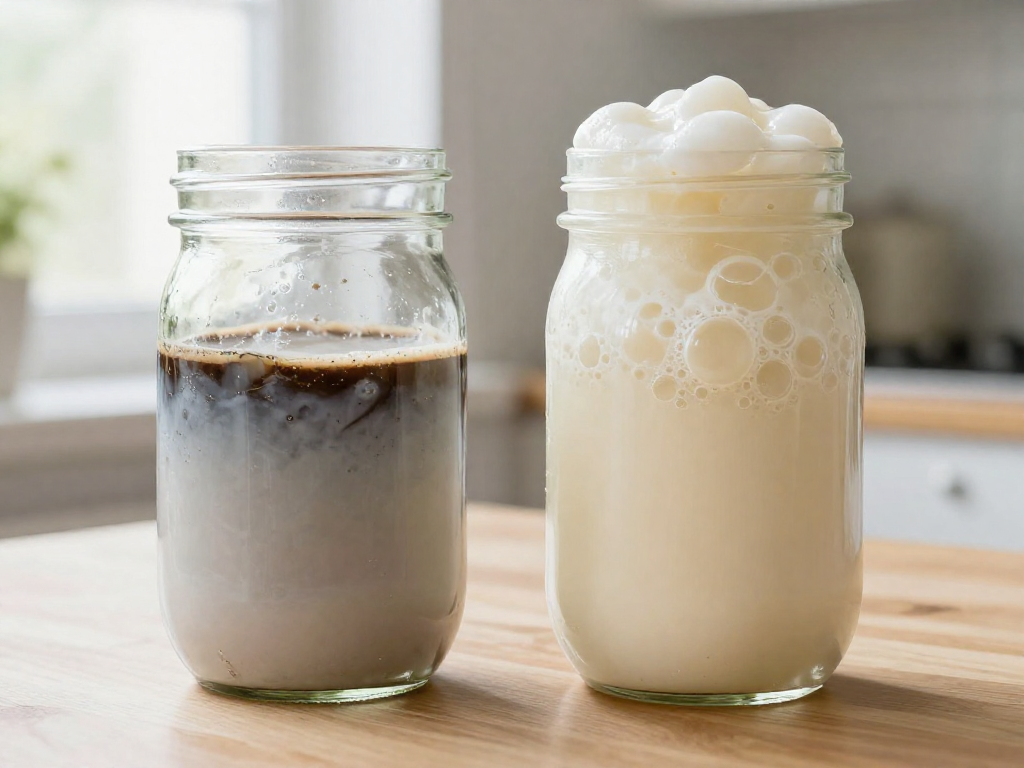
- A layer of dark liquid on top. This is called hooch—alcohol the yeast produces when it's hungry. Gray, brown, or even black hooch is normal. Just pour it off (or stir it in for a more sour flavor).
- Gray or dull color. Color changes from dormancy are cosmetic.
- A sharp, sour, or nail-polish (acetone) smell. A hungry starter smells strongly acidic or boozy. Unpleasant, but expected.
- No bubbles and no rise. A dormant starter looks flat and lifeless. Bubbles return after a feeding or two.
What true failure actually looks like
Real trouble is rare and usually obvious:
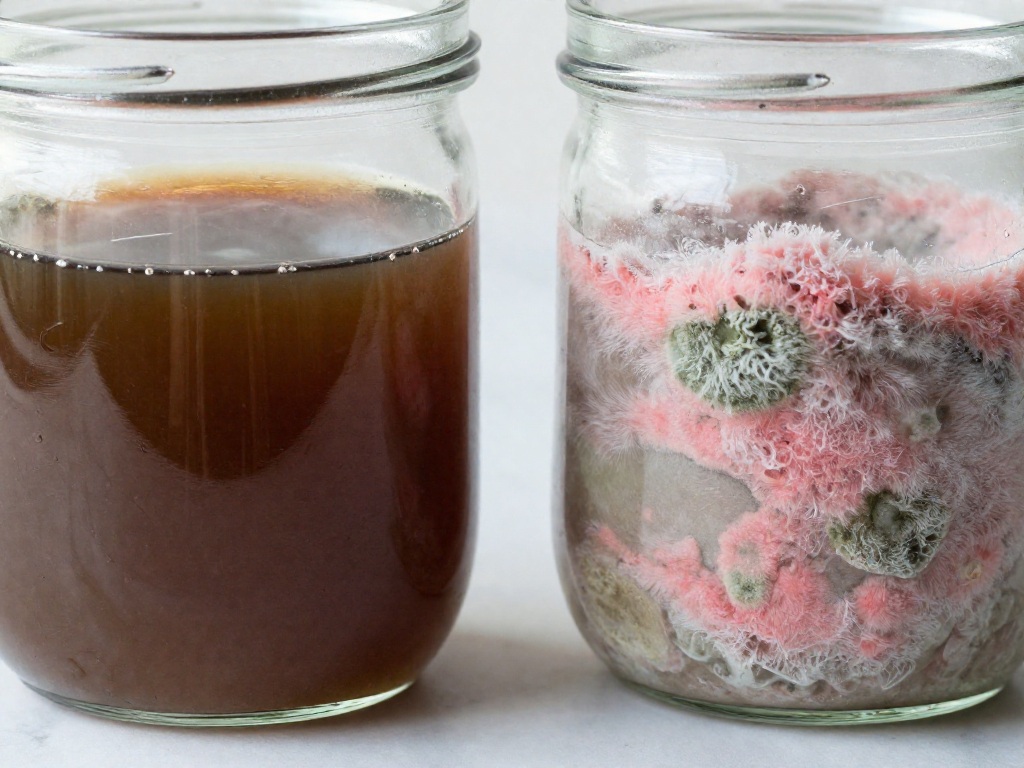
- Fuzzy mold—pink, orange, black, or green spots, often raised and fuzzy. This is the one clear "throw it out" sign.
- A truly rotten smell (think garbage or rotten food, not just sour).
Hooch and a sour smell are not mold. If all you see is dark liquid, a funky aroma, and a sad, flat appearance, you have a sleeping starter—not a dead one.
In the next section, we'll wake it up with a simple feeding schedule.
Signs Your Starter Is Salvageable vs. Truly Dead
Quick answer: If your starter only has liquid on top, a sour or boozy smell, and separation, it's almost certainly salvageable—even after weeks. The only deal-breaker is actual mold.
Salvageable (keep it and revive)
Look for these reassuring signs:
- Hooch — a layer of gray, brown, or clear liquid sitting on top. Hooch is just the alcohol and water your starter releases when it runs out of food. It's harmless. Stir it back in or pour it off.
- A sour, tangy, or sharp "nail polish" smell — strong but clean. This means the yeast and bacteria are hungry, not gone.
- Separation or a dry, crusty top layer — purely cosmetic. Scrape off any hardened crust and use what's underneath.
- No bubbles or rise right now — total inactivity is normal after neglect. Dormant is not dead; a few feedings usually wake it up.
Truly dead or unsafe (discard and start fresh)
Throw it out—no exceptions—if you see:
- Fuzzy mold in pink, orange, black, or green. Fuzz means mold spores, not flour.
- Streaks or spots of color running through the starter, especially pink or orange.
- A slimy, stringy, or ropey texture when you stir it.
Mold and hooch are easy to tell apart: hooch is a flat layer of liquid, while mold is raised, fuzzy, and colored. When in doubt, look for fuzz—liquid alone is never a reason to panic.
When to just start over
Even with no mold, start fresh if the smell is genuinely rotten (like garbage or rancid cheese), or if two to three days of feeding produces zero bubbles or rise. Starters are cheap to rebuild, and a fresh one is faster than fighting a stubborn jar. Results vary by kitchen temperature and flour, so give a clean starter a few warm days before giving up.
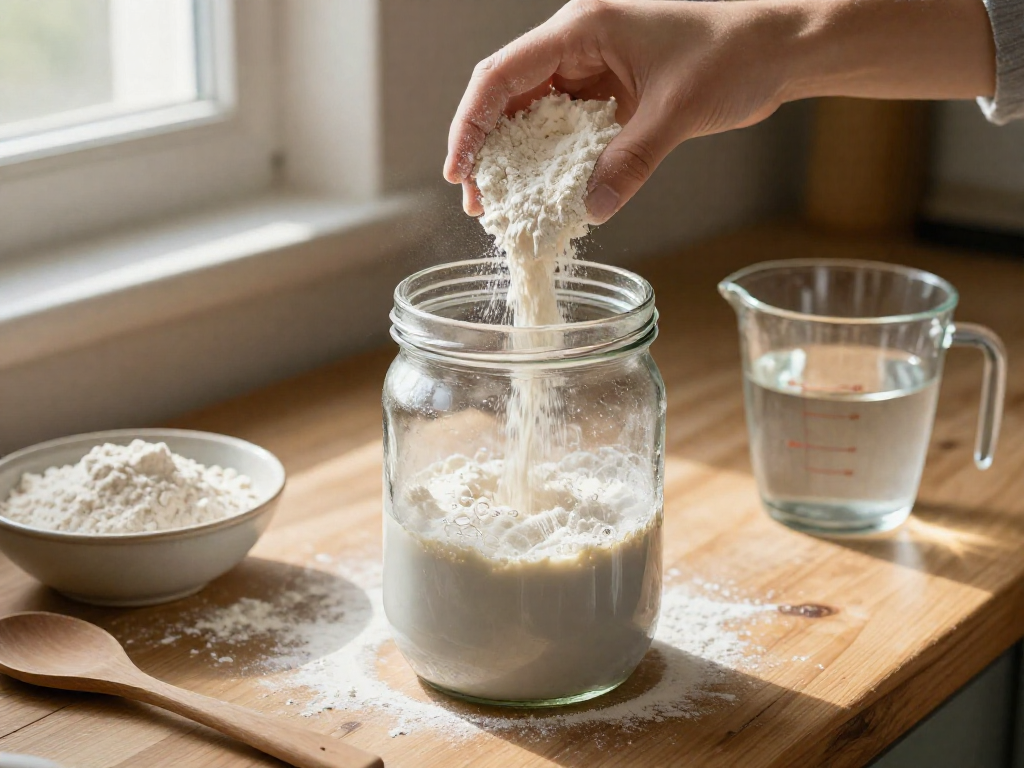
What You'll Need Before You Start
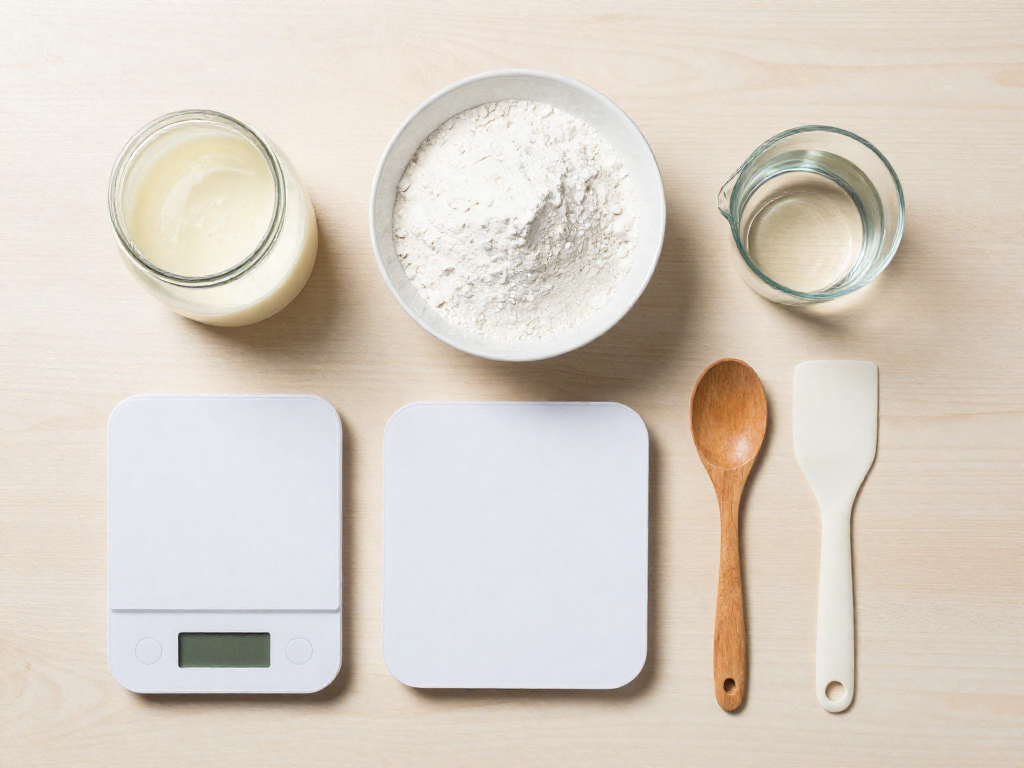
Good news: reviving a starter takes almost nothing you don't already have. Gather these before you begin:
- A clean jar — any glass jar that holds at least 2 cups works.
- Flour — unbleached all-purpose or whole wheat. Whole wheat tends to wake a sluggish starter faster because it carries more wild yeast.
- Water — filtered or room-temperature tap water (around 70°F). If your tap water is heavily chlorinated, let it sit out uncovered for 30 minutes first.
- A kitchen scale (recommended) — measuring in grams is far more reliable than cups. No scale? Measuring cups will do.
- A warm spot — aim for 70–78°F (an oven with the light on, or on top of the fridge).
- Patience — revival usually takes 3–7 days, not minutes. Results vary by kitchen and climate, so don't panic if yours is slow.
The Step-by-Step Starter Rescue Protocol
Yes, you can almost always save a neglected starter. Follow this exact routine and watch for the cues at each stage. Most starters bounce back in 3–7 days.
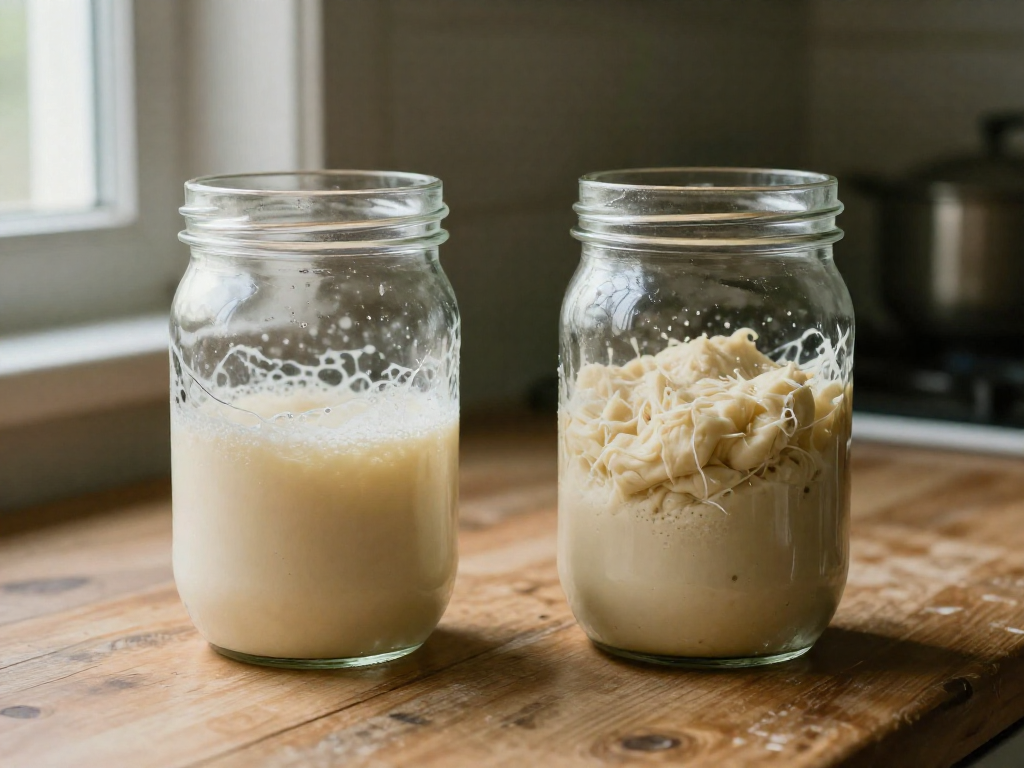
Step 1: Pour off the liquid and skin
Tip off any dark liquid sitting on top. That liquid is hooch — alcohol the yeast produces when it runs out of food. It's harmless, just a sign of hunger. Also scrape away any gray, dry, or crusty top layer. If you see flat pink, orange, or fuzzy mold, throw the whole thing out and start fresh — that's the rare case of a truly dead starter.
Step 2: Save just a spoonful
Scoop about 1 tablespoon (15 g) of the starter from the middle of the jar into a clean jar. Discard the rest.
Why discard so much? The old starter is loaded with acid and waste that slow down the yeast. By keeping only a tiny bit and surrounding it with fresh flour and water, you dilute the acid and give the microbes a clean, food-rich environment. Less old starter actually means faster recovery.
Step 3: Feed it 1:1:1 by weight
Feed equal weights of starter, flour, and water:
| Ingredient | Weight | Approx. cups |
|---|---|---|
| Starter | 15 g | 1 tbsp |
| Flour | 15 g | 2 tbsp |
| Water (lukewarm, ~26°C/78°F) | 15 g | 1 tbsp |
This 1:1:1 ratio means hydration of 100% — equal weights of flour and water, giving a thick-batter texture. A kitchen scale is strongly recommended; cup measures vary too much for a struggling starter.
Speed boost: swap the flour for whole wheat or rye for the first few feedings. Whole grains carry more wild yeast and minerals, so a weak starter often wakes up faster on them. Switch back to white flour once it's active.
Stir well, scrape down the sides, and loosely cover (don't seal — gases need to escape).
Step 4: Keep it warm and feed on schedule
Yeast loves warmth. Aim for 24–28°C (75–82°F) — on top of the fridge, in an oven with just the light on, or near (not on) a warm appliance. Feed every 12–24 hours, repeating Steps 2–3 each time. In cooler kitchens, every 24 hours is fine; in warm ones, every 12.
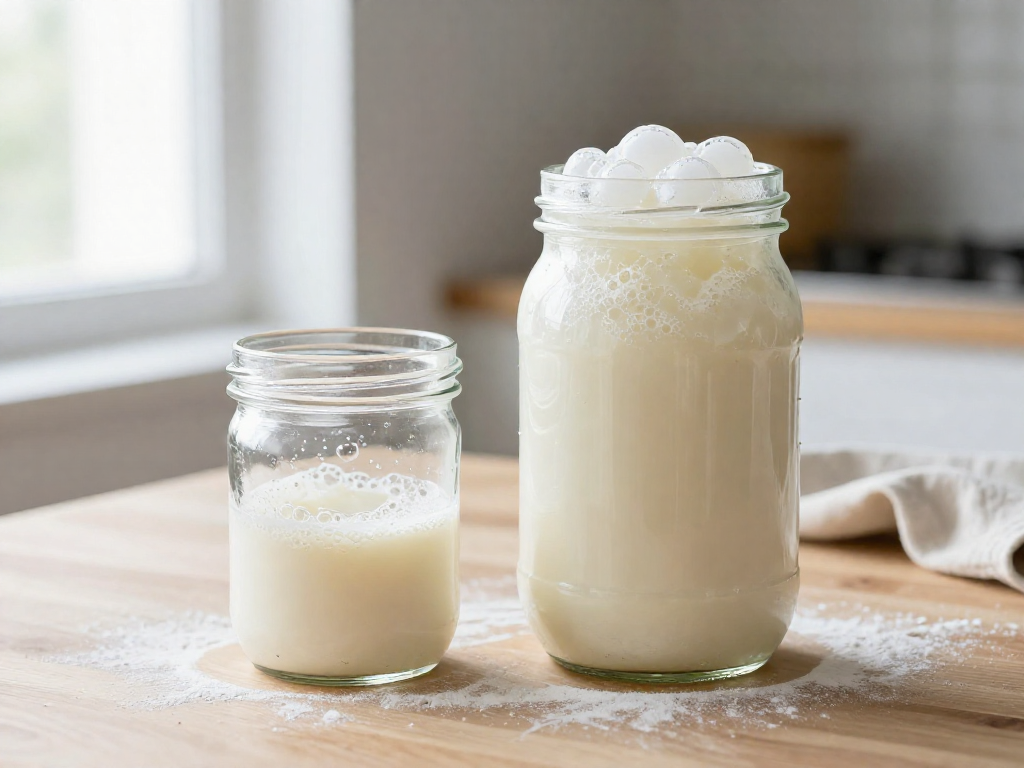
Step 5: Watch for signs of life
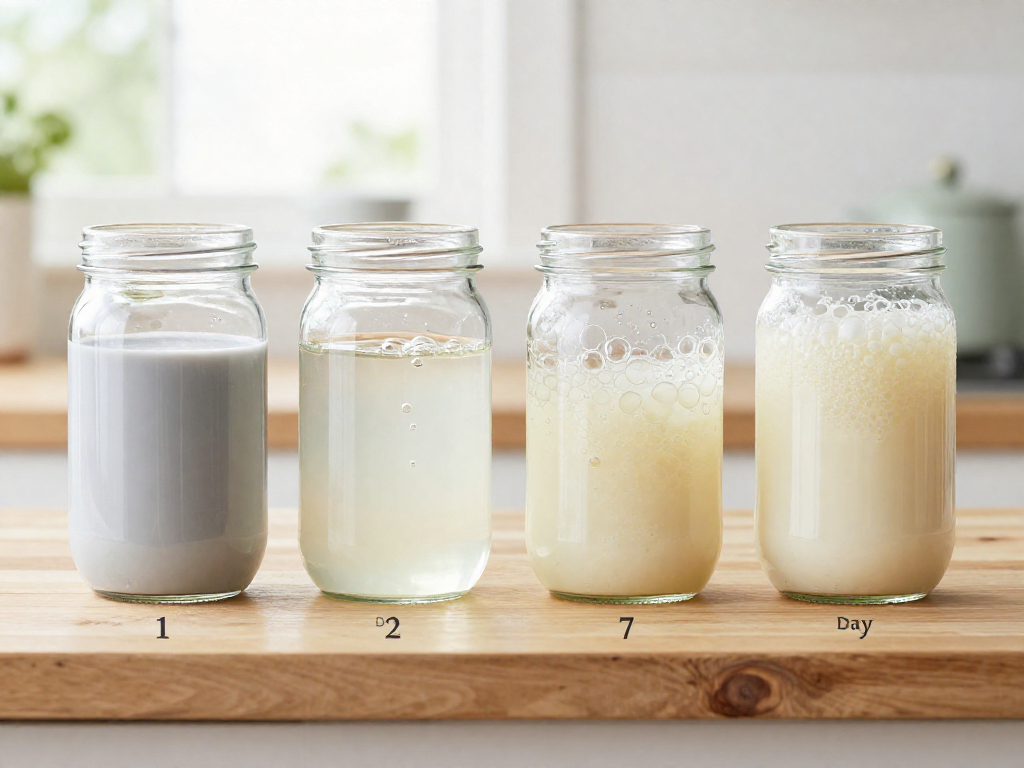
Over the next 3–7 days, look for:
- Day 1–2: a few bubbles, possibly a sharp or "nail polish" smell. Normal — keep feeding.
- Day 3–5: more bubbles, slight rise, smell turning sour and yeasty.
- Day 5–7: the starter doubles within 4–8 hours of feeding and smells pleasantly tangy, like yogurt. That's ready-to-bake.
Results vary by kitchen temperature and flour, so don't panic if yours is slower. Steady bubbling and a doubling rise are your green lights.
How to Know It's Fully Revived and Ready to Bake
Before you bake, your starter needs to prove it's strong enough to lift a whole loaf. Baking too early is the #1 cause of dense, gummy bread after a rescue. Look for all of these signs, not just one:
- It doubles in size within 4–8 hours of feeding. Wrap a rubber band around the jar at feeding time so you can see exactly how high it climbs. Doubling reliably (not just once) is the most important sign.
- It's full of bubbles with a domed, fluffy top. You want bubbles throughout, big and small, and a slightly puffed surface—not a flat, soupy layer.
- It passes the float test. Drop a small spoonful into a glass of room-temperature water. If it floats, it's full of gas and ready. If it sinks, give it more time and more feedings. (Note: the float test isn't perfect, so trust the doubling and bubbles more.)
- It smells tangy and yeasty, like beer, yogurt, or ripe fruit—pleasantly sour. A harsh nail-polish or sharp acetone smell means it needs another feeding or two.
One last step: even once it hits these marks, give it 1–2 extra strong feedings before baking. Feed it a 1:1:1 ratio (for example, 50g starter + 50g flour + 50g water) and let it peak each time. This builds the yeast population up so your first loaf back has real rising power.
If it's doubling, bubbly, tangy, and floating, you're ready to bake.
Troubleshooting: Still No Activity After a Week?
If your starter still looks flat and lifeless after seven days of feeding, don't toss it yet. Wild yeast is just slow to wake up. Work through these fixes in order—change one thing at a time so you can tell what's working.
1. It's too cold. Wild yeast thrives at about 75–82°F (24–28°C). Below that, fermentation crawls. Move the jar somewhere warmer: inside an oven with just the light on, on top of the fridge, or near a warm appliance. A 5–10°F bump often kickstarts visible bubbles within a day.
2. Switch to whole grain flour. All-purpose flour has fewer of the wild yeasts and bacteria your starter needs. For the next few feedings, use 100% whole wheat or rye flour—both are loaded with wild yeast and minerals. Once it's active, you can transition back to white flour.
3. Feed twice a day. Instead of once daily, feed every 12 hours using equal parts (by weight) starter, flour, and water—for example, 50g starter, 50g flour, 50g water. More frequent food gives the yeast steady fuel.
4. Check your water. Chlorine in tap water can suppress yeast. Use filtered or bottled water, or leave tap water out uncovered overnight so the chlorine evaporates.
When to start over: If you've tried all four fixes for another full week and see zero bubbles, no rise, and a sour or rotten smell that never improves, it's likely beyond saving. Starting fresh from new flour and water is faster than fighting a dead jar—and you'll apply everything you just learned.
How to Prevent a Neglected Starter Next Time
Now that your starter is back, here's how to keep it healthy with almost no effort:
- Store it in the fridge. Cold slows everything down, so you only need to feed a refrigerated starter about once a week (mix in equal weights of flour and water, e.g. 50g flour + 50g water + 50g starter). No baking this week? It can safely wait.
- Dry a backup as insurance. Smear a thin layer of active starter on parchment, let it dry completely, then crumble it into a jar. If your main starter ever fails, you can rehydrate this backup and start over.
- Set a simple feeding reminder. A weekly phone alarm labeled "feed starter" removes all the guesswork and panic.
- Trust that it's tougher than it looks. Sourdough starters have survived decades of neglect. A few missed feedings rarely kills them—so relax and bake when you're ready.
FAQ
Can I save a sourdough starter that hasn't been fed in weeks?
Usually, yes. As long as there's no fuzzy or colored mold, most neglected starters can be revived. Pour off any dark liquid on top, scoop out 1 tablespoon (about 15g) of starter from the middle, and discard the rest. Feed that small amount with 50g (about 1/4 cup plus 1 tablespoon) flour and 50g (about 3 tablespoons plus 1 teaspoon) lukewarm water, then leave it at warm room temperature (around 75°F/24°C). Repeat once or twice a day. You're looking for the sensory cue of bubbles and a mild, yeasty-sour smell returning within a few days.
How long can a sourdough starter survive without feeding?
It depends on storage. In the fridge, a starter can typically go 2–3 weeks between feedings without trouble, and many survive several months in a dormant state. At room temperature it gets hungry much faster, often within 12–24 hours. Even starters left untouched for months can frequently be brought back, because the wild yeast and bacteria form a resilient, semi-dormant community. The visual cue that it's overdue is dark liquid on top and little to no bubbling. Results vary by your flour, temperature, and how strong the starter was originally.
Is the liquid on top of my starter bad?
No, that liquid is harmless. It's called hooch—a thin layer of alcohol and water the starter releases when it has run out of food. It signals your starter is hungry, not dead. You can either pour it off (for a milder, less sour flavor) or stir it back in (for a tangier loaf), then feed as usual. The visual cue to recognize: hooch is a smooth, flat liquid that ranges from clear to gray, light brown, or nearly black, sitting on top of the starter.
How do I tell the difference between hooch and mold?
Hooch is a smooth liquid; mold is fuzzy and solid. Hooch sits flat on top and looks clear, gray, brown, or black, with a sharp alcohol smell—this is safe. Mold appears as raised fuzzy or powdery spots in pink, orange, green, blue, or black, often with a fuzzy or dusty texture, and may smell rotten or cheesy. Pink or orange streaks are an especially clear danger sign. The rule: liquid = fine, fuzz = throw it out. If you see actual mold, discard the entire starter and the jar's contents rather than trying to save it.
How many days does it take to revive a starter?
Most starters show signs of life within 2–5 days of consistent feeding. A typical pattern: Day 1–2 you feed once or twice daily and may see little activity; Day 3–4 small bubbles and a fresh sour smell appear; Day 5–7 it should be doubling in size within 4–8 hours of feeding, the cue that it's strong enough to bake with. Keep it warm (around 75°F/24°C) to speed things up. Long-neglected or refrigerated starters may take a week or more, and progress varies with your kitchen's temperature and flour.
Should I throw out my starter if it smells like nail polish or alcohol?
No—that smell is fixable, not fatal. A nail polish (acetone) or strong alcohol smell means your starter is very hungry and overly acidic from going too long without food. It's still alive. To fix it, do a few back-to-back feedings: discard all but 1 tablespoon (about 15g), feed with 50g flour and 50g lukewarm water, and repeat every 12 hours for 2–3 days. The sensory cue you want is the smell shifting from harsh acetone to a pleasant, mild tang like yogurt or sourdough. Only discard if you see actual fuzzy mold or pink/orange streaks.
See also
- How to Make a Sourdough Starter from Scratch
- How Often Should You Feed a Sourdough Starter
- Sourdough Starter Float Test Explained
- Why Is My Sourdough Loaf Dense or Gummy
- Best Flour for Feeding a Sourdough Starter
Related articles
The Emotional Side of Sourdough: Dealing with Starter Anxiety and Failure
How do I cope with the stress and disappointment when my sourdough starter fails or seems to die?
Jul 20, 2026 · 7 min read
Sourdough Starter Fasting: What to Do When You Go on Vacation
How do I prepare my sourdough starter for a multi-week absence and revive it smoothly?
Jul 20, 2026 · 9 min read
Can You Make a Sourdough Starter Without Discarding Flour?
Tired of throwing flour away? Learn whether you can make a sourdough starter without discarding, plus a low-waste method that actually works for beginners.
Jun 29, 2026 · 5 min read