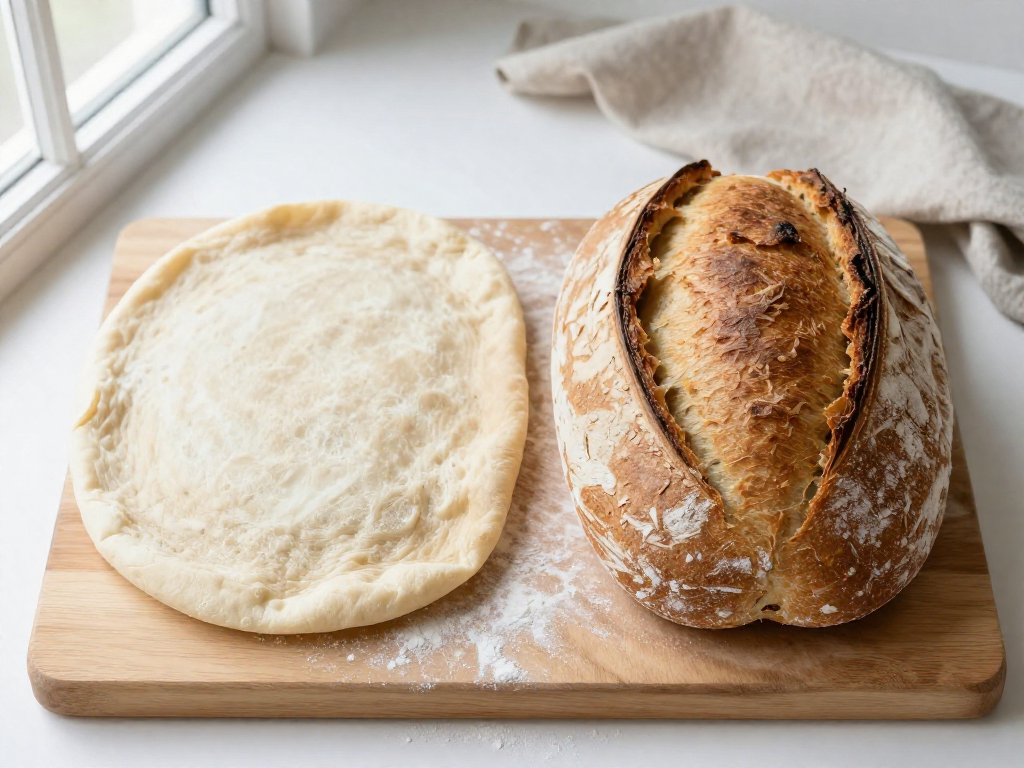
Why Is My Sourdough Flat and Spread Out?
Why won't my sourdough hold its shape and rise tall?
On this page
Quick Diagnosis: What a Flat Loaf Is Telling You
Before you change anything in your recipe, spend 30 seconds answering one question: when did your dough lose its shape? That single clue points you to the fix.
The 30-Second Checklist
- It spread on the counter (puddled before it ever hit the oven) → almost always over-proofing or weak gluten/shaping.
- It held its shape until I scored it, then deflated → likely over-proof (the gas escaped because the structure was too weak to hold it).
- It looked fine going in but spread flat in the oven → usually under-developed gluten or too-slack shaping, so there was no "skin" to push up.
- It rose tall but is gummy inside → likely under-baked or cut too early, not a shaping problem.
What these terms mean (read once):
- Proofing = the final rise after you shape the loaf.
- Over-proof = the dough fermented too long, ate through its strength, and can no longer trap gas.
- Gluten = the stretchy protein network that gives bread its structure and lets it hold a tall shape.
- Shaping = the step where you build surface tension so the dough holds a ball instead of a puddle.
Crumb Clues (What the Inside Tells You)
- Open holes + gummy, wet texture → over-proof and/or under-baked.
- Tight, dense, even crumb → under-proof or weak gluten development.
Symptom → Most Likely Cause
| What you see | Most likely cause | Where to fix it |
|---|---|---|
| Dough puddles on the counter | Over-proof | Shorten bulk ferment |
| Deflates when scored | Over-proof + weak structure | Proof less, build more tension |
| Spreads only in the oven | Weak gluten / loose shaping | More stretch-and-folds, tighter shape |
| Tall but gummy inside | Under-baked / cut too early | Bake longer, cool fully |
Find your row, then read the matching section below for the step-by-step fix. Results vary by kitchen temperature and flour, so use these as starting points, not guarantees.
Cause #1: Over-Proofing (The Most Common Culprit)
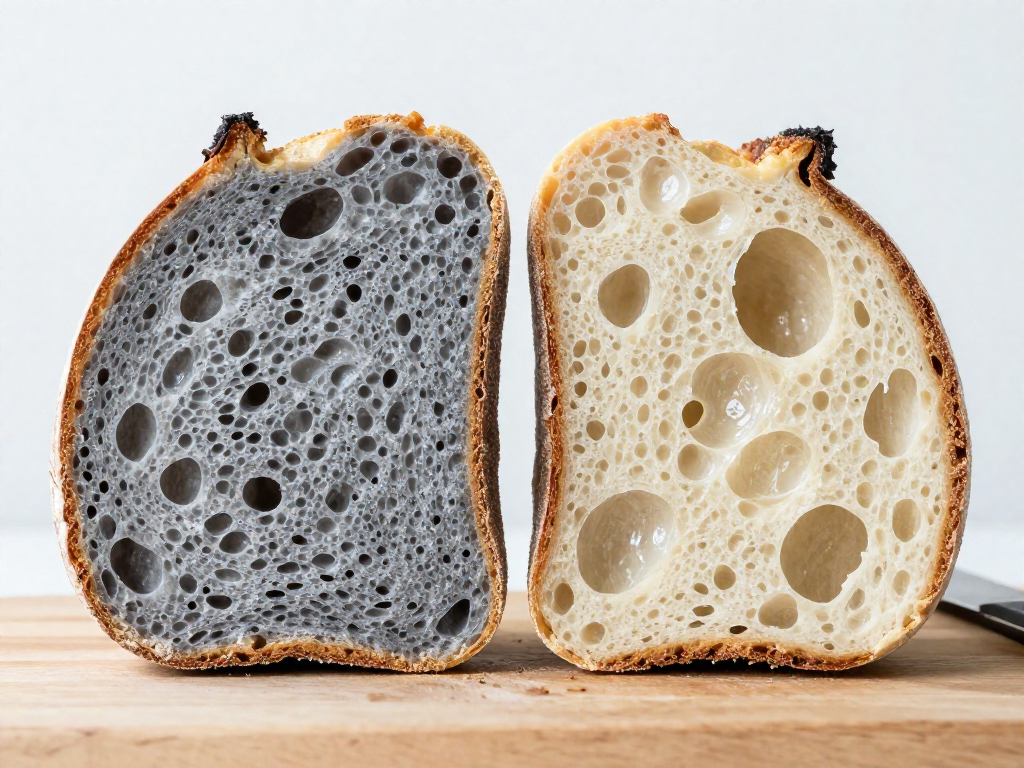
If your loaf baked flat with a wet, holey inside, over-proofing is the most likely reason. Over-proofing means the dough fermented too long—the wild yeast and bacteria in your starter ate through the dough's strength before it ever reached the oven.
How to Fix It (Do This Next Time)
- Cut your bulk ferment short. "Bulk ferment" is the first rise, after mixing and before shaping. Instead of going by the clock, stop when the dough has risen about 50% (not doubled) and looks puffy with a few bubbles on the surface.
- Keep the dough cooler. Aim for a dough temperature of 24–25°C (75–77°F). Warmer kitchens ferment much faster than beginners expect—at 28°C (82°F), bulk can finish hours sooner.
- Use a cold retard. After shaping, put the dough in the fridge for 12–16 hours. The "cold retard" slows fermentation, adds flavor, and makes the dough far easier to score and bake tall.
How to Tell It's Over-Proofed
- No oven spring — the loaf doesn't rise or burst open during baking.
- Very open, gummy crumb — large irregular holes with a wet, sticky texture inside.
- Batter-like dough — slack and soupy before baking, refusing to hold a round shape.
The Poke Test, Done Right
Lightly flour one finger and gently press about 1 cm (½ inch) into the dough, then watch:
- Springs back quickly → under-proofed, needs more time.
- Springs back slowly and leaves a small dent → ready to bake.
- Doesn't spring back at all, dent stays → over-proofed. Bake it now and shorten the next batch.
<details> <summary>Why this happens (optional theory)</summary>
Fermentation produces gas that the gluten (the stretchy protein network that traps air and gives bread structure) holds onto. Left too long, acids and enzymes break that network down. The gluten can no longer hold gas, so the dough collapses and spreads instead of rising tall. </details>
Results vary by flour, starter strength, and kitchen temperature, so treat these as starting points and watch the dough, not just the clock.
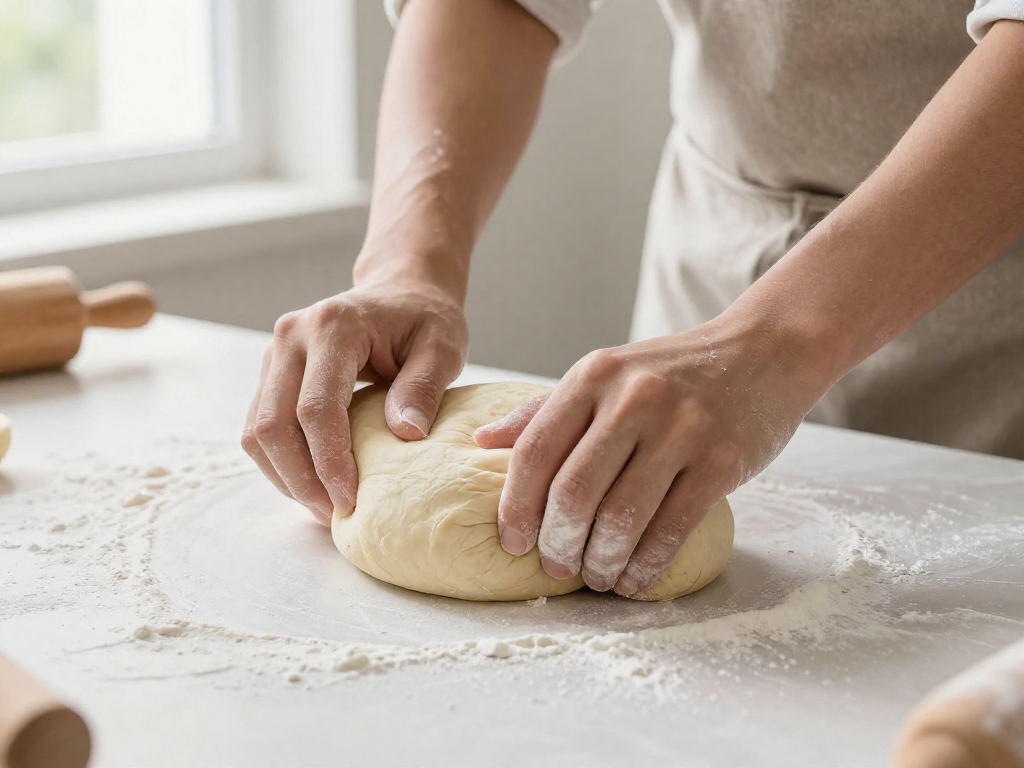
Cause #2: Weak or Underdeveloped Gluten
If your dough spreads into a puddle the moment it leaves the bowl or banneton (the proofing basket), weak gluten is a likely culprit. Here's how to fix it fast, then a short bit of theory if you want it.
Do this first
- Add more stretch-and-folds. During the first few hours of bulk ferment (the long rise after mixing, before shaping), grab one side of the dough, stretch it up, and fold it over the top. Rotate the bowl and repeat 4 times. Do one set every 30 minutes for the first 2 hours (4 sets total).
- Try an autolyse next bake. Autolyse just means mixing your flour and water only, then resting 30–60 minutes before adding salt and starter. This lets the flour hydrate and start building gluten on its own, with zero effort from you.
- Give it time. Cool kitchens (below ~70°F / 21°C) need a longer bulk ferment. Don't rush to shape.
The dough-strength (windowpane) check
Before shaping, pinch off a small piece of dough and slowly stretch it between your fingers.
- Strong enough: it stretches thin enough to see light through it without tearing. Good to shape.
- Too weak: it tears quickly into a ragged hole. Do 1–2 more folds, rest 30 minutes, and test again.
Why this works (optional)
Gluten is the stretchy protein network that forms when flour and water meet and get worked. Think of it as the scaffolding that traps fermentation gas and holds your loaf tall. Skip the folds or under-mix, and there's no scaffold, so the dough sags outward instead of up.
Note: Results vary by flour, kitchen temperature, and humidity, so use the windowpane test as your guide rather than a fixed number of folds.
Cause #3: Poor Shaping and Low Surface Tension
If your loaf rises in the oven but then slumps sideways into a pancake, weak shaping is often the reason. Shaping builds surface tension: the tight, drum-like "skin" you create on the outside of the dough. That skin acts like a corset, holding the dough upright while it proofs and bakes. Without it, the dough has nothing to push against and simply spreads out flat.
Fix it: the three-step shaping routine
1. Pre-shape (light round, 1 minute). After bulk fermentation (the first long rise where the whole dough ferments), tip the dough onto a lightly floured counter. Too much flour makes the dough slip instead of grip, which kills tension. Fold the edges into the center, then flip it seam-side down and gently nudge it into a loose ball.
2. Bench rest (20–30 minutes). Let it sit uncovered. The dough relaxes so the final shape doesn't tear. You'll know it's ready when it has spread slightly and feels soft but not soupy.
3. Final shape with a bench scraper. Flip the dough seam-side up, fold it into a tight package, then flip seam-side down again. Now the tightening pass: place your bench scraper against the far side of the dough, and drag the dough toward you across the counter in short pulls. The friction with the unfloured surface stretches the skin tight. After 4–6 pulls, the dough should feel taut and hold a rounded dome.
Common beginner shaping mistakes
- Too much bench flour — the dough slides and can't grip the counter to build tension.
- Skipping the pre-shape — you start the final shape with disorganized, slack dough.
- Over-handling — endless folding deflates gas and tears the skin; aim for confident, minimal moves.
A tightly shaped dough that still spreads usually points to over-proofing (Cause #1) — check that too. Results vary with your flour and kitchen temperature, so expect a few practice loaves before tension feels natural.
Cause #4: Hydration Too High for Your Skill Level
The quick fix: Drop your hydration to 65–70% until you can handle wetter dough confidently. Hydration just means how much water your dough holds compared to flour, written as a percentage of the flour's weight. So 70% hydration means 70g of water for every 100g of flour.
Why high hydration spreads. More water means a slacker, looser dough. Wet dough has less structure to hold itself up, so instead of standing tall it relaxes and oozes outward into a pancake — especially if your gluten and shaping aren't dialed in yet (see Causes #2 and #3).
Flour matters too. Bread flour (higher protein) absorbs more water and holds shape better than all-purpose flour. Whole wheat and rye drink up even more water. If you swapped flours, your old hydration number may now be too high for what's in the bowl.
Start here as a beginner:
| Flour (g) | Water at 68% (g) | In cups (approx.) |
|---|---|---|
| 500g bread flour | 340g | ~2 cups water |
How to dial water back without ruining the recipe:
- Reduce water by 15–25g at a time (about 1–1.5 tablespoons). Small changes only.
- Mix, then check the feel: the dough should be tacky but not soupy — it sticks slightly, then releases from your fingers.
- If it still spreads flat after baking, drop another 15g next time.
Once your loaves hold their shape consistently at 68%, you can creep up by 2–3% to chase a more open crumb. Climate matters — humid kitchens may need slightly less water, so trust the feel of the dough over the exact number.
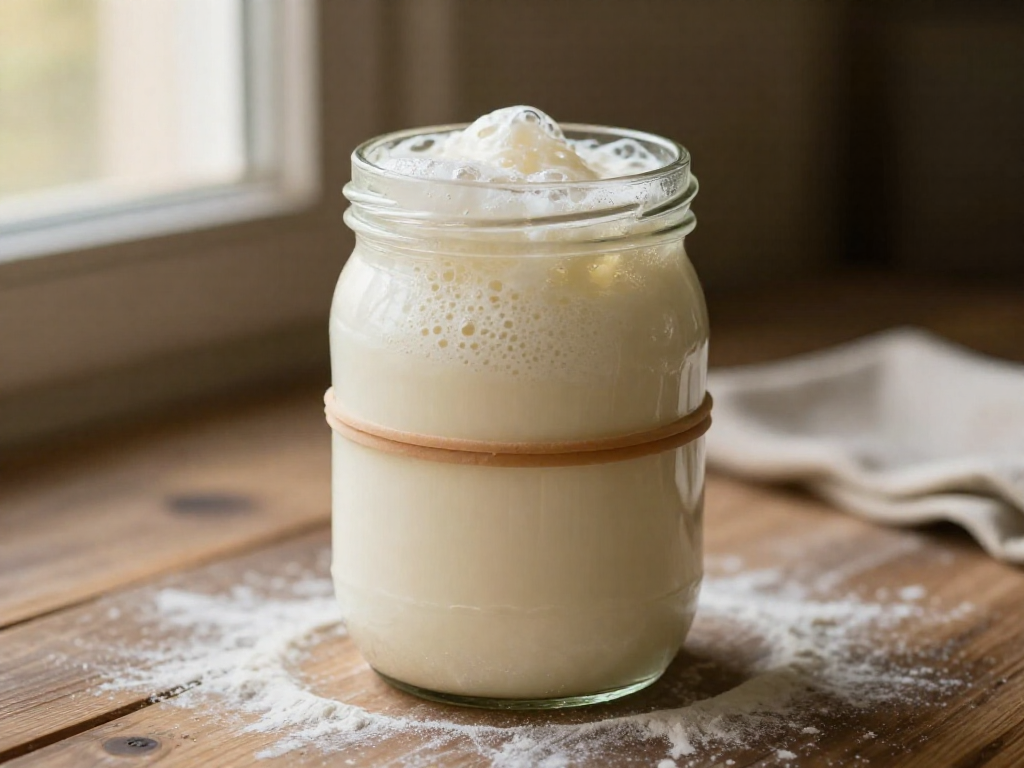
Cause #5: A Weak or Underfed Starter
If your starter is sluggish, your dough never gets enough lift to rise tall—it just slumps into a pancake. A weak starter produces little gas and weak structure, so the loaf spreads instead of holding its shape.
Quick checks before you mix:
- Float test. Drop a teaspoon of starter into a glass of room-temperature water. If it floats, it's full of gas and ready. If it sinks, give it more time or another feeding. (This test isn't perfect, but it's a fast first signal.)
- Rise-and-fall window. A healthy starter should roughly double in 4–8 hours after feeding, then slowly fall. Mix your dough when it's at or near the peak—domed and bubbly—not after it has collapsed.
Feeding ratio and timing. A reliable beginner feed is 1:5:5 by weight—for example, 20g starter, 100g flour, 100g water (about ¾ cup flour, ½ cup water). Feed 4–8 hours before mixing so it peaks right when you're ready.
How to revive a tired starter:
- Discard all but ~20g.
- Feed 1:5:5 once a day for 2–3 days, kept warm (75–80°F / 24–27°C).
- Watch for bubbles, a tangy-not-vinegary smell, and a consistent double.
Once your starter peaks predictably and passes the float test, you've removed a major cause of flat loaves.
Note: Timing varies with your kitchen's temperature—cold rooms mean a slower starter, so adjust by the cues above, not the clock.
Cause #6: Baking Setup—No Steam or Loose Confinement
Even a well-shaped loaf can spread into a pancake if your oven setup lets it sag before the crust sets. Here's how to fix it:
Use a Dutch oven (the #1 fix). A Dutch oven is a heavy lidded pot. Its tall walls physically contain the dough so it grows up instead of out, and the lid traps the steam your loaf releases. That steam keeps the crust soft for the first 20 minutes, letting the loaf expand fully—a burst of rising called oven spring. A bare flat baking sheet gives the dough nothing to push against, so it flattens and the surface dries too fast to rise.
Get the oven hot enough. Preheat to 230°C / 450°F with the Dutch oven inside for 30–45 minutes. A cool oven means slow, weak oven spring and more spreading.
Cold retard first. "Cold retard" means resting the shaped loaf in the fridge overnight (8–16 hours). The chilled, firmer dough is easier to score (slash) cleanly and holds its shape better when it hits the hot pot.
Results vary by oven and climate—watch your loaf, not just the clock.
Your Fix-It Action Plan for the Next Bake
You don't need to fix everything at once. Change only one variable per bake—otherwise you won't know what actually worked. Start at the top of this list and work down:
- Lower your hydration (hydration = the weight of water as a percentage of flour). Drop to 70% for an easier-to-handle dough.
- Shorten the bulk ferment (bulk ferment = the first long rise after mixing) by 30–60 minutes. Stop when the dough has grown about 50%, looks domed, and jiggles slightly.
- Tighten your shaping so the surface feels taut, like a balloon skin.
Beginner-Safe Reset Recipe
A forgiving baseline to rebuild your confidence:
- Bread flour: 500 g (about 4 cups)
- Water: 350 g / 350 ml (about 1½ cups), 70% hydration
- Active starter: 100 g (about ½ cup)
- Salt: 10 g (about 1¾ tsp)
Timing: Mix and rest 30 min → bulk ferment 4–6 hrs at room temp with 3 sets of stretch-and-folds in the first 2 hrs → shape → cold proof in the fridge overnight (12–16 hrs) → bake.
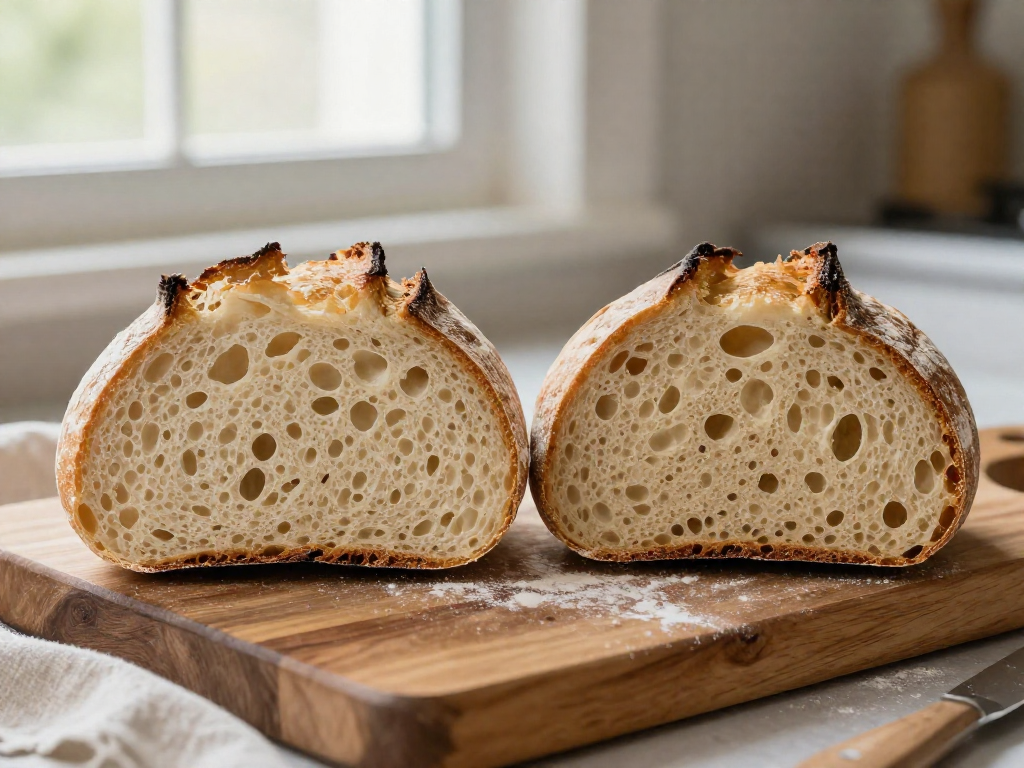
What Success Looks Like
A round dough that holds a dome when tipped from the basket, an "ear" where you scored it, and an open, springy crumb—not a flat disc. Results vary by kitchen temperature and flour, so use the visual cues over the clock.
Bake As-Is or Start Over?
If the dough is slightly slack but still domed, bake it as-is—a passable loaf beats wasted flour. If it's soupy, sticky, and won't hold any shape, it's badly over-proofed; start over rather than baking a pancake.
FAQ
Does over-proofed sourdough taste bad or is it just flat?
It's usually both, but mildly so. Over-proofing means the dough fermented too long, so the yeast and bacteria ran out of food and the gluten broke down. The loaf bakes flat and spread out, with a tight, gummy crumb. The flavor often turns noticeably more sour and slightly boozy or vinegary, because extra acids built up during the long ferment. It won't make you sick and is still edible, just denser and tangier than you'd want. To confirm over-proofing, look for a slack, sticky dough that doesn't hold a shape and shows no spring in the oven.
Can I save sourdough dough that has already over-proofed?
You can rescue it, but you won't fully restore the airy crumb. Best option: gently reshape it, place it in the fridge for 20–30 minutes to firm up the gluten, then bake right away in a preheated Dutch oven so it holds its shape. Don't try to re-prove it longer—that makes it worse. If the dough is badly broken down and soupy, repurpose it: fold it into a loaf pan for a sandwich-style bread, or use it for focaccia, flatbread, or crackers where height doesn't matter. Next time, shorten your bulk fermentation (the main rise after mixing) to catch it earlier.
Will baking in a Dutch oven stop my sourdough from spreading?
A Dutch oven helps, but it won't fix a spreading problem on its own. The lid traps steam, which keeps the crust soft early so the loaf can rise (oven spring) and the walls give the dough something to push against, so it spreads less than on a flat tray. But if the real cause is over-proofing or weak shaping, a Dutch oven only limits the damage. For best results: preheat the empty Dutch oven at 230°C / 450°F for 30–45 minutes, bake covered 20 minutes, then uncovered 20–25 minutes until deep golden. Fix the underlying shaping and proofing issues for a truly tall loaf.
How do I know if my problem is shaping or proofing?
Do a quick check before baking. Shaping problem: the dough felt slack and loose right after you shaped it, with no surface tension—it sagged immediately even though fermentation looked fine. Proofing problem: the dough was tight and well-shaped but became puffy, jiggly, and over-relaxed after the final rise, or it failed to rise at all (under-proofed). Use the poke test: lightly press a floured finger 1 cm into the dough. Springs back fast = under-proofed. Springs back slowly and partly = ready. Stays dented and deflates = over-proofed. If it never built tension at all, that's shaping.
What hydration should a beginner start with to avoid flat loaves?
Start at 65–70% hydration. Hydration is simply the weight of water as a percentage of the flour weight—so 700g flour with 455–490g water is 65–70%. Lower-hydration dough is firmer, easier to shape, and far less likely to spread into a pancake, which makes it ideal while you learn. A reliable beginner ratio: 500g bread flour (about 4 cups), 325g water (about 1⅓ cups, = 65%), 100g active starter (about ½ cup), and 10g salt (about 1¾ tsp). Once you consistently get a domed loaf, push hydration up by 5% at a time to chase a more open crumb.
How long should bulk fermentation take to avoid over-proofing?
There's no fixed time—watch the dough, not the clock. Bulk fermentation (the first rise after mixing, before shaping) usually takes 4–6 hours at warm room temperature (24–26°C / 75–78°F), but it can stretch to 8+ hours in a cool kitchen or finish in under 4 in a hot one. Stop when the dough has risen 50–75% (not doubled, which is a common over-proofing mistake), looks puffy and domed, shows a few bubbles on top and sides, and jiggles slightly when nudged. If it's flattening or smells sharply sour, you've gone too far—shape and bake sooner next time, or slow it down in the fridge.
See also
- How to Tell When Bulk Fermentation Is Done
- A Beginner's Guide to Shaping Sourdough
- Why Is My Sourdough Gummy and Dense?
- How to Feed and Maintain a Sourdough Starter
- Beginner Sourdough Recipe at 70% Hydration
- The Poke Test: How to Check if Dough Is Proofed
Related articles
The Float Test Lie: Why Your Starter Might Be Ready Even If It Sinks
Is the float test a reliable way to tell if my sourdough starter is ready to use? Learn why this common test lies—and what to check instead for perfect bread every time.
Jul 20, 2026 · 8 min read
Sourdough in Summer vs. Winter: How to Adjust for Temperature Extremes
How do you adapt your sourdough baking process for very hot or cold weather?
Jul 20, 2026 · 9 min read
Beginner's Guide to Controlling Sourdough Tang: How to Make It Milder or More Sour
Learn how to control the sourness of your sourdough bread with simple beginner adjustments to fermentation time, temperature, and starter feeding.
Jul 14, 2026 · 12 min read