Why Is My Sourdough Bread So Dense and Heavy?
Why did my sourdough come out dense instead of airy?
On this page
Open by validating the frustration (you followed the recipe and still got a brick), then promise a ranked diagnostic: the most common cause first, so readers can find their problem fast. Frame dense crumb as almost always one of two issues—an underpowered starter or underproofing—then list the rest in likelihood order.
Quick Diagnosis: What Dense Sourdough Is Telling You

Before you read all 8 causes, run this 30-second check. About 80% of dense loaves come down to just two things: a weak starter (your jar of fermented flour and water that makes the bread rise) or underproofing (not letting the dough ferment long enough before baking).
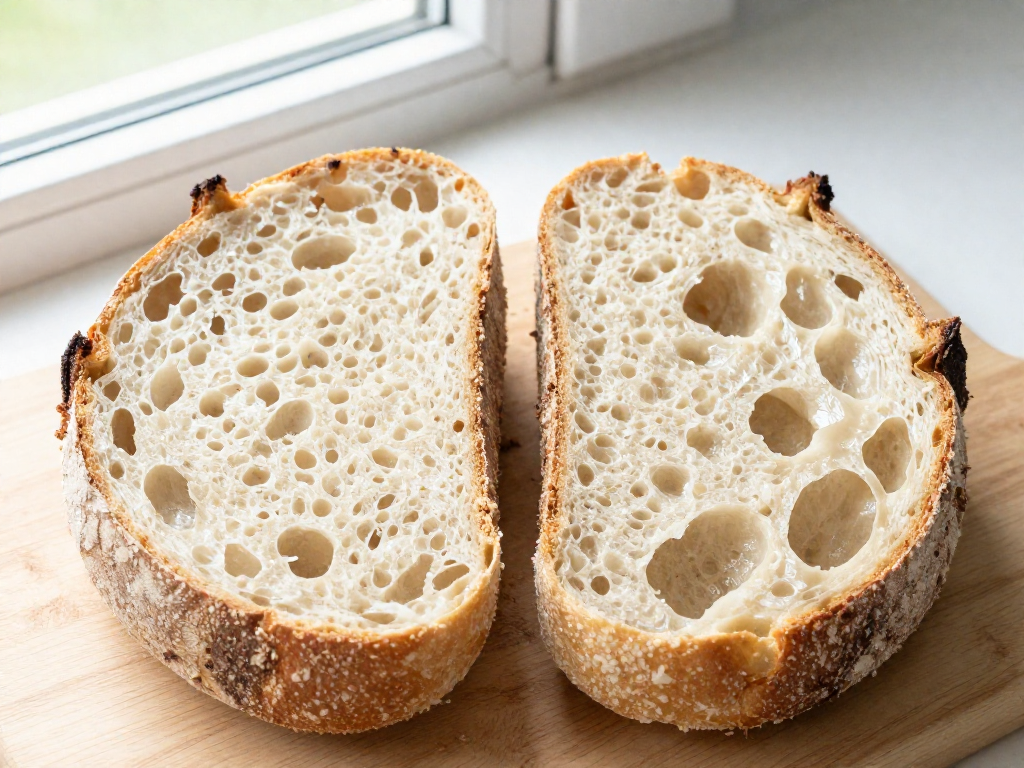
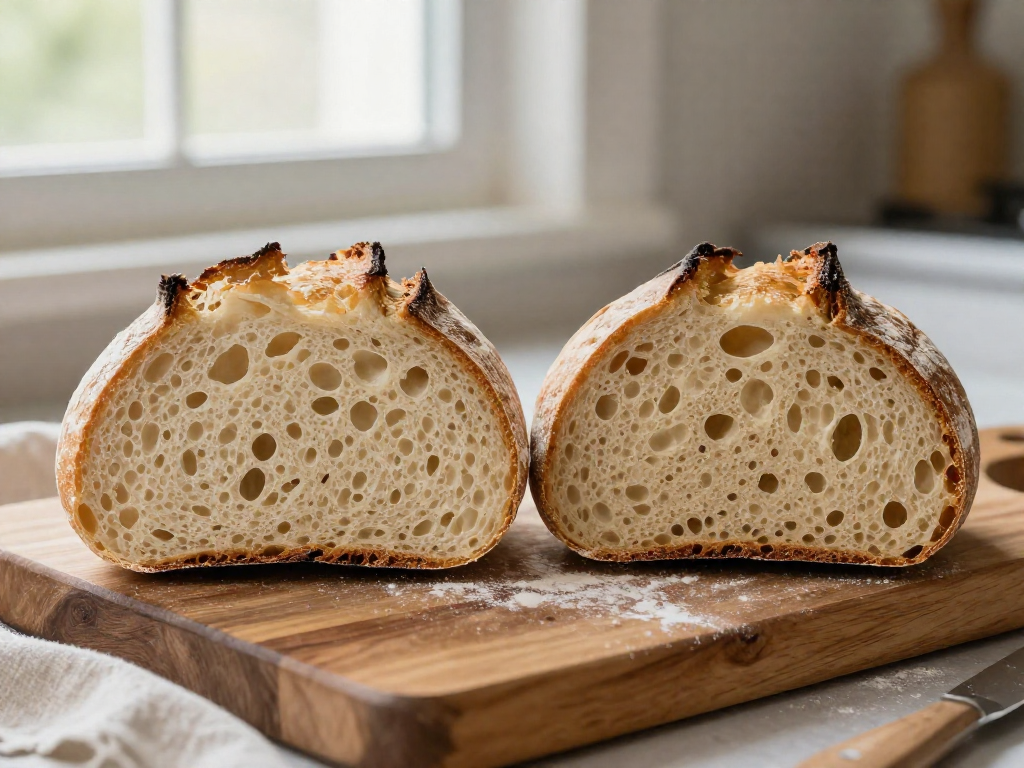
Step 1: Read your crumb. Cut the loaf in half and look at the inside (the "crumb"):
- Gummy and wet, with a dense streak near the bottom → usually underproofed, or sliced while still warm.
- Tight, dry, and even, with no big holes → usually a weak or under-fed starter that didn't have enough power to lift the dough.
- Flat and spread out, like a frisbee → usually overproofed (fermented too long) or weak gluten structure.
Step 2: Do the 30-second self-check. Ask yourself two questions about your dough before it went in the oven:
- Did it nearly double in size during bulk ferment (the first long rise after mixing)?
- Did it pass the poke test? Press a wet finger 1 cm into the dough. If the dent springs back slowly and partway, it's ready. If it springs back fast, it needs more time. If it doesn't spring back at all, it's overproofed.
Step 3: Use the ranked list below. The 8 causes are ordered from most to least common. Match the crumb cue you spotted above, jump to that cause, and apply the fix.
Results vary by kitchen temperature and climate, so treat these as starting points, not guarantees.
Cause #1: Your Starter Isn't Strong Enough

A weak starter is the number-one reason beginner loaves turn out dense. Your starter (the living mix of flour, water, and wild yeast that makes sourdough rise) produces the gas bubbles that lift your dough. If it's sluggish, there simply isn't enough gas to inflate the loaf, so it bakes up tight and heavy.
First, test your starter's strength
The float test (30 seconds): Drop a small spoonful of starter into a glass of water. If it floats, it's full of gas and likely ready. If it sinks, it needs more time or more feeding.
The double-in-4-to-8-hours benchmark: This is the real proof. After you feed it, your starter should roughly double in volume within 4 to 8 hours at room temperature (about 70–75°F / 21–24°C). Mark the jar with a rubber band or tape at the starting level so you can see the rise clearly. If it never doubles, or takes 12+ hours, it's too weak to bake with yet.
Signs of a weak starter
- Slow or no rise after feeding (little to no movement in 8 hours)
- Sharp, vinegary or nail-polish smell instead of a pleasant tangy-yeasty aroma
- Watery gray liquid on top (called hooch) — a sign it's hungry and underfed
- Flat, soupy texture with few bubbles
The fix: feed on a schedule, then use it at peak
Feed your starter 1:1:1 by weight — equal parts starter, flour, and water — for several days in a row:
- 50 g existing starter
- 50 g flour (about ⅜ cup)
- 50 g water (about 3½ tablespoons / 50 ml)
Stir, mark the level, and feed once or twice a day at the same times. Within 3–5 days of consistent feeding, most starters strengthen noticeably and begin doubling reliably.
The most important habit: use your starter at peak, when it has risen to its highest point and looks domed and bubbly, usually 4–8 hours after feeding (timing varies with your kitchen's temperature). Used too early or after it has collapsed back down, even a healthy starter won't give you the lift you need.
Cause #2: Underproofing (You Baked Too Soon)

If your loaf is dense with a tight, tough crumb (the inside texture of the bread), the most likely culprit is underproofing—you baked before the dough finished its first rise. This stage is called bulk fermentation (the long rise after mixing, when the dough ferments as a single mass before shaping). Get this wrong and no amount of good technique later will save the loaf.
The fix: judge the dough, not the clock
Recipes that say "bulk ferment for 4 hours" are only rough guides. The real signal is how much the dough has grown and how it feels.
- Watch for a 30–50% rise in volume. Not double—that advice comes from yeasted bread and often overproofs sourdough. Use a straight-sided container and a rubber band to mark the starting height so you can see the change.
- Run the poke test. Wet a finger and gently press about 1 cm into the dough.
- Springs back slowly, leaving a small dent: ready to shape. ✅
- Springs back instantly and fully: underproofed—give it more time.
- Doesn't spring back at all, dent stays: overproofed (a different problem, covered later).
- Look and feel for life. Ready dough feels puffy, jiggly, and shows a few bubbles on the surface and edges.
Why your timing keeps changing
Temperature controls fermentation speed more than anything else. Yeast and bacteria in your starter work fast when warm and slow to a crawl when cool.
| Dough temperature | Rough bulk time |
|---|---|
| 26–28°C (79–82°F) | 3–4 hours |
| 21–23°C (70–73°F) | 5–7 hours |
| 18–20°C (64–68°F) | 8–12 hours |
These are starting points, not promises—your flour, starter strength, and kitchen will shift them.
Bottom line: in a cool home, extend bulk fermentation as long as it takes to hit that 30–50% rise and pass the poke test. A slow rise in a cold kitchen is normal, not a failure. Let the dough tell you when it's ready.
Cause #3: Overproofing (You Waited Too Long)
If your dough sat too long during bulk fermentation (the first long rise, when the whole batch of dough ferments before you shape it), it can overproof. This means the yeast and bacteria ran out of food and the gluten structure—the stretchy network that traps gas—broke down. The result is a dense, gummy loaf, just like underproofing, which is why beginners mix the two up.
The telltale signs of overproofing:
- Dough is slack, soupy, and won't hold a shape
- Little to no oven spring (the dramatic rise in the first 10–15 minutes of baking)
- A flat loaf with a sticky, tight crumb instead of open holes
- Before baking, the shaped dough looks over-domed, then collapses or spreads out flat
Underproofed vs. overproofed: Both look dense, but they need opposite fixes. Underproofed dough is tight and springs back fast when poked. Overproofed dough is loose, jiggly, and the dent you poke stays put or sinks.
The fix — give it less time and a cooler room:
- Shorten your bulk ferment. Watch the dough, not the clock. Stop when it has risen about 50–75% and looks puffy with a few bubbles on top.
- Lower the temperature. A warm kitchen (above ~78°F / 25°C) speeds fermentation. Move the dough somewhere cooler or shorten the time to compensate.
- Catch it before it over-domes. Shape and bake while the dough still feels lively and slightly springy.
Every kitchen and climate is different, so use these cues as a guide and adjust until you find your dough's sweet spot.
Cause #4: Weak Gluten Development
If your dough was slack, never held a shape, and spread into a puddle, weak gluten is likely your culprit. Here's how to fix it.
The quick fix: Add a series of stretch-and-folds (gently pulling one side of the dough up and folding it over itself) during the bulk ferment — the first long rise after mixing, when the dough does most of its fermenting at room temperature.
Do this during bulk ferment
- Start with an autolyse. Autolyse simply means mixing your flour and water (hold the salt and starter) and letting it rest 30–60 minutes before adding anything else. This jump-starts gluten development with zero effort.
- Do 4 sets of stretch-and-folds, spaced about 30 minutes apart over the first 2 hours. With wet hands, grab one edge of the dough, stretch it up, and fold it to the center. Rotate the bowl and repeat 4 times per set.
- Switch to coil folds for very wet (high-hydration) doughs: lift the dough from the middle so the ends tuck under, letting it "coil" onto itself. This is gentler and won't tear delicate dough.
Why this works
Gluten is the stretchy protein network that forms the "net" trapping the carbon-dioxide gas your starter produces. No net, no bubbles held in place — so the loaf bakes dense instead of airy.
Check your progress: the windowpane test
Pinch off a small piece and slowly stretch it. If it thins into a translucent "window" without tearing, your gluten is ready. If it rips immediately, give it another fold or two.
Note: Folds and timing vary with your flour and kitchen temperature, so use the windowpane test as your real guide rather than the clock.
Cause #5: Hydration Too Low (or Too High)
Quick fix: Aim for about 70% hydration and weigh everything with a kitchen scale. If your dough feels stiff and dry, add water 10–15g at a time on your next bake. If it's so wet you can't shape it, drop the water by the same small steps.
What "hydration" actually means: Hydration is simply the weight of water compared to the weight of flour, written as a percentage. If you use 500g flour and 350g water, that's 350 ÷ 500 = 70% hydration. That's it — no advanced math required.
Why it affects density:
- Too low (under ~65%): The dough is tight and stiff, so it can't trap gas and expand. You get a dry, tight crumb (the holey interior of the bread).
- Too high (over ~80% for a beginner): The dough turns slack and sticky, hard to shape, and spreads flat in the oven — which also reads as dense and gummy when you're new to handling it.
A safe beginner range: Start at 70%. It holds its shape, is forgiving to handle, and still bakes open and light.
| Ingredient | Grams | Approx. cups |
|---|---|---|
| Bread flour | 500g | ~4 cups |
| Water | 350g | ~1½ cups |
| Active starter | 100g | ~½ cup |
| Salt | 10g | ~2 tsp |
The fix, step by step:
- Always weigh flour and water in grams — cups are inconsistent and throw your percentage off.
- Mix to 70% and note how the dough feels.
- Adjust only 10–15g of water per bake until it feels right for your flour and kitchen.
Results vary by flour brand and climate, so treat 70% as a starting point, not a guarantee.
Cause #6: Flour Choice and Quality
The quick fix: Swap all-purpose flour for bread flour (look for 12–14% protein on the label). Protein is what forms gluten, the stretchy network that traps gas and holds your loaf tall. More protein generally means more rise.
Here's why flour matters so much for a light crumb:
- Bread flour beats all-purpose for height. All-purpose flour (around 10–11% protein) makes a weaker gluten network, so loaves spread out and bake flatter. Bread flour gives you the structure beginners need.
- Whole-grain and rye are naturally denser. The bran in whole wheat and rye acts like tiny blades that cut through gluten strands, so 100% whole-grain loaves are supposed to be heavier. That's normal, not a mistake.
- Old or low-protein flour limits structure. Flour past its prime, or cheap low-protein flour, simply can't build a strong enough network to rise well. Buy fresh and store it sealed in a cool, dry spot.
What to do instead:
- Start with 100% bread flour while you're learning. Master one variable at a time.
- Want whole-grain flavor? Blend it in gradually, starting at about 10–20% of total flour (e.g., 80g whole wheat + 420g bread flour for a 500g loaf), then increase as you get comfortable.
Results vary by brand and climate, so test one change at a time and note what works in your kitchen.
Cause #7: Shaping That Doesn't Build Tension
If your loaf spreads sideways into a flat puddle instead of rising up, slack shaping is a likely culprit. Shaping creates surface tension, a tight outer "skin" on the dough ball that acts like a corset, holding the loaf's height during the final proof (the last rise before baking) and the early bake. Without it, the dough relaxes and flattens, baking into a low, dense loaf.
Common beginner mistakes:
- Handling the dough so roughly you press out every air bubble (fully degassing it)
- Leaving the surface loose and floppy, with no taut skin
- Skipping the bench rest, so the gluten is too tight to shape cleanly
Fix: pre-shape, rest, then shape tight.
- Pre-shape: After bulk ferment (the main rise), gently fold the dough into a loose round. This organizes the dough without crushing the gas.
- Bench rest: Let it sit uncovered 20–30 minutes. It should relax and spread slightly, but still hold a soft dome.
- Final shape: Fold the edges into the center, flip seam-side down, and drag the dough across the counter in small circles to tighten the skin. Aim for a smooth, taut surface that resists when you poke it—without flattening it completely.
Results vary by flour and kitchen, so watch the dough, not just the clock.
Cause #8: Baking Setup (Heat and Steam)
Even a perfectly proofed dough can bake up dense if your oven setup is wrong. The fix comes down to three things: heat, steam, and a good score.
Fix it in four steps:
-
Preheat fully and long. Set your oven to 230°C (450°F) and let it heat for at least 45–60 minutes. A cold or barely-warmed oven gives you weak oven spring (the rapid rise a loaf gets in the first 10–15 minutes of baking). The dough sets before it can expand, leaving you with a tight, heavy crumb.
-
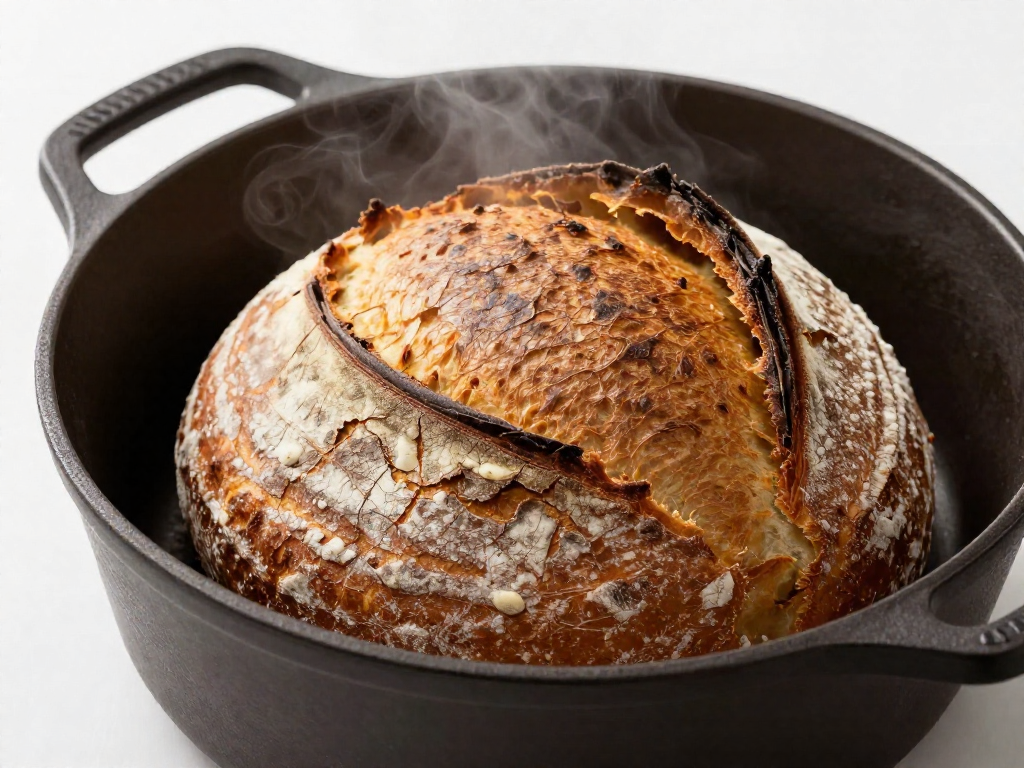
Bake covered to trap steam. Steam keeps the crust soft long enough for the loaf to balloon upward. The easiest way to get it is a Dutch oven (a heavy lidded pot): the loaf's own moisture turns to steam and stays trapped under the lid. Preheat the pot with the oven, bake covered for 20 minutes, then uncover for another 20–25 minutes to brown the crust.
-
Score with one confident slash. Scoring means cutting the top of the loaf with a sharp blade just before baking. A single ~1 cm (½ inch) deep slash gives the loaf a planned place to expand. Skip it, and the crust sets tight and holds the loaf down. Cut quickly and decisively—hesitation drags the dough.
-
Watch for the cues. A good bake springs visibly, opens along the score (the "ear"), and sounds hollow when tapped on the base.
Setups vary by oven, so adjust temperature and timing once you see how your loaves brown.
Dense Sourdough Troubleshooting Checklist
Pin or screenshot this before your next bake. Each cause links to a one-line fix, in the order worth checking.
Check in this order:
- Weak starter → Feed until it doubles in 4–6 hours and floats in water before mixing.
- Underproofed → Let the dough rise until ~50% bigger and jiggly; the poke test springs back slowly.
- Overproofed → Shorten bulk ferment (the first rise) or use cooler water; deflated, slack dough means you waited too long.
- Weak gluten → Add stretch-and-folds during bulk ferment until the dough feels smooth and stretchy.
- Hydration off → Adjust water (hydration = water weight ÷ flour weight). Start near 70% and tweak by 2–3% at a time.
- Low-quality flour → Switch to fresh bread flour with higher protein (12%+).
- Loose shaping → Build surface tension so the shaped loaf holds a taut, round dome.
- Bad bake setup → Preheat a Dutch oven and trap steam for the first 20 minutes.
Change only one variable per bake. If you fix three things at once, you'll never know which one mattered. Pick the most likely cause, adjust it alone, and compare the crumb (the inside texture) next time.
And take a breath: a dense loaf is still bread. Toast it, turn it into croutons, or grilled cheese it. Every "failed" loaf is teaching you something, and your next one will be better.
FAQ
Is dense sourdough safe to eat?
Yes, dense sourdough is almost always safe to eat—it's a texture problem, not a food-safety one. A heavy, tight crumb usually means the dough was underproofed (not fermented long enough to build air) or the starter was weak, not that anything is harmful. The two times to throw a loaf out are if you see fuzzy or colored mold (pink, green, black) on the surface, or if it smells of acetone, alcohol, or rot rather than pleasantly sour. A dense loaf that smells and looks normal is fine to slice; just toast it, use it for grilled cheese, or turn it into croutons or breadcrumbs so the firmer texture works in your favor.
Can I fix dense sourdough after it's baked?
You can't change the crumb of an already-baked loaf—once it's out of the oven, the texture is set—but you can absolutely make it delicious. Slice it thin and toast it well; the heat crisps the surface and masks a tight crumb. Other great rescues: cube and bake it for croutons, blitz it into breadcrumbs and freeze, use thick slices for French toast or bread pudding (the density actually helps it hold up), or grill it for panini and bruschetta. Save the lesson for next time: a dense loaf is feedback that the dough likely needed a longer bulk ferment (the first rise) or a more active starter, both of which you can fix on your next bake.
How do I know if my sourdough is underproofed or overproofed?
The quickest test is the 'poke test': lightly flour a finger and press the dough about 1 cm deep. If it springs back fast and fully, it's underproofed (needs more time). If it springs back slowly and leaves a small dent, it's ready. If the dent stays and the dough feels slack or deflates, it's overproofed (gone too long). Other clues: an underproofed dough looks tight, hasn't grown much, and bakes up dense with a tight crumb and sometimes a big 'tunnel' or burst side. An overproofed dough looks very puffy, spreads flat when turned out, smells sharply sour, and bakes up flat with a gummy or wet crumb. When in doubt, underproofing is the more common beginner problem, so give the dough a little more time and watch for it growing about 50–75% in size with a few bubbles on the surface.
Does a dense crumb always mean my starter is weak?
No—a weak starter is one common cause of dense bread, but it's not the only one. A starter is strong enough to bake with when it reliably doubles in size within 4–8 hours after feeding, looks bubbly and domed, and floats when you drop a spoonful in water. If yours does that, the density is probably coming from somewhere else: under-fermenting the dough (too-short bulk rise), not building enough strength through folds, shaping too loosely, dough that was too cold, or slicing the loaf while it's still warm. Work through those one at a time. If your starter does not double and looks flat or sluggish, then yes—feed it once or twice a day at room temperature for several days until it's active before you bake again.
Why is my sourdough dense and gummy in the middle?
A dense, gummy center usually comes down to one of three things, in order of likelihood. First and most common: you cut it too soon. Sourdough keeps cooking as it cools, so wait at least 2–3 hours (ideally 4) before slicing—warm bread always feels gummy. Second: it's underbaked. Aim for a deep golden-brown crust and an internal temperature of 96–99°C (205–210°F) measured with a thermometer in the center. Third: fermentation was off—either underproofed dough that never developed enough structure, or overproofed dough that collapsed. Fixes: let loaves cool completely on a wire rack, bake longer or hotter if the center is pale, and dial in your bulk ferment so the dough grows about 50–75% before shaping. Start with the cooling fix, since it solves most gummy-middle complaints by itself.
How long should bulk fermentation take to avoid a dense loaf?
Bulk fermentation (the first rise, after mixing and before shaping) typically takes about 4–8 hours at a warm room temperature of 24–26°C (75–78°F), but time is only a guide—watch the dough, not the clock. The reliable target for beginners is to let the dough grow by roughly 50–75% in volume, look domed and jiggly with a few bubbles on top and sides, and feel airy rather than tight. Temperature changes everything: a cool kitchen at 18–20°C (65–68°F) can stretch bulk to 10–12 hours, while a warm 28°C (82°F) kitchen may finish in 3–4. Cutting bulk short is the number-one cause of dense beginner loaves, so if your kitchen is cold, use a slightly warm spot (like an oven with just the light on) and be patient until you see that rise and jiggle.
See also
- How to Tell If Your Sourdough Starter Is Ready to Bake
- Sourdough Bulk Fermentation: How to Know When It's Done
- Why Is My Sourdough Gummy? Causes and Fixes
- Beginner Sourdough Bread Recipe (Step by Step)
- Sourdough Hydration Explained for Beginners
- How to Shape a Sourdough Boule for Better Oven Spring
Related articles

The Float Test Lie: Why Your Starter Might Be Ready Even If It Sinks
Is the float test a reliable way to tell if my sourdough starter is ready to use? Learn why this common test lies—and what to check instead for perfect bread every time.
Jul 20, 2026 · 8 min read
Sourdough in Summer vs. Winter: How to Adjust for Temperature Extremes
How do you adapt your sourdough baking process for very hot or cold weather?
Jul 20, 2026 · 9 min read
Beginner's Guide to Controlling Sourdough Tang: How to Make It Milder or More Sour
Learn how to control the sourness of your sourdough bread with simple beginner adjustments to fermentation time, temperature, and starter feeding.
Jul 14, 2026 · 12 min read