Sourdough in Summer vs. Winter: How to Adjust for Temperature Extremes
How do you adapt your sourdough baking process for very hot or cold weather?
On this page
As a beginner, you finally nailed that perfect sourdough loaf - until the seasons changed. Suddenly your bread is a flat, gummy mess. The secret? Temperature controls everything. This guide compares summer and winter baking and gives you a simple system to adjust so you can bake stunning loaves year-round.
The Science of Sourdough and Temperature: Why Every Degree Matters
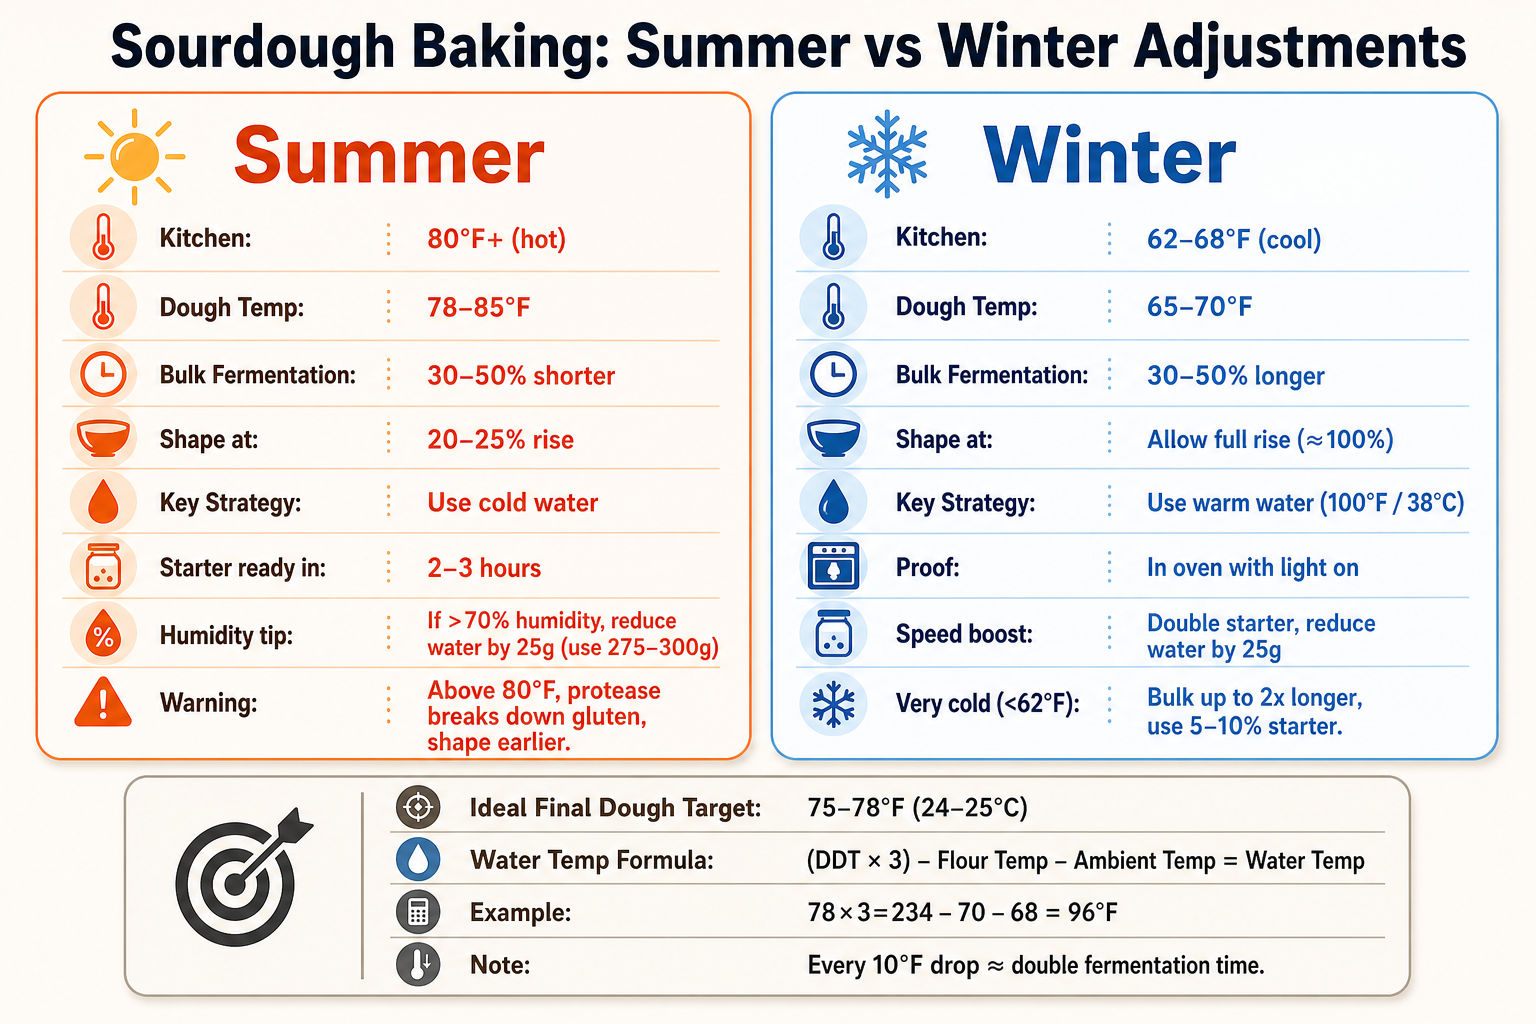
When your kitchen hits 85°F in July or drops to 62°F in January, the way you mix, ferment, and shape your dough needs to change. In hot weather, you'll use cold water, watch for a shorter bulk fermentation (the first rise after mixing), and shape the dough before it doubles; in cold weather, you'll reach for warm water and allow much longer rising times, often with a gentle heat boost. These adjustments aren't guesswork—they come down to the biology of your starter. The yeast and bacteria that make sourdough rise and develop flavor are living things, and every degree of temperature reshapes their activity.
According to Sourdough Geeks, the yeast in your starter performs best between 80–86°F. But temperature doesn't just influence yeast; it also directs which acids the bacteria produce. At cooler temperatures (60–72°F), the bacteria generate both lactic and acetic acid, giving your loaf a more pronounced sour tang. At warmer temperatures (86–99°F), they shift toward lactic acid and ethanol, resulting in a milder, more yogurty flavor. So the same dough fermented at 68°F will taste noticeably more sour than one fermented at 85°F, even if all other ingredients are identical.
Temperature also dictates the clock. A well-established home-baker rule is that for every 10°F drop, fermentation time roughly doubles. If your dough at 78°F finishes bulk fermentation in 4 hours, the same dough at 68°F may need 8 hours. But don't set a timer; bulk fermentation follows a 'hockey stick' curve—it starts so slowly you might think nothing is happening, then accelerates dramatically near the end. Beginners often overproof by mistaking this early sluggishness for lack of activity. Instead of watching the clock, learn to watch the dough: look for a 30–50% increase in volume in warm conditions, or closer to a full doubling in a cool kitchen.
Heat also speeds up protease enzymes, which break down gluten. Above 80°F, protease works fast enough that you need to shape the dough earlier—often at only a 20–25% rise instead of the usual 50%—or risk a slack, sticky mass that won't hold its form. This is why summer loaves can turn into puddles if you follow the same recipe that works in spring.
So what's the ideal? Many expert bakers, including Maurizio Leo of The Perfect Loaf, target a final dough temperature of 75–78°F right after mixing. In this range, yeast and bacteria work in a balanced way: you get enough rise to open the crumb, enough acid to build flavor, and slow enough gluten breakdown to shape with confidence. In winter, achieving that 75°F dough may require water as warm as 95°F; in summer, you might need water straight from the fridge. Knowing this number gives you a concrete target no matter the season.
Understanding these temperature-driven shifts—microbe speed, acid balance, and gluten strength—turns seasonal baking from a frustration into a skill. Once you know what the heat or chill is doing inside your dough, you can tweak ingredients and timing instead of following the same recipe and hoping for the best.
Baking Sourdough in Summer: Taming the Speed Demon
When your kitchen hits 80°F or above, sourdough goes into overdrive. Dough temperatures often land between 78°F and 85°F, and bulk fermentation can shrink by 30 to 50 percent. At 81°F dough temperature, you might only need a 30% rise in 4½ to 5 hours — not the doubling you’d expect in cooler weather. The key to avoiding overproofed, flat loaves is to slow things down and shape much earlier than you think.
Start by swapping warm water for cold — straight from the fridge is fine. That small drop in mixing temperature buys you time. Then ignore the “double in size” rule that works in winter. In summer, shape the dough when it has risen just 20 to 25%. At this stage, it should feel puffy and alive but still hold its shape well. The dough keeps fermenting during shaping, proofing, and those first few minutes in the oven, so an early shape prevents the runaway fermentation that leads to sticky, collapsing loaves.
Humidity adds another layer of mischief. When the air is above 70% relative humidity, flour absorbs extra moisture, making dough tackier and harder to handle. The Perfect Loaf suggests dropping overall hydration by 2 percentage points for a trial bake — if your recipe calls for 76% water (380g for 500g flour), pull back to 74% (370g). In really muggy conditions, you might need to go further. One baker found success cutting total water to as little as 275–300g per 500g flour, reducing by 25g at a time until the dough felt manageable. Start with small tweaks and let the feel of the dough guide you.
Your starter can’t be ignored either. In high heat, it can peak in just two to three hours after feeding instead of the usual four or five. Keep a close eye on it — use it as soon as it’s bubbly and domed on top, before it starts to sink. If you feed it in the morning and walk away, it might collapse before you’re ready to mix, which weakens dough structure. To stay in control, feed it a bit less frequently or use a slightly smaller inoculation (like 1:2:2) to gently slow it down.
All these adjustments work together: cold water, an early shape, slightly lower hydration, and a starter caught at its peak. Summer sourdough isn’t harder, just faster. Lean into these tweaks, and you’ll get an open crumb and a crisp, high-rising loaf even when the thermometer soars.
Baking Sourdough in Winter: Coaxing Life from the Cold
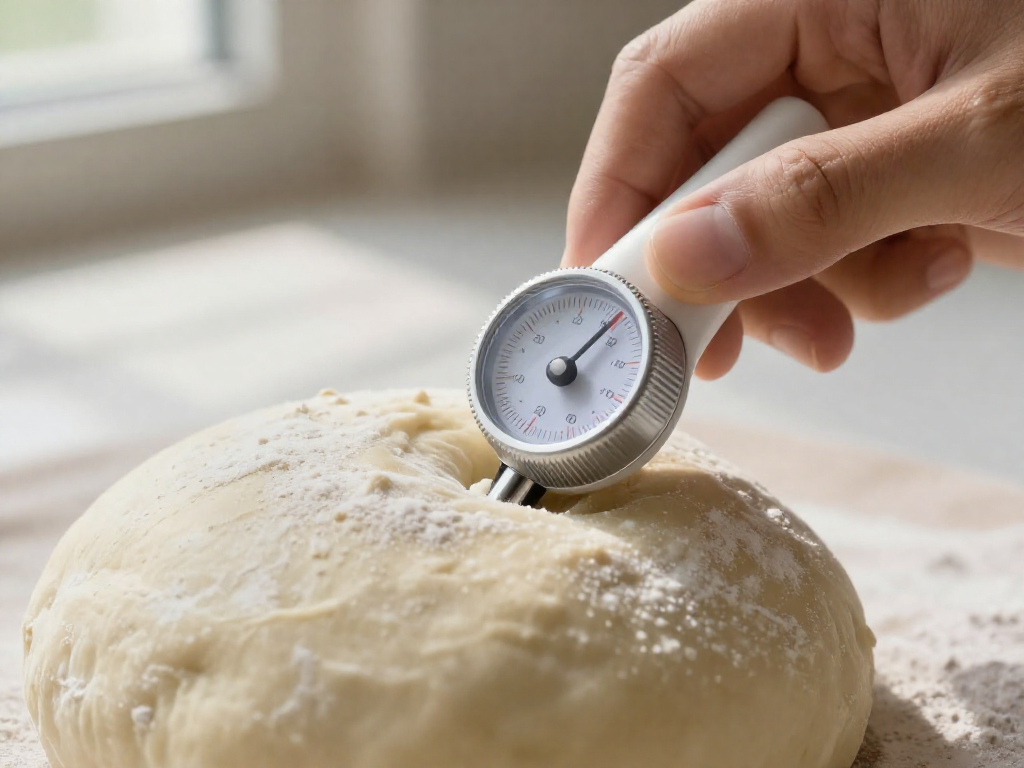
When the kitchen thermometer barely nudges past 62°F, your sourdough wants to hibernate. Dough that would have bubbled up in 4 hours on a mild day can easily take 6 or more, and if you stick to summer timings, you’ll end up with a dense, pale loaf that never had a chance. The solution isn’t to wait longer—it’s to give the dough a warmer start and a cozier spot to rise.
The easiest lever to pull is your water temperature. Instead of room-temp water, mix your dough with water heated to 100°F (38°C). That single change lifts the initial dough temperature enough to shave hours off bulk fermentation. And if your kitchen is truly frigid, consider this aggressive but reliable tactic: double the amount of starter. In a recipe calling for 50g of ripe starter, use 100g, and subtract 25g from the water to keep the consistency right. Pastry Arts Magazine recommends exactly this move, and it works—more yeast and bacteria right from the start means faster gas production and less waiting.
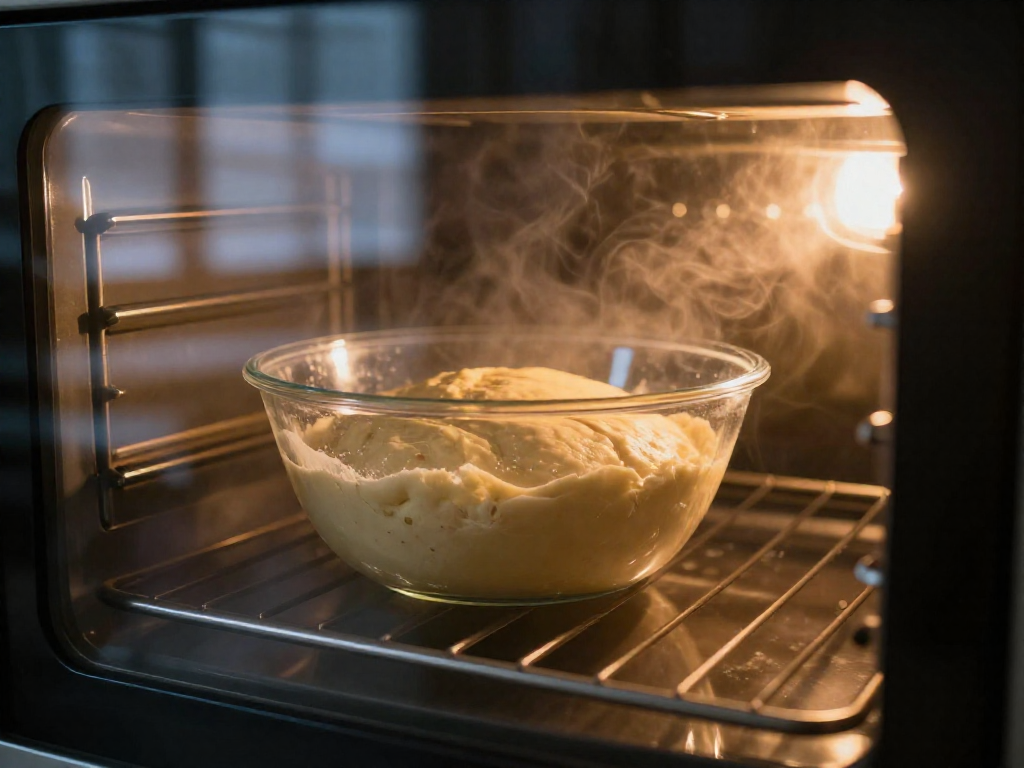
Of course, temperature drops as soon as the bowl sits on the counter. The fix is to create a warm proofing pocket. The easiest is your oven with just the light on; that often holds steady around 80–85°F. If your oven light runs too hot or you don’t have one, place a cup of boiling water in the microwave, shut the door, and let the steamy chamber become a proofing box. Just don’t microwave the dough. Position the bowl inside with the water cup, and the trapped humidity keeps the surface from skinning over while the warmth nudges fermentation along.
Even with these tricks, winter bulk fermentation will likely take longer than a standard recipe suggests. In a 62–68°F kitchen, expect 30–50% longer, and below 62°F it can double. The most important shift is when you end bulk. Forget about the clock and watch the dough. It should fully double—yes, a true 100% increase in volume—or at least 75% in a tall, straight-sided container. In summer you’d shape at a mere 20–30% rise to avoid over-proofing; in winter, you must push it to that full, jiggly dome. The dough should feel puffy, show a scattering of small bubbles on the surface, and jiggle when you shake the bowl.
For those with a very cold kitchen (below 62°F) and a patient schedule, there’s a hands-off option: an overnight bulk fermentation at room temperature with a drastically reduced starter. Using only 5–10% of the flour weight in starter (instead of the typical 20%) will slow the process enough that 8–12 hours overnight turns into perfect, long-fermented dough by morning. This method trades speed for flavor, developing more complex sourness without over-acidifying the dough. It’s a set-it-and-forget-it strategy that turns winter’s chill into an asset.
The Dough Temperature Formula: Your Baking Compass
Get your dough to the perfect temperature, and you solve half the frustration of seasonal baking before the yeast even wakes up. The key is a dead-simple calculation called the Desired Dough Temperature (DDT) — the target temp you want your dough to hit right after mixing. Once you know it, you only have to measure two things: the flour temp and the ambient temp. Then you do the math for the water.
Here’s the classic baker’s formula, broken down by Sourdough Geeks: Water Temperature = (3 × DDT) − (Flour Temp + Ambient Temp). In plain English, triple your target, then subtract the flour and room temps, and what’s left is the water temperature you need.
A real-world example: say you’re aiming for a DDT of 78°F, your flour is sitting at 68°F, and your kitchen is 70°F. Multiply 78 by 3 to get 234, then subtract 68 and 70. You’re left with 96°F. That’s your water temperature — comfortably warm, not scalding, and exactly what your dough needs to start life on the right foot.
Most recipes target a final dough between 75°F and 78°F. That’s the sweet spot where fermentation moves steadily without racing ahead. By plugging in your own numbers, you ditch the guesswork. In winter, you might be pouring surprisingly warm water; in summer, it might be straight from the fridge. The formula works the same either way, and it turns your kitchen thermometer into a baking compass you can trust.
Why Temperature Charts Aren't Foolproof: A Real-World Story
Temperature-rise charts are a great starting point, but they assume a neutral flour—something that rarely exists in a home kitchen. Different flours ferment at wildly different speeds even when the dough temperature is identical. A baker on r/Sourdough proved this point perfectly: with dough at 27°C (81°F) and a bulk environment held at 25°C (77°F), the chart predicted a 30% rise in 3–5 hours. Instead, nothing seemed to happen for much longer. That loaf needed 8–9 hours to hit the same 30% mark—because it used Caputo Nuvola, a flour that behaves very differently from the standard bread flours the chart was built around. Despite the huge time difference, the results were excellent. The takeaway isn’t that charts are useless; it’s that you must observe your flour, not someone else’s. Use the chart as a rough guide, then trust the dough—its jiggle, its bubbles, its liveliness—more than any timer.
Quick Troubleshooting: Fixing Seasonal Loaf Failures
If your summer loaf turned out flat and dense, it likely overproofed. Hot kitchens (dough hitting 78–85°F) slash bulk fermentation time by 30–50%. The fix: shape much earlier—when the dough has risen just 20–25%, not doubled—and use cold water when mixing. Humidity adds another variable. When kitchen humidity exceeds 70%, reduce dough water by 25g right off the bat (Pastry Arts). For extra insurance, drop your dough’s hydration (water content) by about 2% from your usual recipe.
A winter brick with no oven spring signals underproofing. In a 62–68°F kitchen, dough temp hovers at 65–70°F—bulk fermentation can stretch 30–50% longer. Give it a boost: double the starter (e.g., 100g instead of 50g), cut water by 25g, and mix with warm water (100°F/38°C). Proof in the oven with just the light on for gentle, steady warmth. Above all, ignore the clock and watch the dough—look for a jiggly, airy texture that says it’s ready, no matter how long it took.
Sources
- Sourdough Bulk Fermentation Chart: Stop Guessing, Start Shaping — sourdougharchive.com
- Sourdough Bulk Fermentation Guide: Times & Temperatures Explained — youtube.com
- I tried the temperature chart method instead of doubling size for bulk fermentation. — reddit.com
- The Importance of Dough Temperature in Baking | The Perfect Loaf — theperfectloaf.com
- Sourdough in the Summer | Pastry Arts — pastryartsmag.com
- Sourdough Secrets: How Colder Weather Affects Sourdough Baking | Pastry Arts — pastryartsmag.com
- How to Bake Sourdough Bread in Summer | The Perfect Loaf — theperfectloaf.com
See also
- Sourdough Starter Troubleshooting: Reviving a Sluggish Starter
- Ultimate Guide to Sourdough Bulk Fermentation
- Beginner Sourdough Recipe: No-Knead Method
Related articles
Help! My Sourdough Collapsed When I Turned It Out of the Banneton
Why does my dough deflate when I flip it out of the proofing basket? Quick troubleshooting guide covering over-proofing, weak gluten, and poor shaping, with immediate fixes.
Jul 28, 2026 · 6 min read
Why Your Sourdough Timeline Is Always Off (and How to Fix It)
Why does my sourdough take longer than recipes say it should?
Jul 28, 2026 · 9 min read
The Float Test Lie: Why Your Starter Might Be Ready Even If It Sinks
Is the float test a reliable way to tell if my sourdough starter is ready to use? Learn why this common test lies—and what to check instead for perfect bread every time.
Jul 20, 2026 · 8 min read