My Sourdough Has Big Holes or No Holes: What Went Wrong?
Why is my crumb full of giant holes or completely tight?
On this page
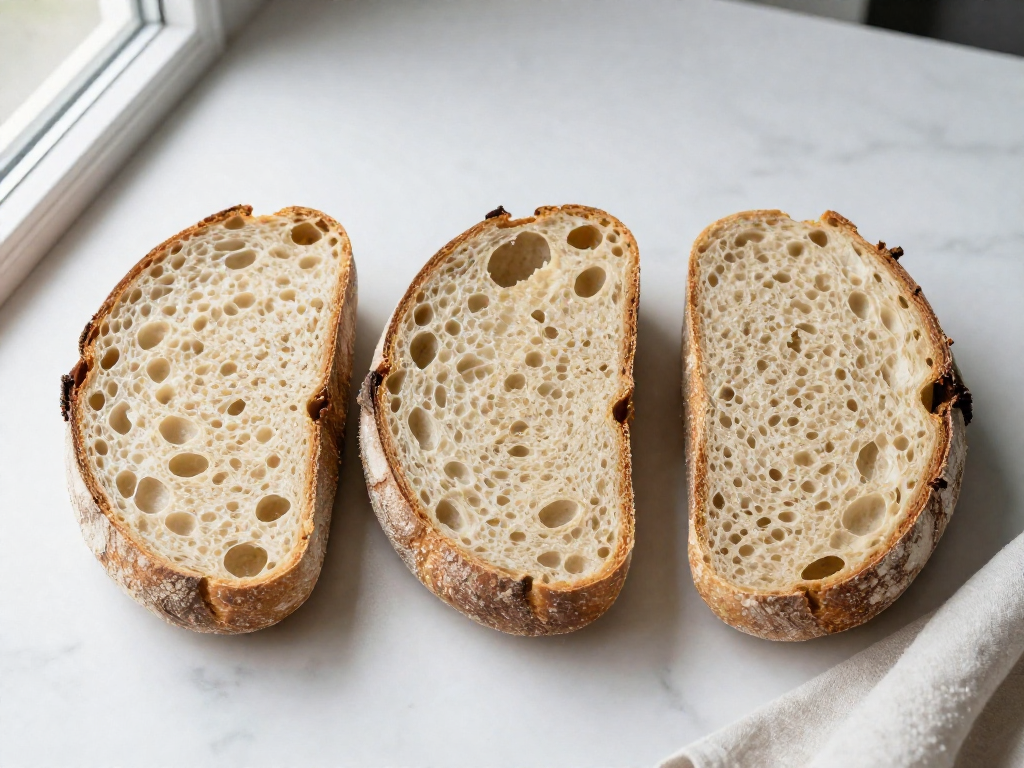
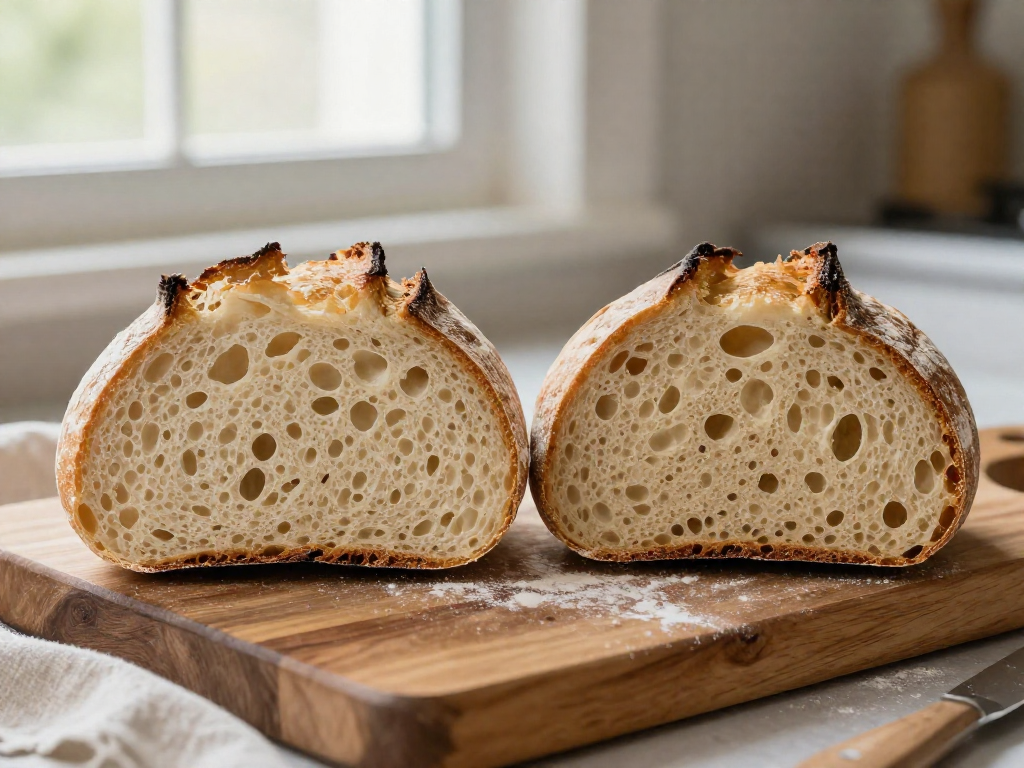
First, What a 'Good' Crumb Actually Looks Like
Before you judge your loaf, know this: a "good" crumb (the holes inside the bread) is even and irregular, not full of giant tunnels. Those dramatic, hole-filled slices you see on Instagram aren't the goal for most home bakers.
What to actually look for:
- Balanced crumb: Holes of varying sizes spread fairly evenly across the slice. This is the sweet spot.
- Tunnels: A few huge holes (often near the top) with dense bread elsewhere. Looks impressive, but it's actually a sign something went off, and it makes for messy sandwiches and butter that falls through.
- Tight crumb: Small, uniform holes throughout. Totally fine, and exactly what you want for sandwich and everyday loaves.
A big open crumb is not better bread. It just means more, larger holes, which suits rustic loaves but not toast or sandwiches. Plenty of bakeries sell tight-crumb sourdough on purpose.
So treat your crumb as a clue, not a grade. The size and pattern of the holes tell you what happened during fermenting and shaping, and we'll use those clues in the next sections to figure out your fix.
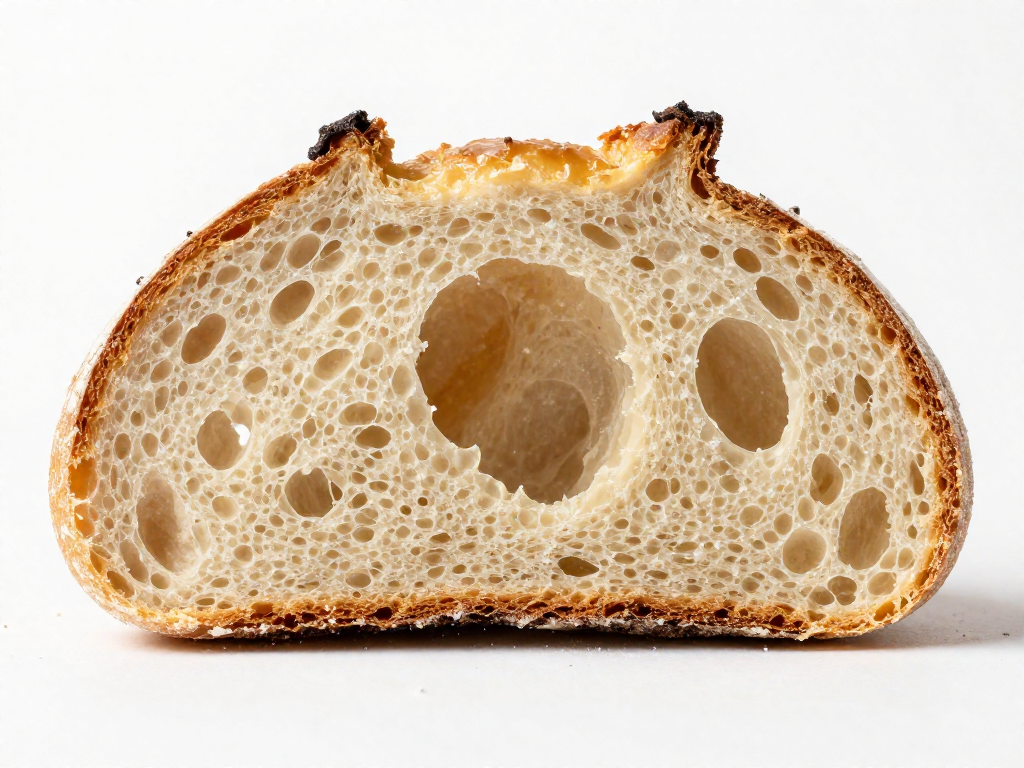
Big Irregular Holes (Tunneling): The Usual Causes
Got one or two cavernous tunnels with dense, tight bread around them? That uneven crumb almost always traces back to one of five fixable mistakes. Here's how to spot which one is yours.
Quick diagnosis: match your symptom to the cause
| What you see | Most likely cause | The fix |
|---|---|---|
| Big holes near the top crust, dense bottom | Under-fermentation | Let your bulk ferment (the first rise, after mixing, where the dough roughly grows and fills with gas) run longer |
| A few random giant pockets, no pattern | Loose or sloppy shaping | Build more surface tension when shaping |
| One big gap just under the crust | Trapped air from weak pre-shape | Gently degas (press out) large bubbles before final shaping |
| Wet, gummy holes you can't control | Too-high hydration | Drop your hydration (water weight ÷ flour weight, as a %) to 65–70% while learning |
| Tunnels plus a pale, soft interior | Oven too hot, crust set too early | Bake at 230°C / 450°F, not higher |
The two biggest culprits for beginners
1. Under-fermented dough. If the dough didn't ferment long enough, the gas (carbon dioxide from the wild yeast) is spread unevenly, so it pools into a few big holes instead of many small ones. Watch for these cues at the end of bulk ferment: the dough has grown by about 50%, looks domed and jiggly, and shows a few bubbles on the surface. If it still looks flat and tight, give it 30–60 more minutes.
2. Loose shaping. A slack, poorly tensioned dough ball can't hold an even structure, so air collects in pockets. When you shape, drag the dough across an unfloured counter to build a taut "skin." It should feel like a tight little balloon, not a puddle.
Trying to fix tunneling and tight crumb at once? Lower your hydration to 70% (e.g., 350g water to 500g flour) first. Drier dough is far more forgiving while you build shaping skills, and it removes one variable from the puzzle.
Results vary by kitchen temperature and flour, so change one thing at a time and note what happens.
No Holes / Tight Dense Crumb: The Usual Causes
If your loaf came out dense, gummy, or flat with little to no air pockets, work through these causes in order. The first one fixes most beginner loaves.
1. Weak or under-active starter (the #1 cause). A "starter" is the living mix of flour and water that makes your bread rise instead of commercial yeast. If it isn't strong, the dough simply can't inflate. Fix: Before mixing, do the float test — drop a teaspoon of starter in a glass of water. If it floats, it's full of gas and ready. If it sinks, feed it (e.g., 50g starter + 50g flour + 50g water) and wait until it doubles in size in 4–6 hours and looks bubbly and domed.
2. Under-proofed dough. "Proofing" is the rest time when the dough fills with gas. Cut it short and there's no air to trap. Cue: Properly proofed dough looks puffy, jiggles like set jelly, and grows about 50% during bulk ferment (the first long rise after mixing). The poke test helps: press a floured finger 1cm into the dough — it should spring back slowly and leave a slight dent. If it springs back instantly, give it more time.
3. Over-proofed dough. Go too far and the gas structure collapses, baking into a flat, tight loaf. Cue: The dough spreads out, feels slack and bubbly-wet, and the poke test leaves a dent that doesn't bounce back at all. Fix: Shorten your bulk ferment or proof somewhere cooler.
4. Not enough gluten development. Gluten is the stretchy protein network that holds gas bubbles. Weak dough can't trap air. Fix: During bulk ferment, do 3–4 sets of "stretch and folds" (lift one side of the dough up and fold it over, rotate, repeat) spaced 30 minutes apart. Strong dough holds its shape and passes the windowpane test — a small piece stretches thin enough to see light through without tearing.
5. Gummy crumb from slicing early or under-baking. A wet, pasty interior is often just impatience. Bake until the internal temperature reaches 205–210°F (96–99°C), then cool the loaf completely on a rack for at least 2 hours before slicing. Cutting hot bread releases steam mid-set and leaves it gummy.
Results vary by kitchen temperature and flour, so use these visual cues rather than the clock alone.
How to Tell Under-Proof from Over-Proof
Both an under-proofed and an over-proofed loaf can bake up dense, so beginners often "fix" the wrong problem. ("Proof" just means the final rise of your shaped dough before baking.) Here's how to tell them apart.
Start with the poke test. Lightly flour one finger and press it about 1 cm (a half inch) into the dough, then watch how it springs back:
- Springs back fast and fully → under-proofed. The dough needs more time.
- Springs back slowly and leaves a small dent → ready to bake.
- Doesn't spring back; the dent stays and the dough may sigh or deflate → over-proofed.
Check the shape before baking. An under-proofed loaf holds a tight, taut, domed surface and feels firm. An over-proofed loaf looks slack and spread out, flatter and wider, with a loose, sometimes bubbly skin.
Read the oven spring after baking. "Oven spring" is the burst of rise in the first few minutes of baking. A dramatic, sometimes bursting rise with a tight crumb points to under-proof. Little to no rise and a flat top points to over-proof.
| Sign | Under-proofed | Over-proofed |
|---|---|---|
| Poke test | Springs back fast | Stays dented / sinks |
| Surface | Tight, domed, firm | Slack, spread, flat |
| Oven spring | Big, may burst | Weak or none |
| Crumb | Tight, gummy center | Flat, sometimes coarse |
Results vary by kitchen temperature, so use these cues together rather than relying on the clock alone.
Quick Fixes for Your Next Loaf
Work through these in order. Change one or two things per bake so you can tell what actually helped.
-
Fix the starter first. A weak starter is the most common cause of dense loaves. Feed it 1:1:1 by weight (for example, 30g starter + 30g flour + 30g water) once or twice a day at room temperature. Only bake when it reliably doubles in 4–8 hours and looks bubbly and domed. If it isn't doubling, keep feeding for a few more days before baking.
-
Watch the dough, not the clock. Bulk fermentation is the first long rise, when the whole batch of dough ferments before shaping. End it when the dough has grown about 50% larger, looks puffy and jiggly, and shows a few bubbles on the surface and sides. Cold kitchens take longer; warm kitchens go faster. Big irregular holes usually mean it went too long; a tight crumb means it ended too early.
-
Add stretch-and-folds. During the first 1–2 hours of bulk ferment, every 30 minutes grab one side of the dough, stretch it up, and fold it over the center. Rotate and repeat 4 times. Do 3–4 sets total. This builds structure for an even crumb.
-
Shape tighter. A loose shape gives you big random holes. Pull the dough into a snug, taut ball with surface tension before the final rise.
-
Lower hydration while learning. Hydration is the ratio of water to flour. Drop to around 70% (for example, 350g water per 500g flour). Stiffer dough is easier to handle and read.
-
Cool completely before slicing. Wait at least 2 hours. Cutting early traps steam and makes the crumb feel gummy even when the bake was fine.
Results vary by flour, kitchen, and climate, so expect to adjust over a few bakes.
Crumb Troubleshooting Cheat Sheet
Pin this quick-reference table. Match what you see in your sliced loaf to the most likely cause, then try the single fix below for your next bake. (Results vary by kitchen and climate, so change one thing at a time.)
| Symptom | Likely cause | One fix to try |
|---|---|---|
| Tunneling (a few giant holes, dense around them) | Trapped gas from loose, uneven shaping | Shape tighter; build surface tension by dragging the dough across the counter before the final rise |
| Tight, dense crumb (few holes, heavy) | Under-proof (dough didn't rise enough) or weak starter | Extend bulk ferment 1–2 hours; feed starter until it doubles in 4–6 hours before baking |
| Gummy, sticky crumb (pasty when sliced) | Sliced too soon, or underbaked | Cool fully (2+ hours) before cutting; bake to an internal temp of 205–210°F (96–99°C) |
| Flat, spread-out loaf (no height) | Over-proof or weak gluten | Cut bulk ferment short; add 1–2 extra stretch-and-folds early on |
Bulk ferment = the dough's first long rise after mixing, before shaping.
FAQ
Why does my sourdough have one giant hole under the crust?
That big tunnel under the top crust is usually called a "flying crust," and it comes from a few common beginner mistakes. The most frequent cause is under-proofing the dough during bulk fermentation (the long rise after mixing, when the wild yeast does most of its work) — the loaf hasn't relaxed enough, so trapped gas pushes up into one pocket in the oven. Other causes: shaping too tightly so a large air bubble gets sealed under the surface, not degassing gently when shaping, or baking in too hot an oven. Quick fixes: let bulk ferment run until the dough is jiggly and risen about 50–75% (not just doubled), shape with even, gentle tension to avoid trapping one big bubble, and try dropping your oven temperature by about 15°C (25°F). Results vary by kitchen temperature, so judge by how the dough looks and feels rather than the clock alone.
Are big holes in sourdough a sign of good bread?
Not necessarily — this is a popular myth. A wide-open, holey crumb (the term "crumb" means the interior texture of the bread) is great for some breads like ciabatta, but it's not the goal for everyday sandwich or table loaves, and it isn't proof of quality. Large, uneven holes often signal high hydration dough (lots of water relative to flour), very strong fermentation, or shaping that trapped big bubbles — not necessarily better flavor or a better bake. A loaf with an even, moderately open crumb is usually easier to slice, holds butter and toppings without it falling through, and is a more reliable target for beginners. Aim for the crumb that suits how you'll eat the bread, not the most dramatic photo.
Why is my sourdough dense and gummy in the middle?
A dense, gummy center almost always means the bread is under-fermented, under-baked, or both. Start with these checks: (1) Bake longer and hotter — the inside should reach about 96–99°C (205–210°F) on an instant-read thermometer; if you don't have one, bake until the crust is deep brown and the loaf sounds hollow when tapped on the bottom. (2) Make sure bulk fermentation went far enough — in a cool kitchen this can take much longer than recipes suggest; the dough should look puffy, jiggly, and risen by roughly 50–75%. (3) Use an active starter that reliably doubles within 4–8 hours of feeding. (4) Let the loaf cool completely — at least 1–2 hours — before slicing, because the crumb is still setting as it cools. Gummy bread often turns out fine if you simply give it more bake time and more patience before cutting.
Can a weak starter cause no holes in sourdough?
Yes — a sluggish or under-active starter is one of the top reasons for a tight, dense crumb with little or no air. Your starter is the live culture of wild yeast and bacteria that makes the dough rise, and if it isn't strong, fermentation stalls and the dough never builds enough gas. Before baking, do the float test: drop a small spoonful of recently fed starter into water; if it floats, it's usually active enough. A healthy starter should roughly double in volume within 4–8 hours after feeding, smell pleasantly tangy (not flat or like nail polish), and look bubbly. To strengthen a weak one, feed it on a consistent schedule for several days, keep it warm (ideally 24–27°C / 75–80°F), and feed it at a 1:5:5 ratio (1 part starter, 5 parts flour, 5 parts water by weight). Wait until it's lively and predictable before baking again.
How do I get a more even crumb in my sourdough?
An even crumb comes from balanced fermentation and gentle, consistent handling. Practical steps: (1) Build dough strength with a series of stretch-and-folds during bulk fermentation (fold the dough over itself every 30–45 minutes for the first couple of hours) so gas distributes evenly. (2) Don't over-ferment or under-ferment — aim for dough that's risen about 50–75% and feels airy but not collapsing. (3) When shaping, degas gently to pop the largest bubbles, then build even surface tension so the loaf holds its shape. (4) If you're working with very wet, high-hydration dough (say 78%+ water), lower the hydration toward 70–72% for a tighter, more uniform crumb while you're learning. (5) Bake in a preheated Dutch oven for steady heat and good oven spring. Small, consistent improvements matter more than any single trick, and exact timing will shift with your kitchen's temperature.
Does cutting sourdough too early cause a dense crumb?
Yes — slicing a hot loaf is a surprisingly common cause of a crumb that looks dense, damp, or gummy. When sourdough comes out of the oven, the inside is still finishing baking as it cools: steam is escaping and the crumb structure is setting. Cut too soon and you release that moisture into the open slices, leaving them feeling pasty and compressed, even when the bread was baked correctly. Let your loaf cool completely on a wire rack — at least 1–2 hours, and longer for larger loaves — before slicing. If you've checked your fermentation and bake and the bread still seems gummy, try this patience step first before changing anything else in your recipe; it often solves the problem on its own.
See also
- How to Tell If Your Sourdough Starter Is Active and Ready
- Beginner Sourdough Bread Recipe (Step-by-Step)
- Why Is My Sourdough Gummy? Causes and Fixes
- Sourdough Bulk Fermentation Guide for Beginners
- How to Shape a Sourdough Boule Tightly
Related articles

The Float Test Lie: Why Your Starter Might Be Ready Even If It Sinks
Is the float test a reliable way to tell if my sourdough starter is ready to use? Learn why this common test lies—and what to check instead for perfect bread every time.
Jul 20, 2026 · 8 min read
Sourdough in Summer vs. Winter: How to Adjust for Temperature Extremes
How do you adapt your sourdough baking process for very hot or cold weather?
Jul 20, 2026 · 9 min read
Beginner's Guide to Controlling Sourdough Tang: How to Make It Milder or More Sour
Learn how to control the sourness of your sourdough bread with simple beginner adjustments to fermentation time, temperature, and starter feeding.
Jul 14, 2026 · 12 min read