How to Read Your Dough: Visual Cues for Bulk Fermentation
How can I tell when bulk fermentation is done by looking at the dough?
On this page
What Bulk Fermentation Actually Is (and Why Timing Fails)
Quick answer: Bulk fermentation is done when your dough looks and feels right—not when the timer beeps. A clock can't see inside your bowl, so learning to read the dough is the single biggest fix for dense, gummy, or flat loaves.
What bulk fermentation is
Bulk fermentation (often shortened to "bulk ferment" or just "bulk") is the first rise—the stretch of time after mixing when your dough sits as one mass before you shape it. During this window, the wild yeast and bacteria in your sourdough starter (the living mix of flour and water you feed to leaven bread) eat the flour's sugars and release carbon dioxide gas. That gas inflates tiny pockets in the dough, while the gluten (the stretchy protein network in wheat) traps it. The result is a dough that grows, lightens, and turns airy. Get this stage right and the open, springy crumb is mostly already decided.
Why recipe times are only estimates
A recipe might say "bulk for 4–6 hours," but that number assumes a specific kitchen. Three things constantly shift the clock:
- Temperature — warmth speeds fermentation; a cold kitchen can double the time.
- Starter strength — a young or sluggish starter works slower than a vigorous, recently fed one.
- Flour — whole grain and freshly milled flours ferment faster than white bread flour.
Because all three vary kitchen to kitchen, a fixed timer is a guess, not a guarantee.
The cost of getting it wrong
- Stopped too early (under-proofed): not enough gas built up, so the loaf bakes up dense and gummy.
- Gone too long (over-proofed): the gluten breaks down and the dough collapses, baking up flat and slack.
Reframe the goal
Use the recipe time only as a rough window for when to start checking. Then let the dough decide. In the next sections, you'll learn the exact visual and feel cues—rise, dome, bubbles, jiggle—that tell you it's truly ready.
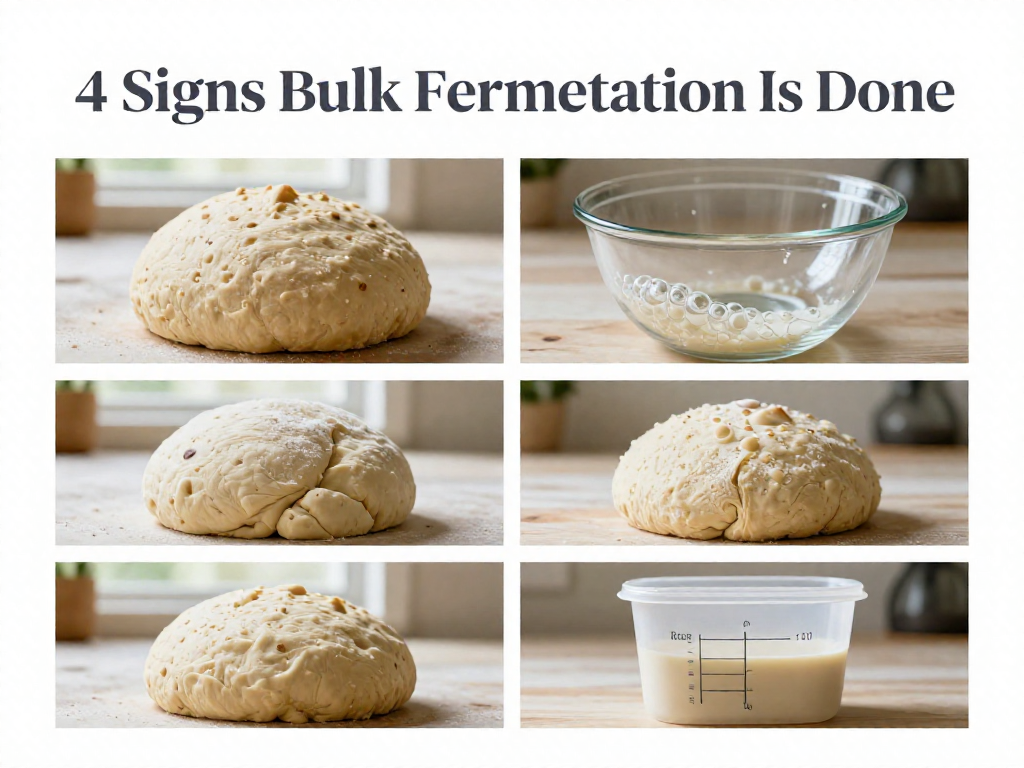
The 4 Core Visual Cues at a Glance
Before we dig into each sign, here's your quick checklist. Bulk fermentation—the first long rise after mixing, when your starter is doing the heavy lifting to inflate the dough—is usually done when you see most of these cues at once:
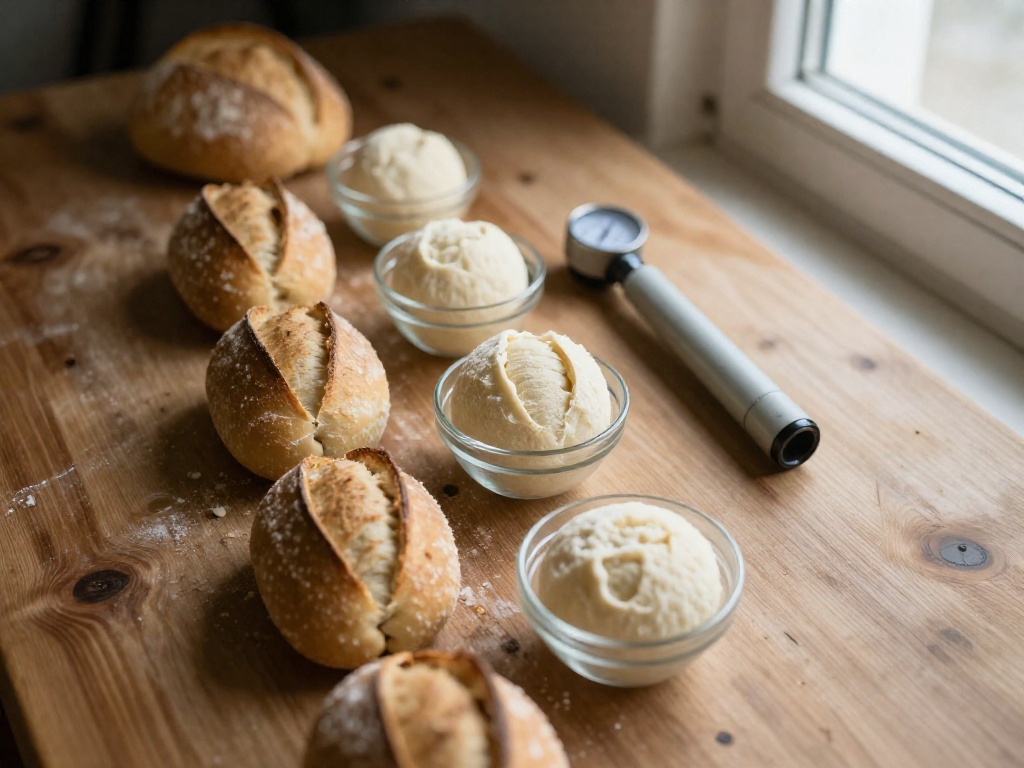
- Rise of about 50–75%. Your dough should grow noticeably taller, but not double. For beginners, aiming for roughly a 50% increase in volume is the safest target. (A tall, straight-sided container makes this easy to eyeball or mark with a rubber band.)
- Bubbles along the sides and top. Look through the side of the container for small to medium bubbles, plus a few breaking the surface. This tells you fermentation gas is active throughout the dough, not just on top.
- A domed, jiggly top. The surface should curve up gently and wobble like set jelly when you nudge the container. A flat or sunken, slumped top means you've likely gone too far (over-fermented).
- Smooth, billowy edges pulling away from the sides. Well-fermented dough looks puffy and relaxed, and the edges start to ease away from the container walls.
The one rule to remember: you want most of these cues together—not every single one, and not a stopwatch. Climate, flour, and starter strength all shift the timing, so the dough is your real clock.
If you only have a few seconds, screenshot this list. The rest of the article walks through each cue with photos so you can match what you see in your own kitchen. Don't worry if your dough doesn't look textbook-perfect on the first try—reading dough is a skill that builds loaf by loaf.
Cue 1: Reading the Rise Percentage
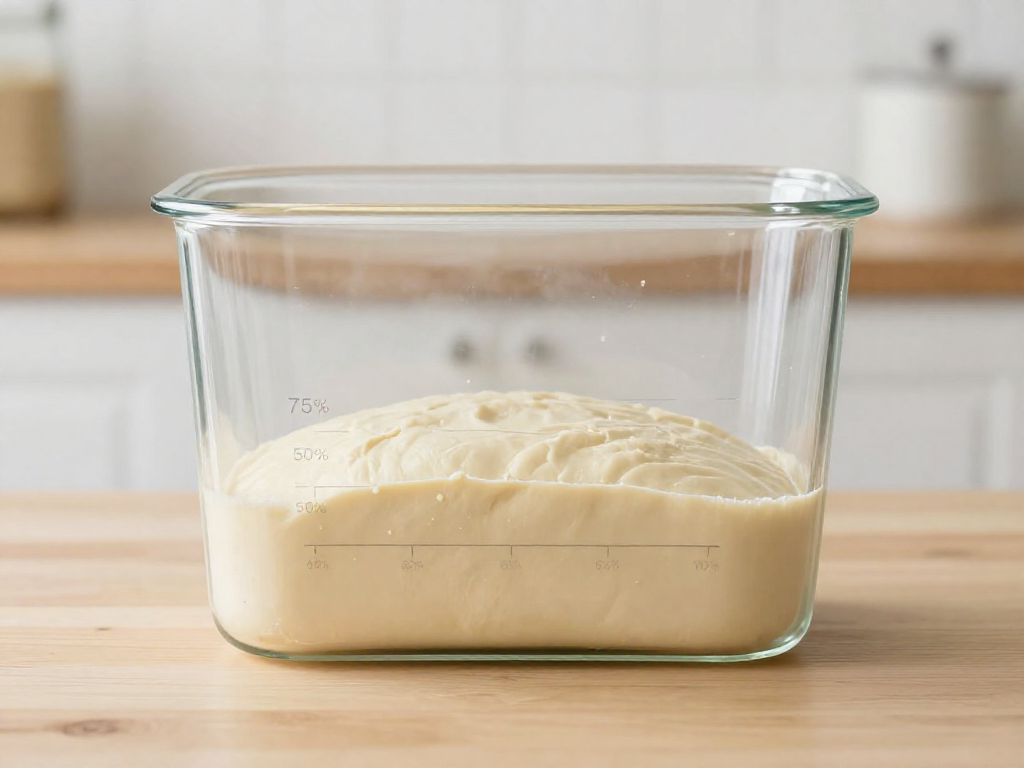
The quick answer: For your first loaves, end bulk fermentation (the first long rise, before you shape the dough) when it has grown 30–50% bigger than its starting size. That single visual cue is more reliable than any clock.
What "rise %" means
Rise percentage is simply how much taller your dough has gotten compared to where it started. A 50% rise means the dough is one-and-a-half times its original height. Most recipes target somewhere in the 30–75% range, but that whole window assumes you can spot the exact peak — which beginners usually can't yet.
How to track it (no special tools)
- Use a straight-sided container. A clear, straight-walled tub or jar lets you read the rise accurately. Bowls that curve outward distort the height and make the dough look like it grew more than it did.
- Mark the start line. Right after mixing, press the dough flat and snap a rubber band around the container at the top of the dough — or mark it with tape or a dry-erase pen.
- Estimate the target line. If the dough starts at 4 cm tall, a 50% rise reaches 6 cm. Add a second band there so you know exactly when to stop.
That's it — no scale tricks or math beyond multiplying the start height.
Why beginners should aim lower (30–50%)
The most common reason for gummy, dense, or flat loaves is over-proofing — letting bulk fermentation run too long. Stopping at 30–50% leaves a safety margin: the dough still has energy left to rise in the oven (called oven spring). A slightly under-proofed loaf is far more forgiving than an over-proofed one. As you gain confidence, you can push toward 75%.
How temperature changes the target
Warmth speeds up fermentation; cold slows it down.
- Warm kitchen (above ~25°C / 78°F): dough rises fast and the inside ferments more than the surface suggests — aim for the lower end (30–40%).
- Cool kitchen (below ~20°C / 68°F): rise is slow and even — you can safely wait for 50% or more.
Note: Results vary by kitchen, flour, and starter strength. Treat 30–50% as a starting guideline, then adjust based on how your loaves turn out.
Cue 2: The Jiggle Test
The jiggle test is the fastest way to feel whether your dough is ready, even before you trust your eyes. Bulk fermentation is the first long rise, after mixing and before you shape your loaf, when the dough builds gas and structure. Here's how to read it by touch.
How to Do It
- Keep the dough in its straight-sided container (a clear one helps).
- Grip the container with both hands.
- Gently shake it side to side once or twice, just a small nudge.
- Watch how the surface moves and how quickly it settles.
That's it. Do this near the end of your rise, not in the first hour, so you don't knock back the gas too early.
What Each Result Means
Ready dough: wobbly and jelly-like. The whole mass jiggles together like a set custard, then quickly springs back and settles. It looks alive and domed, with a few bubbles visible at the edges. This is your green light to shape.
Under-fermented dough: stiff, barely moves. If the dough looks tight and only the surface trembles slightly, it hasn't built enough gas yet. Give it more time, ideally in a warmer spot (around 24–26°C / 75–78°F), and re-test every 30 minutes.
Over-fermented dough: loose and soupy. If it sloshes like batter, keeps moving after you stop, and shows no spring back, the gluten has broken down. Shape it gently right away and bake; expect a flatter loaf this time, and start the test earlier on your next bake.
Why it works (optional): As yeast and bacteria produce gas, the gluten network traps it and turns elastic. That trapped gas is what creates the lively wobble. Too little gas means a stiff jiggle; too much breaks the structure into a soupy mess.
Results vary by flour, kitchen temperature, and starter strength, so use the jiggle alongside Cue 1 (the rise percentage) rather than on its own.
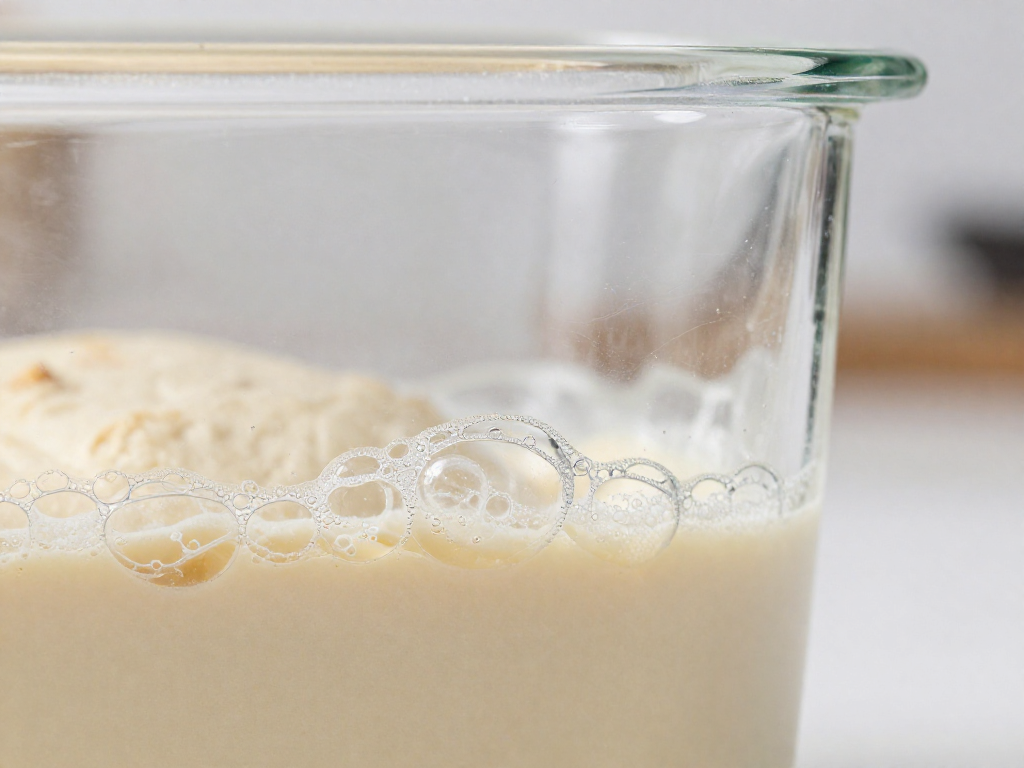
Cue 3: Bubbles on the Surface and Sides
Quick answer: When bulk fermentation (the first long rise, before you shape the loaf) is progressing well, you'll see small to medium bubbles forming along the edges of the dough and against the sides of your container, plus a few bubbles starting to break through the top surface. That's your signal the dough is alive and gassy—getting close to done.
Here's how to read what you see:
- Small to medium bubbles along the sides: Look at where the dough meets the glass. Healthy fermentation shows a scattering of pea-sized (and smaller) bubbles climbing the walls. This tells you the wild yeast is producing gas evenly throughout the dough.
- A few bubbles on top: Toward the end of bulk ferment, one or two bubbles will dome up and gently pop on the surface. A few is good. The top should still look mostly smooth and rounded.
- Too many large, collapsing bubbles = over-proofed: If the surface is covered in big, slack bubbles that flatten when you nudge the bowl, the dough has gone too far. Over-proofed dough (fermented too long) bakes up flat and can turn gummy inside. Next time, end bulk ferment earlier.
The most common misread: You can't judge bubbles in a sealed or opaque container. A metal bowl or a covered crock hides the side bubbles completely, so beginners think nothing is happening and wait too long. Use a straight-sided clear glass container (a quart mason jar or glass bowl works) so you can see the sides without lifting the lid.
Don't rely on bubbles alone. They vary with your flour, hydration (the ratio of water to flour), and kitchen temperature. Always combine this cue with the rise percentage (Cue 1) and the jiggle test (Cue 2). Results differ from kitchen to kitchen, so read all three together.
Cue 4: Dome, Texture, and the Poke Test
By the end of bulk fermentation (the first long rise after mixing, when the dough develops flavor and structure), the surface gives you several quick reads. Check these in order:
1. Look at the dome. A ready dough has a gently domed, smooth top that looks slightly puffy and relaxed. When you nudge the container, it jiggles like a soft set jelly. A flat or sunken top means you've likely gone too far (over-fermented); a tight, high mound that barely moves means it needs more time.
2. Check the volume and texture. The dough should look billowy and noticeably bigger—soft and airy rather than tight. You'll often see it has visibly relaxed and spread to fill the container.
3. Watch the edges. Where the dough meets the container walls, ready dough usually pulls slightly away or shows a soft, rounded shoulder rather than clinging flat and tight.
4. Use the poke test as a backup. Lightly flour one fingertip and press about 1 cm (½ inch) into the dough, then remove it.
- Slow, partial spring-back (the dimple fills in most of the way, but not completely): ready to shape.
- Springs back fast and fully: needs more time.
- Dent stays put and looks slack: likely over-fermented—shape now and bake a little sooner.
Treat the poke test as a supporting check, not the only one. Use it together with the dome, jiggle, and edge cues for a confident read.
Note: Every kitchen is different. Warmer rooms move faster, cooler rooms slower, so trust what the dough shows you over any clock. Results vary by flour, temperature, and starter strength.
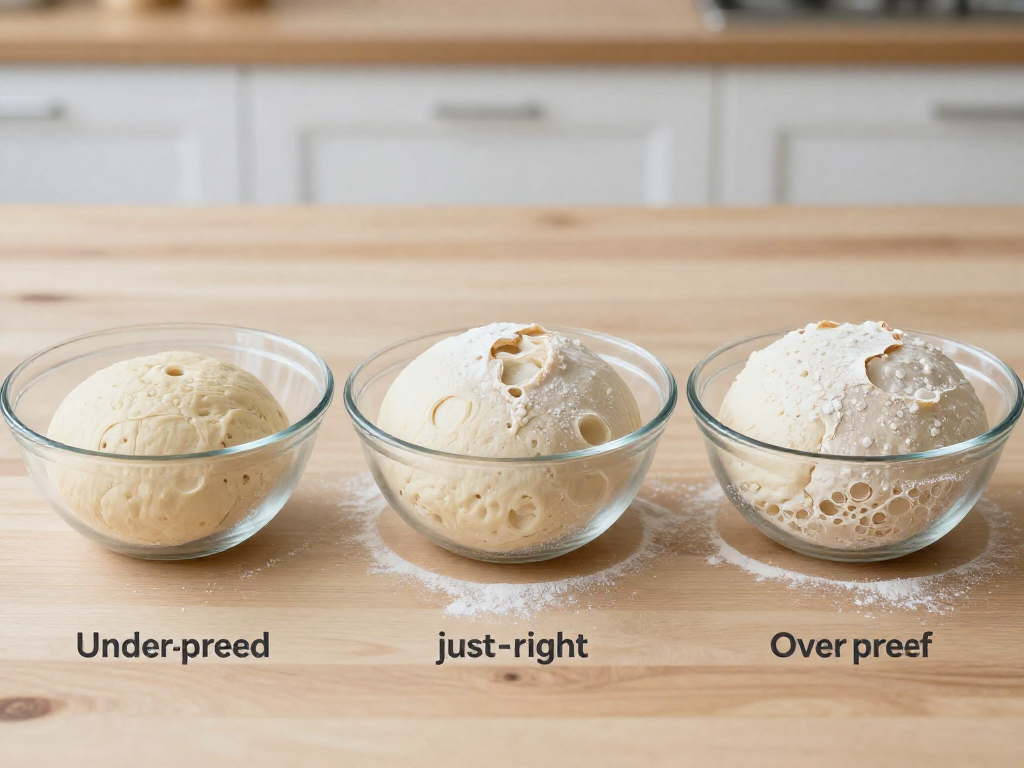
Under-Proofed vs. Just Right vs. Over-Proofed
Use the four cues from earlier sections together—rise, jiggle, bubbles, and the poke test—to place your dough in one of three stages. Here's the side-by-side so you can self-diagnose at a glance.
| Cue | Under-Proofed | Just Right | Over-Proofed |
|---|---|---|---|
| Rise | Less than ~30% bigger | Roughly 30–75% bigger | Doubled or more, then sinking |
| Jiggle (gentle bowl shake) | Stiff, barely moves | Soft, wobbly like set jelly | Sloshy, loose, almost liquid |
| Bubbles | Few or none | Scattered bubbles on top and sides | Large bubbles, popping or flattening |
| Poke test (press 1 cm with a wet finger) | Springs back fast | Springs back slowly, leaves a faint dent | Stays dented or collapses |
(Bulk fermentation = the first long rise after mixing, when the dough develops flavor and gas. "Proofed" just means how far that rise has gone.)
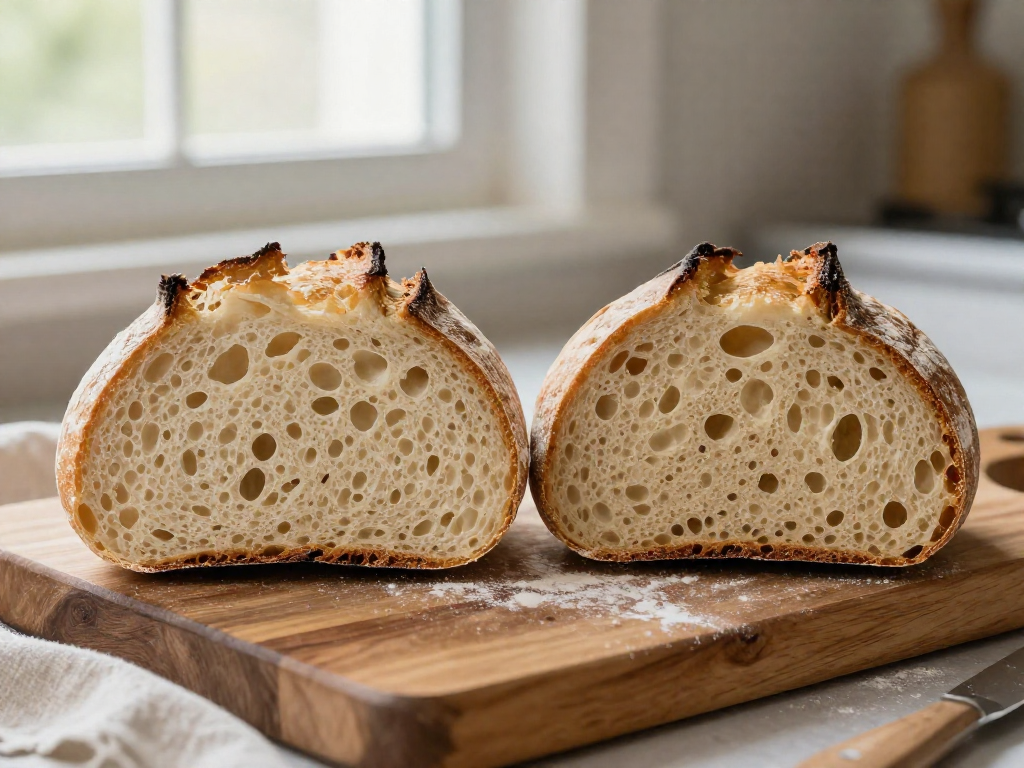
Under-proofed → dense, gummy loaf. Not enough gas built up, so the crumb (the inside of the bread) bakes tight and can feel sticky or doughy near the center.
Just right → open, springy crumb. Enough gas for a light, airy inside with a good "oven spring" (the final burst of rise in the oven), giving a domed top and irregular holes.
Over-proofed → flat, slack, sticky. The dough ran out of strength, so it spreads instead of rising and bakes into a flat, gummy loaf with a tight crumb.
How to course-correct:
- Caught it under-proofed before shaping? Give it another 30–60 minutes and re-check the cues.
- Slightly over-proofed? Shape gently, chill in the fridge 30 minutes, and bake straight from cold to firm it up.
- Next time: Adjust by what you saw, not the clock—warmer kitchens ferment faster, cooler ones slower, so results vary by kitchen and climate.
How Temperature Changes Everything
The single biggest reason timer-based recipes fail beginners is temperature. Dough temperature controls how fast your starter eats and produces gas during the bulk ferment (the first long rise, when the whole batch of dough ferments before you shape it). The clock lies; the dough doesn't.
Quick rules to bake by:
- Warm kitchen (around 78–82°F / 25–28°C): Fermentation moves fast. Your dough may hit the right cues in 3–4 hours, and you can shape at a slightly lower rise (about 50% bigger). Check early and often.
- Cool kitchen (around 65–68°F / 18–20°C): Everything slows down. The same dough might take 6–8+ hours. Don't shape just because the timer went off—wait for the visual cues.
- Cold kitchen (below 65°F / 18°C): Expect very slow, uneven results. Warm the dough up before trusting any schedule.
Simple ways to hold a stable dough temperature:
- Put the dough in your oven with only the light on (a gentle, steady warm spot).
- Set the bowl on top of the fridge or near (not on) a warm appliance.
- In a cold home, use a small cooler with a jar of warm water beside the dough.
Why this matters for the cues: The visual signs you learned in the previous sections—rise percentage, jiggle, surface bubbles, the poke test—stay constant no matter the temperature. A warm kitchen just gets you there faster; a cold one slower. Read the dough, not the clock, and you'll get consistent results across seasons.
Note: Every kitchen is different, so use these ranges as starting points—your dough's appearance is always the final word.
Quick Troubleshooting Checklist Before You Shape
Before you tip the dough out to shape, run through these four yes/no questions. Bulk fermentation is the first rise, when your starter inflates the whole batch of dough.
- Rise: Has the dough grown by 50–75% in volume? (Not double—that's often too far for beginners.)
- Jiggle: Does it wobble like set jelly when you shake the bowl?
- Bubbles: Can you see bubbles on the surface and along the sides of the container?
- Poke test: Does a floured fingertip dent spring back slowly and only partway?
When cues disagree: Trust the jiggle and poke test over the rise percentage. Volume can mislead you if your dough was slack or your container is an odd shape. If two or more cues say "not yet," wait.
Wait longer if: the dough feels dense, the dent springs back fast, or you see few bubbles. Check again in 20–30 minutes.
Proceed to shaping if: at least three cues say yes and the dough looks domed and jiggly.
Tip: Photograph the dough at the start and end of every bulk ferment. Over a few bakes you'll build a visual memory that's faster than any checklist. Results vary by kitchen temperature, so your own photos are the most reliable guide.
See also
- A beginner's guide to feeding and maintaining a sourdough starter
- How to do stretch and folds during bulk fermentation
- Why is my sourdough gummy? Common causes and fixes
- Sourdough hydration explained for beginners
- How to shape a sourdough boule step by step
Related articles

The Float Test Lie: Why Your Starter Might Be Ready Even If It Sinks
Is the float test a reliable way to tell if my sourdough starter is ready to use? Learn why this common test lies—and what to check instead for perfect bread every time.
Jul 20, 2026 · 8 min read
Sourdough in Summer vs. Winter: How to Adjust for Temperature Extremes
How do you adapt your sourdough baking process for very hot or cold weather?
Jul 20, 2026 · 9 min read
Beginner's Guide to Controlling Sourdough Tang: How to Make It Milder or More Sour
Learn how to control the sourness of your sourdough bread with simple beginner adjustments to fermentation time, temperature, and starter feeding.
Jul 14, 2026 · 12 min read