10 Most Common Beginner Sourdough Mistakes (and Quick Fixes)
What mistakes do beginners make most with sourdough?
On this page

Why Your Loaves Keep Failing (It's Almost Always One of These 10)

If your bread keeps coming out dense, flat, or gummy, it isn't because you lack the "baking gene." Almost every beginner failure traces back to a handful of repeated, fixable mistakes—not talent.
Here's the good news: your loaf is trying to tell you what went wrong. The crumb (the soft inside of the bread) is a diagnostic tool:
- Dense (tight, heavy, few holes) often points to a weak or underfed starter, or under-proofing.
- Flat (spread out, no height) usually means over-proofing or weak shaping.
- Gummy (sticky, undercooked-feeling center) typically signals slicing too early or underbaking.
Use the 10 mistakes below as a quick checklist, walking through your process from starter (the live mix of flour and water that makes your bread rise) all the way to the cooled loaf. Find the symptom that matches yours, apply the quick fix, and bake again.
One last rule that speeds everything up: change only one variable at a time. Fix a single thing per bake so you can clearly see what made the difference. Results vary by kitchen and climate, so small, focused adjustments beat starting over from scratch.
Mistake 1: Using a Starter That Isn't Active Yet
If your loaf came out dense and flat, your starter (the living mix of flour and water that leavens, or rises, your bread) probably wasn't active when you mixed your dough. This is the number one beginner mistake.
Signs your starter isn't ready:
- It looks flat, soupy, or unchanged hours after feeding
- Few or no bubbles on the surface and sides
- A sharp, vinegary smell instead of a pleasant, yeasty-tangy one
Two quick tests before you bake:
- The float test: Drop a small spoonful into a glass of water. If it floats, it's full of gas and ready. If it sinks, give it more time.
- The doubling benchmark: A healthy starter should roughly double in size 4–8 hours after feeding. Mark the jar with a rubber band so you can see the rise clearly.
The quick fix: Feed on a consistent schedule using equal weights of starter, flour, and water (for example, 50 g each). Once it reliably doubles, mix your dough at peak rise—when it's domed and bubbly, just before it starts to collapse.
Timing varies with your kitchen's temperature; a warm room speeds the rise, a cool one slows it.
Mistake 2: Inaccurate Measuring (Cups Instead of a Scale)
Quick fix: buy a cheap digital kitchen scale and weigh everything in grams. This single change fixes more failed loaves than any other tip here.
Here's the problem with cups: a "cup of flour" isn't a fixed amount. Scoop it straight from the bag and you might pack in 150g; spoon it in lightly and you'll get closer to 120g. That's a 30g swing on one ingredient, every single time you bake.
Why does that matter? Because of hydration — the ratio of water to flour in your dough, written as a percentage. A recipe at 70% hydration means 700g water for every 1,000g flour. If your flour amount secretly drifts by 30g, your real hydration shifts too, and you never know it. The result is a dough that's too stiff one week and too slack the next, with no clear reason why.
Weighing in grams removes the guesswork:
- Flour, water, starter, salt — all on the scale, all in grams.
- Use the tare button to zero out the bowl between ingredients.
- Same numbers every bake = repeatable results you can actually troubleshoot.
A basic scale costs little and lasts for years. It's the best first upgrade a beginner can make.
Mistake 3: Skipping or Rushing the Autolyse
Quick fix: Mix only your flour and water, then let them rest 30–60 minutes before adding starter and salt. That's it.
What autolyse does. Autolyse (auto-lees) is a rest period where flour and water sit together before anything else goes in. During that rest, the flour fully absorbs the water and the gluten (the protein network that traps gas and gives bread its chew) begins forming on its own—no kneading required. The result is dough that's smoother, stretchier, and easier to shape, which means a more open crumb (the holes inside the loaf) and better rise.
Why beginners skip it. It feels like a pointless extra wait when you're eager to bake. But skipping it gives you stiffer, harder-to-work dough and often a denser loaf.
Do this:
- Combine 500g (about 4 cups) flour and 350g (about 1½ cups) water until no dry spots remain.
- Cover and rest 30–60 minutes—the dough should look shaggy but feel softer and more cohesive afterward.
- Add your starter and salt, then continue mixing.
Note: results vary by flour type and kitchen temperature, so use the feel of the dough—not the clock alone—as your guide.
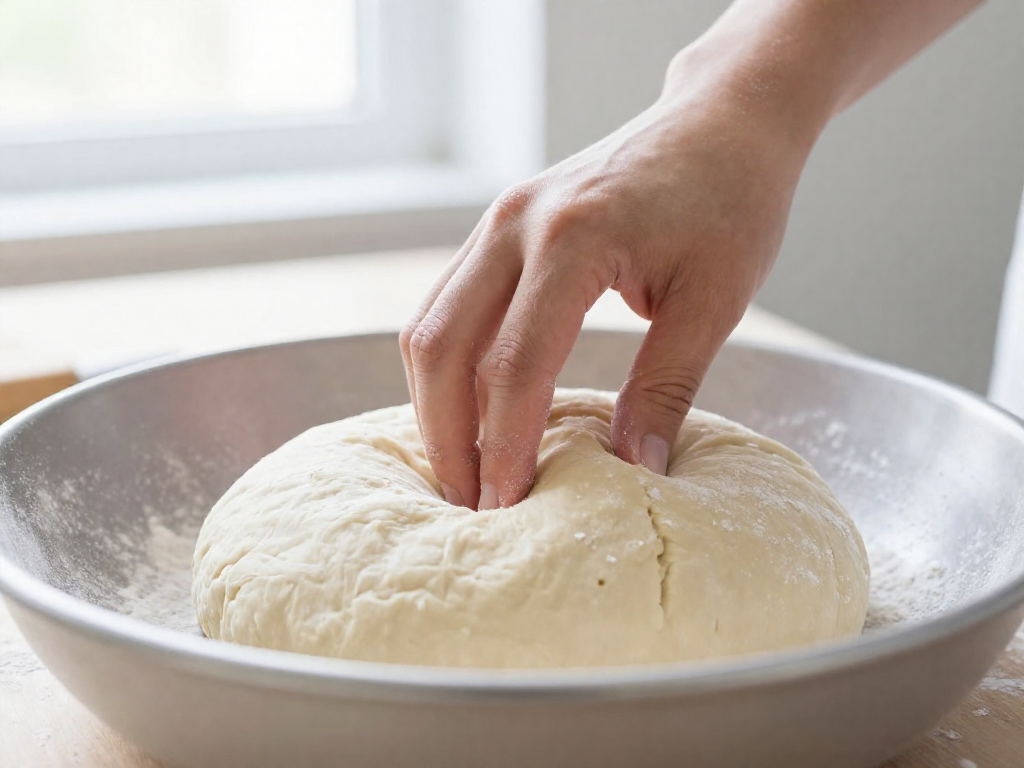
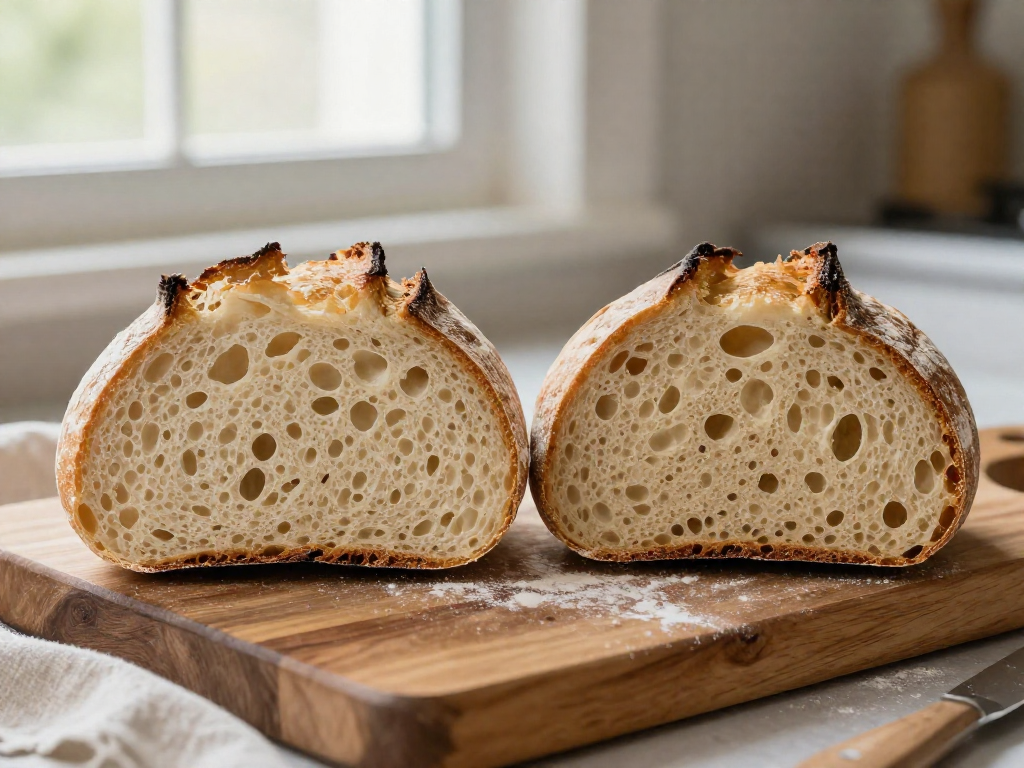
Mistake 4: Under- or Over-Proofing the Dough
Proofing is the final rise after shaping, when the dough relaxes and fills with gas before baking. Get the timing wrong here and you'll get the two most common beginner loaves: gummy or flat. The fix is to stop watching the clock and start reading the dough.
Quick fix: use the poke test. Lightly flour a finger and press about 1 cm (½ inch) into the dough, then watch how it springs back:
- Springs back fast and fully → under-proofed. Give it more time. Under-proofed dough looks tight and small, feels dense, and bakes up gummy with a tight crumb.
- Springs back slowly, leaving a small dent → ready to bake. This is your target.
- Doesn't spring back, stays dented or deflates → over-proofed. Over-proofed dough looks slack and puffy, jiggles loosely, and bakes flat with a pale, weak structure.
Why a fixed timer fails: temperature changes everything. Dough at 26°C (78°F) can be ready in 3–4 hours, while the same dough at 20°C (68°F) may need 6–8 hours. A recipe written for a warm kitchen will badly over-proof in a cold one, and vice versa. Use times only as a rough window, then confirm with the poke test.
Troubleshooting recap: Gummy, tight crumb → under-proofed, proof longer. Flat, spreading loaf → over-proofed, proof less or keep the dough cooler.
Results vary by kitchen and climate, so trust what the dough is telling you over any number on a schedule.
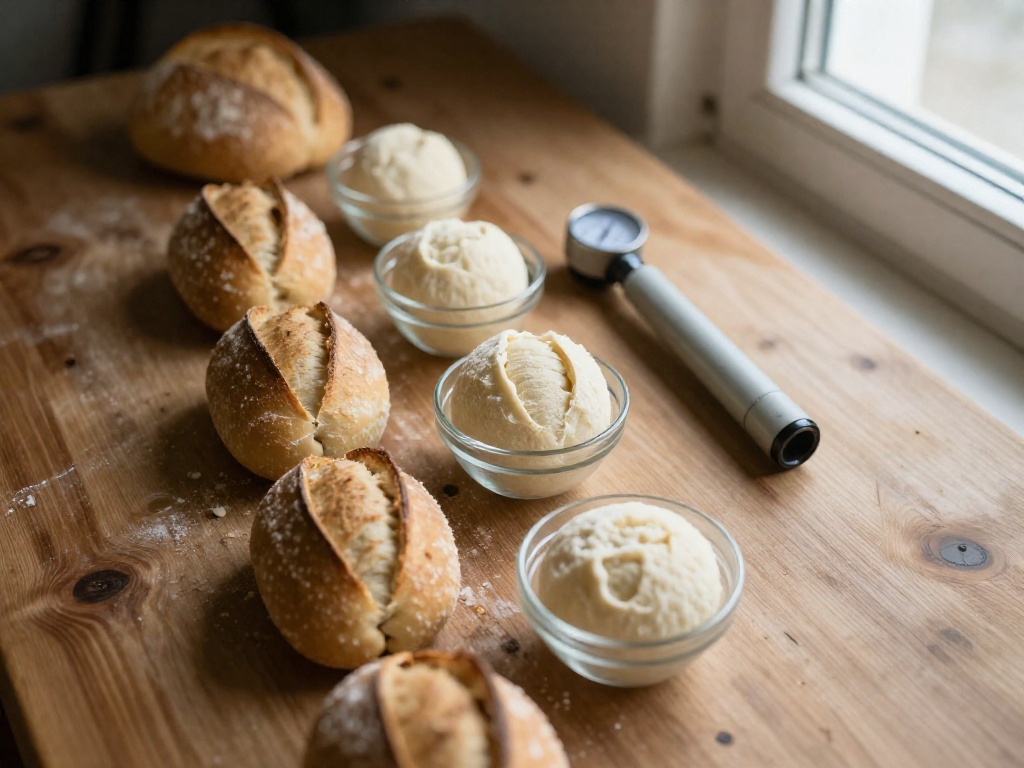
Mistake 5: Ignoring Dough Temperature
Quick fix: aim for a final dough temperature of 24–26°C (75–78°F). This is the single easiest way to make your timing predictable.
Yeast and bacteria in your dough work faster when they're warm and slow down when they're cold. Fermentation (the process where your starter eats flour sugars, producing gas that makes bread rise) can take twice as long in a 18°C (64°F) kitchen as it does in a 26°C (78°F) one. If you follow a recipe's clock without checking temperature, you'll often under- or over-proof.
How to hit the target:
- Check your dough temp with an instant-read thermometer right after mixing.
- Adjust your water. Too cold a result next time? Use warmer water (around 30–32°C / 86–90°F). Too warm? Use cooler water.
- Find a warmer spot. An oven with just the light on, or near a sunny window, usually sits around 24–27°C (75–80°F).
Sensory cue: dough at the right temp feels comfortably warm, not chilly, against your wrist.
Why it matters: Temperature, not the clock, controls how fast your dough is ready. Results vary by kitchen and season, so watch the dough.
Mistake 6: Weak Shaping and No Tension
Quick fix: Build surface tension before the final rise so your loaf climbs up instead of spreading out.
The shape technique (3 minutes):
- Tip the dough onto a lightly floured counter, smooth side down.
- Fold all four edges into the center like an envelope, pressing gently to seal.
- Flip it seam-side down so the smooth top faces up.
- Cup your hands behind the dough and drag it toward you in short pulls, 4–6 times. The skin should feel taut, like a tight drum.
- Pinch the bottom seam closed and place seam-side up in your proofing basket (the bowl or basket your dough rises in before baking).
What "tension" actually means: That tight outer skin acts like a balloon wall. It traps the gas your starter produces, forcing the loaf to rise upward and hold a round, high shape.
Common errors that deflate the dough:
- Over-flouring the counter, so the dough slides instead of gripping (it needs slight friction to build tension).
- Squeezing or punching the dough, which knocks out the gas.
- Leaving a loose, baggy surface with no taut skin.
A flat, spreading loaf is almost always weak shaping, not a bad starter. Results vary by flour and kitchen, so judge by feel: aim for a smooth, firm ball that holds its shape on the counter.
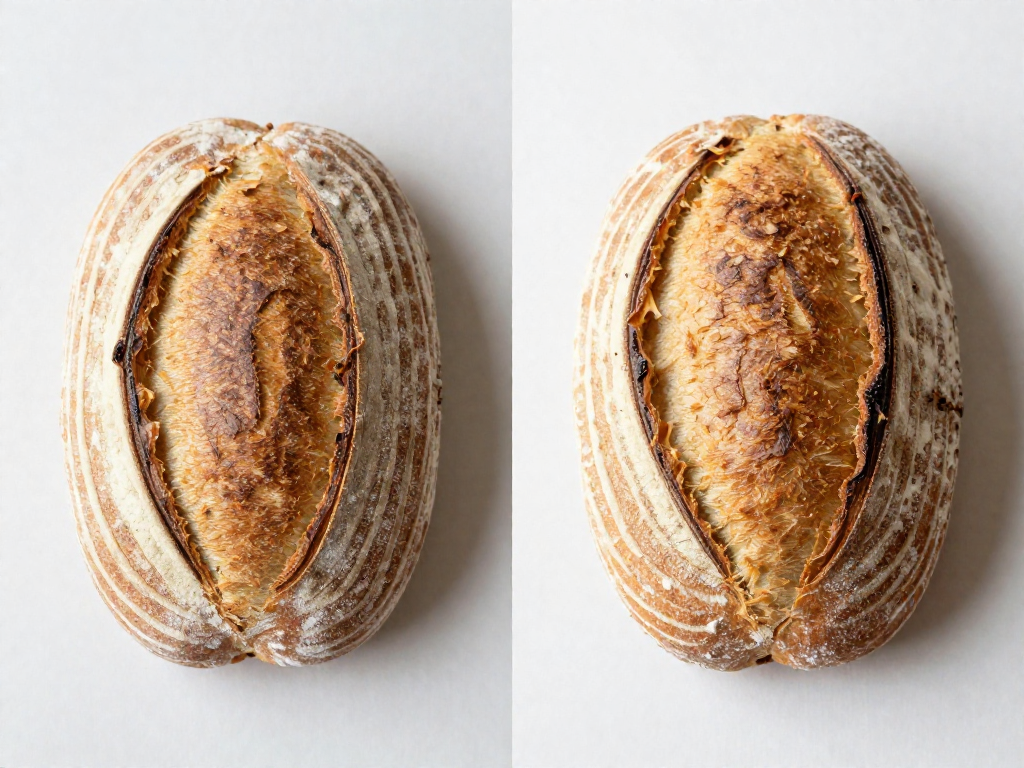
Mistake 7: Not Scoring Deep Enough (or at All)
Quick fix: Make one confident, angled slash about ¼ inch (0.5–0.75 cm) deep just before the loaf goes in the oven.
Scoring means slashing the top of your shaped dough with a sharp blade (a "lame" or a clean razor) right before baking. That cut gives the loaf a planned place to expand. Without it, steam and the rapid rise in the first few minutes of baking, called oven spring, force their way out wherever the crust is weakest, usually causing it to burst at the side and bake up lopsided.
If your scores are too shallow, the same thing happens: the dough seals over and tears unevenly instead of opening along your cut.
Do this:
- Hold the blade at roughly a 30° angle to the dough, not straight down.
- Make one decisive ¼-inch-deep slash in a single motion across the top.
- Score cold dough straight from the fridge; it's firmer and cuts cleanly.
You'll know it worked when the cut opens into a raised "ear" and the loaf rises evenly. Results vary with your dough and oven, so adjust depth slightly on your next bake.
Mistake 8: Baking Without Enough Steam
Quick fix: Bake in a Dutch oven (a heavy lidded pot) with the lid on for the first 20 minutes, then remove the lid and bake another 20–25 minutes until deep golden brown. The trapped moisture does all the work for you.
Why steam matters: In the first 20 minutes, your loaf needs to expand. Steam keeps the outer crust soft and stretchy long enough for the dough to rise (this final burst of expansion in the oven is called oven spring). Without steam, the crust sets too early and locks the loaf in place before it can grow.
Steam clues to watch for:
- Pale, thick crust → too little steam; the surface dried out and toughened
- Cracked or torn sides → the crust set before the loaf finished expanding
- Deep, glossy, golden crust → you got the steam right
No Dutch oven? Place a metal tray on the bottom rack and pour a cup of boiling water into it as you load the bread, then bake as usual.
Results vary by oven and climate, so use crust color as your guide rather than the timer alone.
Mistake 9: Oven Too Cool or Not Preheated
Quick fix: Preheat your oven (with the Dutch oven inside) at 250°C / 480°F for a full 45–60 minutes, and confirm the real temperature with a cheap oven thermometer.
A weak, flat loaf with little rise often comes down to one thing: the oven wasn't hot enough when the dough went in. That early burst of rise in the first 10–15 minutes is called oven spring — the rapid expansion of the loaf as trapped gases and steam heat up fast. A blazing-hot oven drives a strong oven spring; a lukewarm one lets the dough spread out and bake dense before it can climb.
Here's the trap for beginners: your oven's built-in display can lie. Many home ovens run 15–30°C (25–50°F) cooler than the dial says, so you think you're at 250°C when you're really at 220°C. You can't see this without checking.
Do this:
- Preheat 45–60 minutes, not the 10 minutes the beep suggests.
- Put your Dutch oven or baking surface in to preheat too.
- Hang an inexpensive oven thermometer inside and adjust the dial until it reads 250°C / 480°F.
Sensory cue: A properly hot oven gives you a noticeably domed, risen loaf with an "ear" at the score line. If your loaves come out flat and pale despite good shaping, suspect the oven temperature first. Results vary by oven, so let the thermometer — not the dial — be your guide.
Mistake 10: Slicing the Loaf Too Soon
Quick fix: Cool your loaf completely on a wire rack for at least 1–2 hours before slicing. That's it. As tempting as warm bread is, this single step rescues many "gummy" loaves that were actually baked just fine.
Here's why it matters. When your bread comes out of the oven, the inside isn't done yet. The crumb (the soft interior of the loaf) is still finishing its set as the loaf cools and trapped steam continues to escape. Cut into it too early and you release that steam all at once, leaving the cut surface damp, sticky, and dense-looking — the classic "gummy" texture beginners often blame on a bad bake.
Do this instead:
- Move the loaf straight to a wire rack so air circulates underneath (a plate traps moisture and steams the bottom).
- Wait 1–2 hours for a standard loaf; larger or higher-hydration loaves may need longer.
- Listen for a faint crackle from the crust as it cools — a good sign it's setting properly.
- Slice only once the loaf feels barely warm or fully room temperature to the touch.
Patience here is the easiest fix on this whole list. Results vary by loaf size and kitchen climate, so use the cool, set crumb as your real signal — not the clock alone.
Your Quick Troubleshooting Cheat Sheet
Bookmark this table. When a loaf disappoints, match what you see to the most likely fixes, then test one change on your next bake.
| Symptom | Likely Causes | Quick Fixes |
|---|---|---|
| Dense and flat | Sluggish starter, under-proofing, weak shaping | Use starter at its peak (doubled, bubbly, passes the float test); let bulk ferment (the first rise) finish; build tension when shaping |
| Gummy crumb (sticky, undercooked center) | Under-proofing, short bake, slicing warm | Proof fully; bake until internal temp hits 205–210°F (96–99°C); cool at least 2 hours before slicing |
| Pale or thick crust | Too little steam, oven too cool | Add steam for the first 20 minutes (covered Dutch oven works great); preheat to 475°F (245°C) |
The one rule that fixes everything faster: change only one variable per bake and jot it in a simple bake log (flour, water, times, temps, result). You'll spot your kitchen's pattern within a few loaves. Results vary by climate, so trust your dough's cues over the clock.
See also
- Beginner Sourdough Starter Guide: From Flour to First Rise
- Easy Beginner Sourdough Bread Recipe (Step by Step)
- Understanding Sourdough Hydration for Beginners
- How to Tell When Sourdough Is Done Proofing
- Sourdough Shaping for Beginners: Building Tension
- Baking Sourdough in a Dutch Oven: A Beginner's Guide
Related articles

The Float Test Lie: Why Your Starter Might Be Ready Even If It Sinks
Is the float test a reliable way to tell if my sourdough starter is ready to use? Learn why this common test lies—and what to check instead for perfect bread every time.
Jul 20, 2026 · 8 min read
Sourdough in Summer vs. Winter: How to Adjust for Temperature Extremes
How do you adapt your sourdough baking process for very hot or cold weather?
Jul 20, 2026 · 9 min read
Beginner's Guide to Controlling Sourdough Tang: How to Make It Milder or More Sour
Learn how to control the sourness of your sourdough bread with simple beginner adjustments to fermentation time, temperature, and starter feeding.
Jul 14, 2026 · 12 min read